
Getting Started with EverWeb 1: Creating Your First Website
February 26th, 2016EverWeb is great for first time users as it combines ease of use with a rich feature set, but there’s always going to be a bit of a learning curve at the start. This is where the ‘Getting Started with EverWeb’ series can help out by taking you through the basics of EverWeb. As well as getting you up to speed quickly, ‘Getting Started with EverWeb’ will also be peppered with hints and tips, best practice advice and background information to explain specific concepts and workflow.
We begin the series with ‘Creating Your First EverWeb Website Project’ which covers
- Installing & Launching EverWeb
- The Projects Window
- Creating Your First Website Project
- Setting Your EverWeb Preferences
- A Tour of the EverWeb User Interface
Installing EverWeb
You can download EverWeb from www.everwebapp.com. Choose the right version of EverWeb for your operating system, either the OS X 10.6 version or the OS X 10.7 and later version. Remember to read the instructions on the Download page before starting your download. If you haven’t done so already, create your client account on the Rage Software website, using the instructions on the download page. Once you have finished your download you can install EverWeb on your computer…
- The EverWeb application zip file is downloaded to the ‘Downloads’ folder in the Dock on your Mac.
- Drag and drop the ‘everweb19.zip’ file to the desktop. The zip file name may vary depending on the current version of the product. At the time of writing, EverWeb version 1.9.5 was the latest public release.
- Double click on the zip file. The EverWeb application file will automatically unzip.
- Once unzipped, move the ‘everweb19.zip’ zip file to the trash can.
- Next, open a Finder window and navigate to the Applications folder.
- Drag and drop the ‘EverWeb.app’ file from the desktop in to the Applications folder.
- You’re all set to go! Launch EverWeb by double clicking on the ‘EverWeb.app’ file in the Applications folder.
- The first time you launch EverWeb, may see some warnings as OS X verifies the authenticity of the application you just installed.
- Accept the verification messages and ‘Open’ the application as you know that EverWeb has been downloaded from a trusted source.
EverWeb will now appear on screen on the Projects Window.
If any software updates are available you’ll see a dialog box asking if you want like to download the latest EverWeb version. Please be sure to read the ‘Release Notes’ of the dialog box before deciding to update or not. If you choose not to update, you can always do so later. It’s also important to remember that when you purchase EverWeb you get a year’s worth of free software updates and support. After a year you can renew your update and support plan. Your license for the EverWeb product that you purchased never expires.
Add EverWeb To The OS X Dock
If you want EverWeb easily available for launch at all times, add the EverWeb icon to the Dock. As you’ve just launched EverWeb, it’s icon in the Dock already. ‘Ctrl-Click’ on the icon and a menu appears. Select Options-> Keep in Dock. When you close EverWeb, the icon stays in the Dock so all you need to do to relaunch EverWeb is to double the icon again.
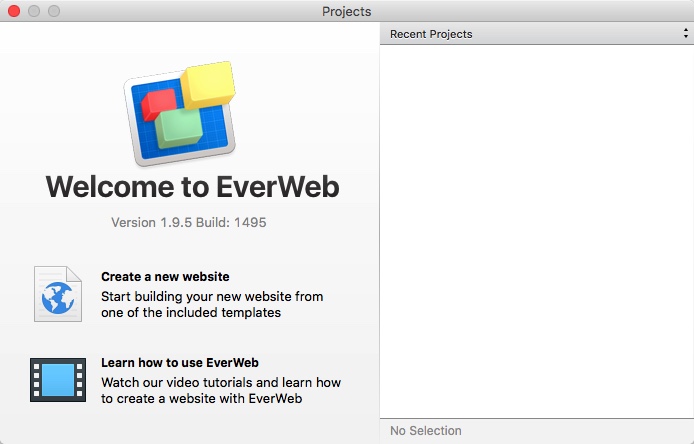
The EverWeb Projects Window
The Projects Window
The first screen you see in EverWeb is the Projects Window (see screenshot above.) This screen lists all of your website Projects you have created on the right hand side. If it’s your first time in EverWeb the ‘Recent Projects’ pane will be empty. As well as listing your website Projects, the Projects Window where you can do lots of administrative tasks relating to your website Project files. At the moment we’ll just use this screen to create a new website project. Mouse over ‘Create a new website’. The area becomes a button when you do this, so double click on it.
The next screen that appears offers you a choice of over 50 different Theme Templates to base your website pages on. Theme Templates can be very useful and time saving as each Theme has a number of different page styles to choose from. Scroll down the list of Themes on the left hand side of the dialog box, and choose the page style you want to use on the right hand side. Just click on the one you want then press ‘Select’. For our website Project we are going to use the first theme, ‘Blank’, and the ‘Home’ page style.
Congratulations! You have created your first website project and your first web page ‘Home’. You are now in EverWeb’s main work area, the Project Window.
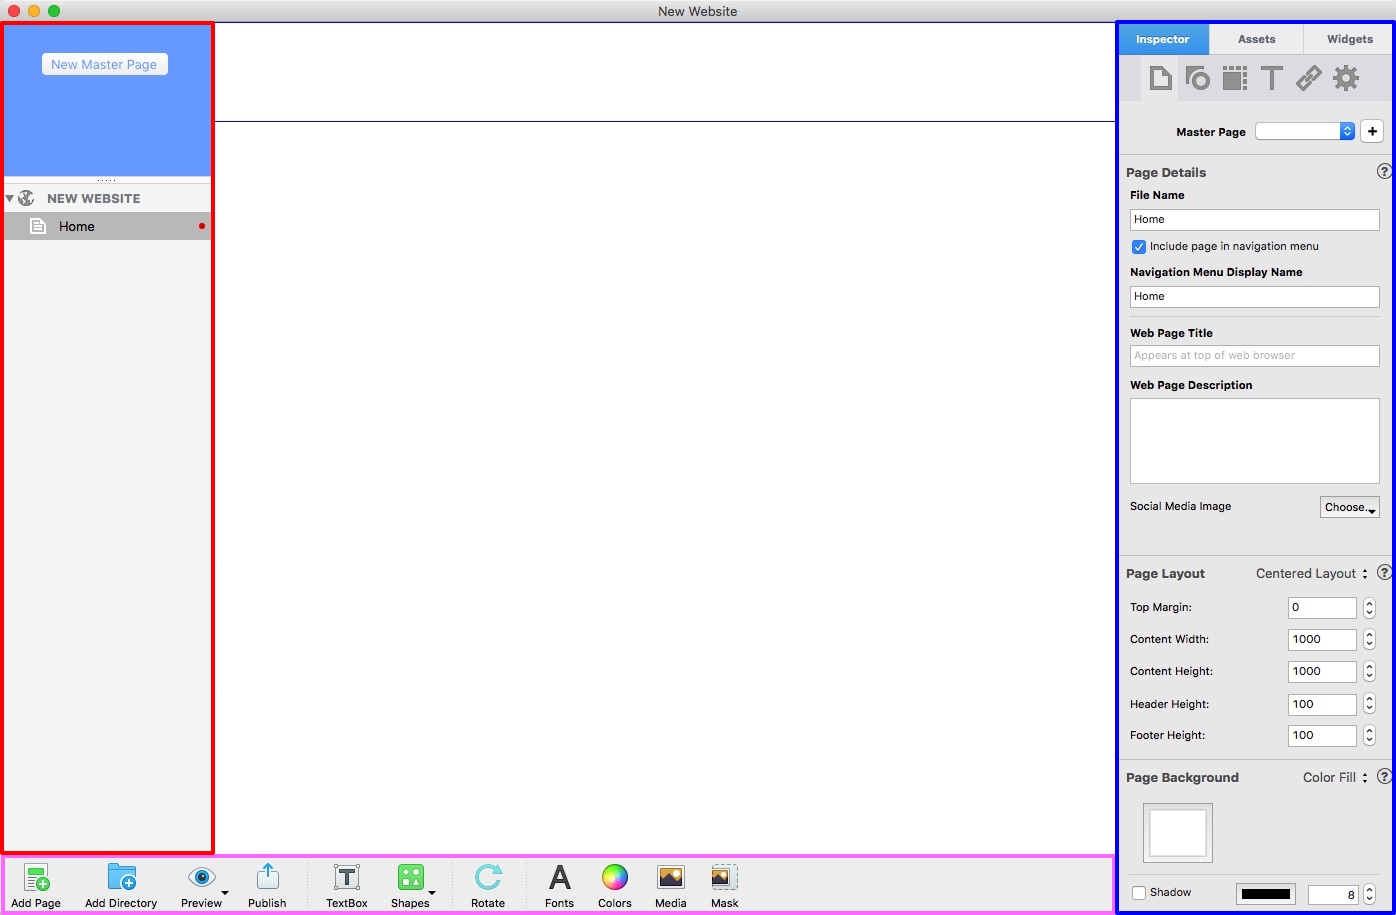
The EverWeb Project Window showing the Web Page List (blue box), The Inspector Window (red box), the Toolbar (pink box) and the Editor in the center in white.
A Quick Tour of EverWeb’s Project Window
Now that you inEverWeb’s Project Window, it’s a good time to review the User Interface. The main areas are highlighted in colored boxes in the above screenshot and have the following functions:
- The Web Page List is on the left hand side of the Project Window (in the red box above) and shows your website’s structure, including directories, and all of the web pages you have created. There are two types of pages: Master Pages, which are template pages, are listed in the blue area, and regular web pages which listed in the grey area. When you create a website Project, you automatically create your first web page for it at the same time. As you can see in the screenshot, there is our first page is called ‘Home’. Between the Master Page and regular page areas is a splitter bar. Click on this and drag the splitter up and down to show more of less of each section or to completely hide the Master Page area (which we don’t advise!) If you create long web page names you can adjust the Web Page List horizontally. Just click and drag the right hand edge of the Web Page List to the left or right to this.
- The white space in the middle is the Editor Window, your work canvas where you create your page content. You may see some blue horizontal lines as well. These lines separate out sections of the page like in a book. If you scroll down to the bottom of the page you’ll notice the EverWeb logo in the ‘Footer’ area of the page. We’ll explore the Editor window including the page sections in depth next time…
- Above the Project Window is the Menubar which includes most of the commands and tools you need for your project. To the right of many of the menu options are short cut keys which are good to learn as they will save you time.
- To the right of the Editor Window is the Inspector Window (shown in the blue box.) It’s a panel made up of three tabs
- The Inspector tab is where you set your Page Settings, Shape Options, Metrics, Text, Hyperlink and Widget settings. Click through the six icons to see their settings and options. We’ll explore these icons in a future blog.
- The Assets tab is where all the files used in your website Project, such as images, audio, video etc. are listed and administered.
- The Widgets tab contains seventeen predefined ‘mini apps’ that extend the functionality of EverWeb. There’s lots to choose from including a Contact Form, Image Sliders and Galleries, PayPal E-commerce, Navigation Menus and more! Additional Widgets are available form third parties.
- At the bottom of the Projects Window is the Toolbar (shown in the pink box) which includes shortcuts to many of the functions of EverWeb that you’ll be frequently using.
Setting Up Your First Website Project
Before getting down to creating web pages for your website, it’s a good idea to set up your working environment first:
- Save and Backup Preferences: Use the EverWeb-> Preferences menu to set up automatic back up and auto save preferences. Both options are on the ‘Backup’ tab. Click the red ‘Close Window’ dot in the top left hand corner of the dialog when finished. Whilst in the Preferences dialog box, have a look at the other preferences to get familiar with what’s where in EverWeb!
- Set Your Default Styles: Why not set up your default styles and colors for text, shapes and hyperlinks before you begin working on your website? Use the Format-> Default Styles… menu option. This is a great time saver to do before you start working on your web pages!
- Name Your Website Project: By default when you create a new website it’s called ‘NEW WEBSITE’. To change the name to one you want to use, double click on the words ‘NEW WEBSITE’ that appear next to the globe symbol in the Web Page List. Enter the name you want. You can letters, numbers and spaces in the name but avoid using any special characters as EverWeb will reject them. Press ‘Enter’ to confirm your new name.
- Set Your Site Publishing Settings: When you double clicked on the name ‘NEW WEBSITE’ you probably noticed that the Editor Window changed to show your Site Publishing Settings. This is where you enter the details of where you are publishing your website to. To go back to the blank Editor window just click on the page name you created in the Web Page List. In our example we would click on the page ‘Home’. Site Publishing Settings has three options so now is a good opportunity to add in these settings:
EverWeb: Use this option is you purchased an EverWeb+Hosting plan. You should be able to complete the details on this screen using your EverWeb client account details.
Folder: If you want to publish to your local hard disk
FTP: Use this option if you have purchased EverWeb software only and use your own Hosting Provider. If you are unsure about what details to fill in, consult with your Hosting Provider who should be able to help you.
Need Help?
As with almost everything else in EverWeb, Help is easy to find. The Help menu includes the EverWeb User Manual in PDF format. The manual contains lots of good, in-depth information about all aspects of EverWeb. There are also video tutorials on many aspects of EverWeb. Where you see the question mark in a circle in EverWeb, there will be an accompanying video tutorial relating to that feature. Alternatively try EverWeb’s YouTube channel. If you get stuck, try searching the EverWeb Discussion Forum or if you can’t find anything on your problem, just ask a question, the community is there to help!
And don’t forget social media to stay up to date!
Twitter handle @ragesw
To end the session select the EverWeb-> Quit EverWeb menu or use the Cmd+Q shortcut. Next time you launch EverWeb you will see your Project name listed in the Projects Window. Just double click on it to open up your Project again.
Next time we’ll explore more of the Editor window… but if you have a question in the meantime, let us know below!