
EverWeb’s Scroll Position for Anchors in Your Site!
October 16th, 2022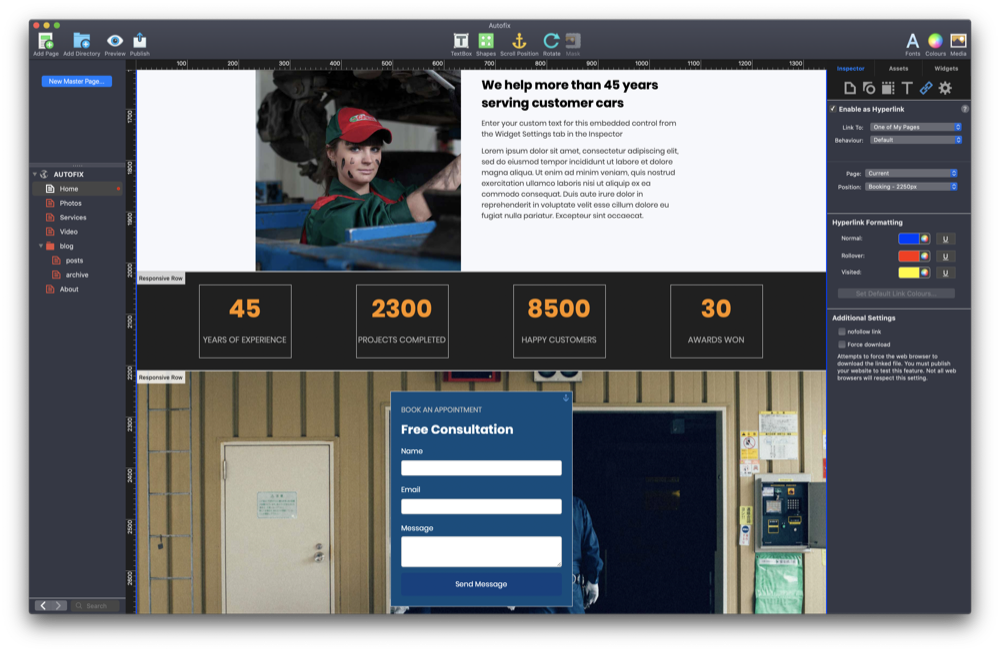
One of the most useful things that website designers often want is for their visitors to be able to jump from one location to another on the same page, or to to be able to jump from one page to a specific location on another page. In EverWeb this is super easy to do. Before showing you how, it is useful to have some background information that is good to know before you start…
Anchors, Scroll Position and Smooth Scrolling
The ability to ‘jump’ from one location to another is known in HTML coding terms as using an ‘anchor’ tag, so this is why this feature is often referred to as ‘anchoring’. The reference is analogous to anchoring a boat. In EverWeb, we use the term ‘Scroll Position’ which still is anchoring, but if your jumping from one location to another on the same page, EverWeb will scroll smoothly to the new location, making the transition from one place to another on the page smoother for the user.
Anchors and EverWeb’s Scroll Position Features
There are two ways in EverWeb for setting up anchors: ‘Insert Fixed Scroll Position’ and ‘Set Shape as Scroll Position’. Here’s a quick summary of what each Scroll Position is used for:
- Insert Fixed Scroll Position: You can use this type of Scroll Position in a Fixed Width Page Layout. Typically this will be when using a ‘Centered Layout for your page. When you insert the Scroll Position, you will see a blue/green line across the width of the page at the point where you inserted it. You can move the Scroll Position up and down the page and you can give it a unique name using the Settings Button/Cog in the Inspector Window. If you want to delete the Scroll Position, just click on the blue/green line then hit the delete key. The main caveat to using this type of Scroll Position is that it should only be used on either the Centered or Left Aligned Page Layout. This type of Scroll Position should not be used on a Responsive Page layout.
- Set Shape as Scroll Position: This type of Scroll Position attaches the anchor point to an object on your page, so can be used in both responsive and fixed width page layouts. When you attach the Scroll Position to the object of your choice, you will see a blue anchor symbol displayed in the top right hand corner of the object. As with the Insert Fixed Scroll Position, you can rename the Scroll Position. but in this case you have to go to the Shape Options tab in the Inspector Window, open the Scroll Position section and change the name there. If you want to delete the Scroll Position, just delete the name from the Scroll Position field.
Jumping to Where You Want to Be On The Same Page
If you are using a fixed width page layout you have the choice of which type of Scroll Position to use. If you are in a situation where you used fixed and responsive page layouts, e.g. if you are building different sites for customers, then it is probably best to only use Set Shape as Scroll Position. If you use Insert Fixed Width Scroll Position on a responsive page, it will not work properly, so our recommendation is to use Set Shape as Scroll Position at all times.
In the following example, we are going to create a Scroll Position to jump from one location in our page to another location on the same page. This example uses a Responsive page layout and uses a button at the top of the page which when pressed goes to a specific location further down the page which would not usually be visible unless you scrolled the page.
- First go to the page where you want to create the Scroll Position and create a button at the top of the page e.g. place a rectangle shape on the page and customize it to create the look of a button. If you click inside the shape, you can enter the text of the button. In the Text Inspector, center the button text to be horizontally and vertically centered. Remember to set the After Paragraph setting to zero to ensure correct text centering.
- After creating the button, go to the object that you want to be the anchor. Click on the object you have chosen, in this example, a Contact Form Advanced Widget to select it.
- Next, click on the Scroll Position button in the Toolbar at the top of the EverWeb User Interface and select ‘Set Shape as Scroll Position’.
- You will be asked to give the Scroll Position a name. In this example, I am going to call it ‘Booking’. The name you use must be unique for the page, so you could create a Scroll Position on another page with the same name if you want.
- Click on the OK button. You will notice that there is now an anchor symbol in the top right hand corner of the object.
- Now that the Scroll Position has been created, go back to the button you created earlier. We will now link the button to the Scroll Position so when a visitor clicks on the button, they will be taken to the contact form.
- Select the text of the button then go to the Hyperlinks Inspector. Click on the checkbox next to ‘Enable as Hyperlink’ to activate the settings.
- For the ‘Link To’ field, make sure that ‘One of My Pages’ is selected.
- In the ‘Page’ Field select ‘Current’ to select the page you are currently on. A new field, ‘Position’ will then be displayed under the ‘Page’ field.
- Click on the dropdown and you will see the Scroll Position ‘Booking’ is listed. Click on it to select it.
- Preview the page using the Preview button in the Toolbar to test that your Scroll Position works properly.
Jumping to Where You Want to Be On a Different Page
Once you have created a Scroll Position on the page, you can jump to it from the current page, as in the example above, or from any other page in your site, using the same hyperlinking procedure as outlined above. The only difference is that instead of using ‘Current Page’ in the ‘Page’ field, you would use the actual name of the page where the Scroll Position is located on instead.
If you have a question about hyperlinking in EverWeb, or any question relating to EverWeb, please let us know in the Comments Section below!