
15 EverWeb Image Gallery Widget Tips!
January 8th, 2016
EverWeb’s Image Gallery using picture frames, Google Fonts and a shape background.
Web design trends over the last couple of years have shifted towards a more image based approach accentuated by bold yet sparse text content. The power of an image can’t be denied. Using the right images on your website will immediately create the style, tone or mood that you want everyone to see. Images instantly tell a your visitors a story and make a greater impact than text can.
EverWeb has a couple of built in widgets to help you tell your story through images: The Image Slider widget gives you a range of slideshow possibilities, which we discussed in the blog ‘Update Your Website with EverWeb’s Updated Image Slider’, and the Image Gallery. In this blog we get acquainted with the Image Gallery Widget. It’s an easy way to display and organise collections of images on a web page. Here are fifteen tips on getting the most from the Image Gallery…
Image Gallery Basics
- Prepare your images beforehand. If possible your images should all be the same size, orientation and resolution. Images that have a consistent size and resolution look better in the Image Gallery and are easier to look at for your visitors. Use photo editing software to edit your images so that they all the same characteristics. If you don’t have any photo editing software OS X’s Preview application may help as it has some basic editing features. And don’t forget that large images can impact your page loading times, so optimise your images before bringing them in to EverWeb. If your image file is large when you import it, EverWeb will warn you and will give you some optimization choices.
- Name your image files. Always give your image files a meaningful name. It’s good practice as they will easier to find in the future and it can be helpful for SEO purposes. Rename your images files before importing them in to EverWeb as this is most effective for SEO. If the image has already been imported, you can rename it in the Assets List tab just by double clicking on the file name and entering a new name. it’s a less effective way but still better than not doing it at all!
- Create a consistent look and feel for your Image Gallery whenever possible. There may be times where you can’t achieve the consistency you want. If, for example, you need to mix portrait and landscape images together, try grouping the portrait images together followed by the landscape images. Alternatively split the images in to separate Image Galleries.
- Use the ‘+’ symbol to move the Image Gallery Widget. The ‘+’ symbol in the top right hand corner of the widget moves the whole gallery around your page. Move the mouse pointer on top of the symbol then click and hold the mouse button down whilst dragging and dropping the widget to it’s new location.
- Drag and drop images within the gallery. You can move images you have added to the gallery just by dragging and dropping them to their new location. It’s quicker and easier than rearranging the Widget’s Assets List.
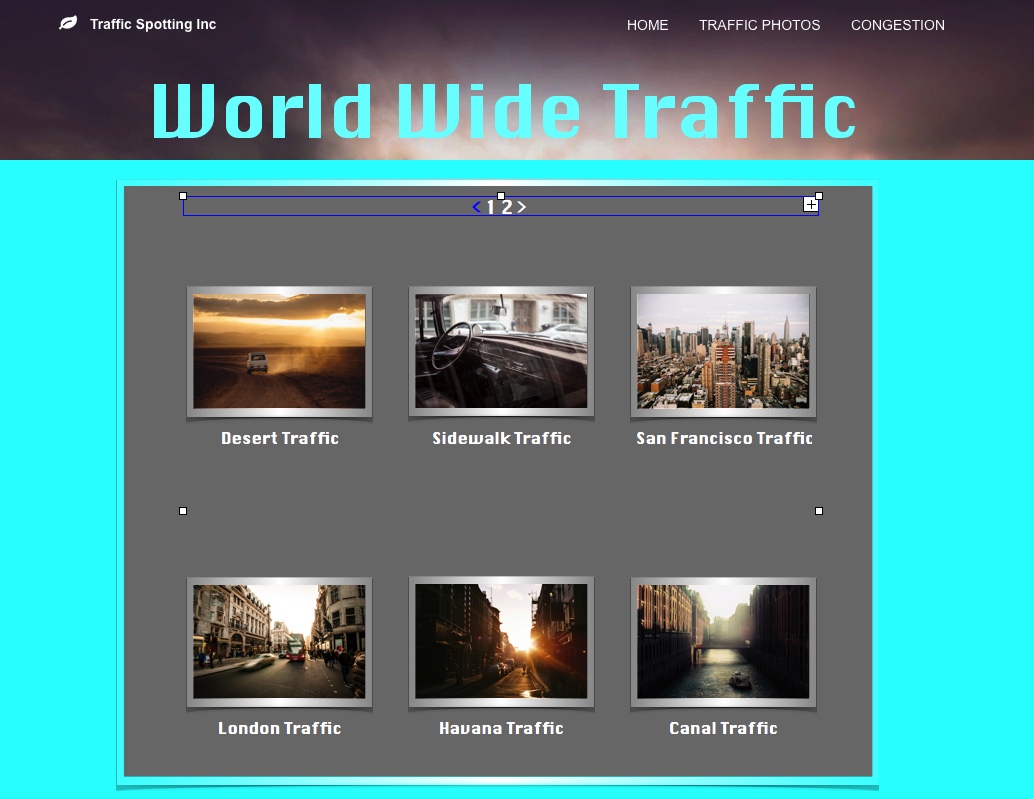
The page indicator section at the top of the Image Gallery is highlighted for styling options to be applied
Styling Captions and Page Numbers
- Use Styling options for your captions. First select the Image Gallery and then click on the Fonts button in the Toolbar to access the Fonts Panel. The panel allows you to alter the text font, the text size and the text color.
- Align your captions left, center or right using the Alignment Options in the Text Inspector.
- Styling options for the page number indicator. If you have more than one page of images you will see the page number indicator in the top left hand side of the Image Gallery. If you have styled any captions you may notice that it does not affect the page number indicator. This is because EverWeb allows you to style the indicator separately. Just click in the area immediately above the top of the first row of images. You should see a narrow selection box which contains the page counter on the left and the ‘+’ symbol on the right (see above screenshot). With this area now selected, use the Fonts Panel to select the font style and size you want.
- Changing the page number indicator color and underline. To change the colors and underlining to go to the Hyperlinks Inspector and change the colors for Normal, Rollover and Visited as desired. You can also remove the underline as well if you don’t want it shown.
- Aligning the page number indicator. The indicator can be aligned left, centre or right using the Alignment options in the Text Inspector, The example screenshot at the top of this blog shows the results of some of these above customisation options.
Image Gallery Backgrounds
- If you want to add a background to your Image Gallery, just add a shape, size it to cover the Image Gallery and then use Arrange -> Send to Back to move it behind the Image Gallery.
- To quickly select the background shape at any time, perform a secondary click (i.e. a two finger tap) on the Image Gallery and scroll down to ‘Pick Layer’ on the submenu. From here you can select the shape layer beneath the Image Gallery.
- You can also group the Image Gallery and background shape. Select both then use the Arrange-> Group menu option. When grouped, just use the Image Gallery’s ‘+’ symbol to move both Image Gallery and background shape at the same time.
Adding Borders and Frames
- Adding Picture Frames. The Image Gallery is a great place to use EverWeb’s Picture Frames feature. You’ll find the picture frames in the Shape Options tab. In the ‘Stroke’ section, click on the up/down to the right of the word ‘Stroke’ and select ‘Picture Frame.’ You then have 20 frames styles to choose from. To change the frame border size use the ‘Scale’ slider.
- The Shape Options tab is also where you can add a drop shadow background to the images in the gallery. Just tick the box next to the word ‘Shadow’ to activate the available options.
More about EverWeb’s Image Gallery Widget
Don’t forget that there are plenty of resources for EverWeb including the EverWeb’s Image Gallery tutorial
and YouTube videos such as Image Gallery Widget – How To Add An Image Gallery To Your Website In EverWeb
Let us know below if you have any questions, comments or tips you’d like to add!