EverWeb’s Scroll Position for Anchors in Your Site!

Sunday, October 16th, 2022
One of the most useful things that website designers often want is for their visitors to be able to jump from one location to another on the same page, or to to be able to jump from one page to a specific location on another page. In EverWeb this is super easy to do. Before showing you how, it is useful to have some background information that is good to know before you start…

Anchors, Scroll Position and Smooth Scrolling

The ability to ‘jump’ from one location to another is known in HTML coding terms as using an ‘anchor’ tag, so this is why this feature is often referred to as ‘anchoring’. The reference is analogous to anchoring a boat. In EverWeb, we use the term ‘Scroll Position’ which still is anchoring, but if your jumping from one location to another on the same page, EverWeb will scroll smoothly to the new location, making the transition from one place to another on the page smoother for the user.

Anchors and EverWeb’s Scroll Position Features

There are two ways in EverWeb for setting up anchors: ‘Insert Fixed Scroll Position’ and ‘Set Shape as Scroll Position’. Here’s a quick summary of what each Scroll Position is used for:

  • Insert Fixed Scroll Position: You can use this type of Scroll Position in a Fixed Width Page Layout. Typically this will be when using a ‘Centered Layout for your page. When you insert the Scroll Position, you will see a blue/green line across the width of the page at the point where you inserted it. You can move the Scroll Position up and down the page and you can give it a unique name using the Settings Button/Cog in the Inspector Window. If you want to delete the Scroll Position, just click on the blue/green line then hit the delete key. The main caveat to using this type of Scroll Position is that it should only be used on either the Centered or Left Aligned Page Layout. This type of Scroll Position should not be used on a Responsive Page layout.
  • Set Shape as Scroll Position: This type of Scroll Position attaches the anchor point to an object on your page, so can be used in both responsive and fixed width page layouts. When you attach the Scroll Position to the object of your choice, you will see a blue anchor symbol displayed in the top right hand corner of the object. As with the Insert Fixed Scroll Position, you can rename the Scroll Position. but in this case you have to go to the Shape Options tab in the Inspector Window, open the Scroll Position section and change the name there. If you want to delete the Scroll Position, just delete the name from the Scroll Position field.

Jumping to Where You Want to Be On The Same Page

If you are using a fixed width page layout you have the choice of which type of Scroll Position to use. If you are in a situation where you used fixed and responsive page layouts, e.g. if you are building different sites for customers, then it is probably best to only use Set Shape as Scroll Position. If you use Insert Fixed Width Scroll Position on a responsive page, it will not work properly, so our recommendation is to use Set Shape as Scroll Position at all times.

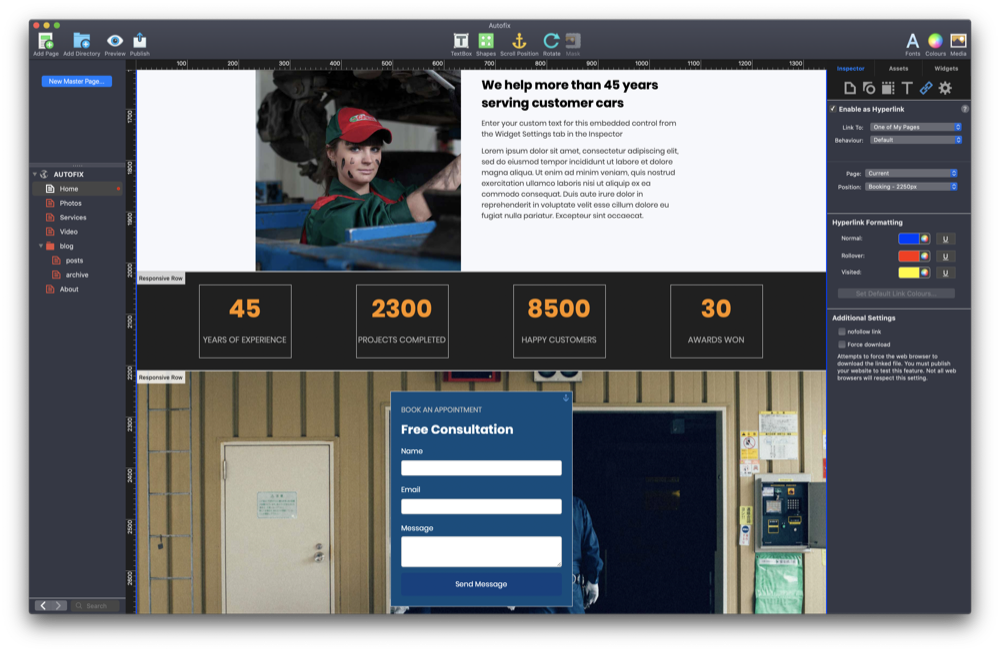
In the following example, we are going to create a Scroll Position to jump from one location in our page to another location on the same page. This example uses a Responsive page layout and uses a button at the top of the page which when pressed goes to a specific location further down the page which would not usually be visible unless you scrolled the page.

  1. First go to the page where you want to create the Scroll Position and create a button at the top of the page e.g. place a rectangle shape on the page and customize it to create the look of a button. If you click inside the shape, you can enter the text of the button. In the Text Inspector, center the button text to be horizontally and vertically centered. Remember to set the After Paragraph setting to zero to ensure correct text centering.
  2. After creating the button, go to the object that you want to be the anchor. Click on the object you have chosen, in this example, a Contact Form Advanced Widget to select it.
  3. Next, click on the Scroll Position button in the Toolbar at the top of the EverWeb User Interface and select ‘Set Shape as Scroll Position’.
  4. You will be asked to give the Scroll Position a name. In this example, I am going to call it ‘Booking’. The name you use must be unique for the page, so you could create a Scroll Position on another page with the same name if you want.
  5. Click on the OK button. You will notice that there is now an anchor symbol in the top right hand corner of the object.
  6. Now that the Scroll Position has been created, go back to the button you created earlier. We will now link the button to the Scroll Position so when a visitor clicks on the button, they will be taken to the contact form.
  7. Select the text of the button then go to the Hyperlinks Inspector. Click on the checkbox next to ‘Enable as Hyperlink’ to activate the settings.
  8. For the ‘Link To’ field, make sure that ‘One of My Pages’ is selected.
  9. In the ‘Page’ Field select ‘Current’ to select the page you are currently on. A new field, ‘Position’ will then be displayed under the ‘Page’ field.
  10. Click on the dropdown and you will see the Scroll Position ‘Booking’ is listed. Click on it to select it.
  11. Preview the page using the Preview button in the Toolbar to test that your Scroll Position works properly.

Jumping to Where You Want to Be On a Different Page

Once you have created a Scroll Position on the page, you can jump to it from the current page, as in the example above, or from any other page in your site, using the same hyperlinking procedure as outlined above. The only difference is that instead of using ‘Current Page’ in the ‘Page’ field, you would use the actual name of the page where the Scroll Position is located on instead.

If you have a question about hyperlinking in EverWeb, or any question relating to EverWeb, please let us know in the Comments Section below!

EverWeb on Social Media

You can also find EverWeb on the following social media platforms:

Facebook

Flipboard

YouTube

X

Instagram

Discover NEW and Improved Hyperlinking Features in EverWeb 3.7!

Friday, May 6th, 2022

Hyperlinking in the recently released EverWeb version 3.7 adds some great new, and expanded, capabilities to the stalwart feature that’s been around since the very first EverWeb release.

Hyperlinking is an essential, integral part of building your website as most website developers will want to add links to other pages in their site, to pages in an external site, to a file, or link to an email app. All these features debuted with EverWeb 1.0 and since then EverWeb’s added a number of other hyperlink related features which we will outline below as most features have been enhanced with the release of EverWeb 3.7. We begin, however, with a brand new hyperlinking feature: Force Download.

EverWeb’s New Force Download Option

Prior to EverWeb version 3.7, if you set up a link to a file, such as a PDF file, when you clicked on the associated link, the file would open in the browser window. If you wanted to save the file, you could do so at this time. In EverWeb 3.7, you now have the ‘Force Download’ option which automatically downloads the file to your visitor’s device when they click on the associated link. This is very useful as it saves the step of the visitor having to view and manually download the file. One thing of note if you use Force Download is that the feature depends on whether the browser in use allows for this function. Some browsers may not support the feature or allow you to customize the browser settings to stop such downloads.

To use Force Download, just tick its checkbox in the Hyperlinks Inspector or in any other hyperlinking dialog boxes within EverWeb.

‘Nofollow’ for Links You May Not Trust…

The ‘nofollow’ option was introduced in to EverWeb with version 1.9 and instructs search engines NOT to visit the site, or rather, not to ascribe credit to boost the ranking of the destination site based on the link. Check the ‘nofollow’ checkbox when you need to have the link but want to exclude it from SEO crawls as you do not have confidence or trust in the linked site.

The ‘Nofollow’ checkbox appears in the Hyperlinks Inspector and In EverWeb 3.7 is now included in all hyperlinking dialog boxes.

Choosing Your Link Behavior

Since EverWeb 1.9 you have been able to open a hyperlink in the current browser window, a new browser window or in a popup window. These features are now available in all hyperlinking dialog boxes within EverWeb.

Easier Scroll Position Linking

The last hyperlinking feature is Scroll Position where you can create two types of links for on your page. The first is where you ‘Insert Fixed Scroll Position‘ on the page which should only be used for Center or Left Aligned Page Layouts. The second type of Scroll Position, ‘Set Selected Shape as Scroll Position‘ allows you to link to an object on a page such as a TextBox or shape. This type of Scroll Position can be used on both fixed width page layouts and Responsive Page Layouts.

Prior to EverWeb 3.7, if you wanted to add a link in a widget using the ‘Link’ button, or via the Styled Text Editor within a widget, you would need to ‘hardwire’ the link using the URL field in the hyperlinking dialog box. In EverWeb 3.7, you no longer need to do this, as the hyperlinking dialog boxes now all include a ‘Position’ field which will display the Scroll Position names for the page you have selected. This makes linking a lot easier when using Scroll Position.

Hyperlinking Dialog Boxes

All of the above mentioned features are available in the Hyperlinks Inspector tab of the Inspector Window. Depending on the context of what you are linking to e.g. a page, a file or an email, some options may, or may not, be available for you to use.

Where EverWeb 3.7 differs from previous versions is that the features of the Hyperlinks Inspector are now available when you click on the ‘Link’ button within widgets, or when you click on the Hyperlink button in the Styled Text Editor within a widget that includes e.g. the FlexBox or PayPal Widget.

If you are creating a link in a blog post, you can use the hyperlink button in the Blog Post Editor Window’s Toolbar, although this will only give you options to quickly set up a hyperlink. If you need to use any of the above options in a Blog Post, highlight the text or image you want to link to, then go to the Hyperlink Inspector and check the ‘Enable as Hyperlink’ box to make all of the hyperlinking options available for use.

…and There’s More to Come!

EverWeb’s 3.7’s new Force Download feature and improved hyperlinking throughout the app will make linking much easier and more flexible for all EverWeb users. But stay tuned as we are planning more updates for hyperlinking in an upcoming EverWeb release!

if you have any questions about Hyperlinking in EverWeb, or any EverWeb related questions, please let us know in the Comments Section below. We’re happy to have you comments and feedback and to answer any questions you may have.

EverWeb on Social Media

You can also find EverWeb on the following social media platforms:

Facebook

Flipboard

YouTube

X

Instagram

EverWeb’s Hyperlink to Current Page Feature

Thursday, November 26th, 2020

EverWeb’s Hyperlink to Current Page feature gives you an easy way to add a ‘Go to Top’ of page function to your Master Page and you can also it with Scroll Position in your Master Pages!

Many websites use a long form page format style. This style of page is particularly useful on mobile devices where it is often preferable to scroll up and down a long page rather than clicking back and forth to different pages. This page style, therefore, makes a ‘Go to Top’ of page feature a good idea to implement. Your visitors can quickly jump back to the top of the page. 

You can add a Go To Top of page feature on a page by page basis which is what you have to do if you are using any version of EverWeb up to version 3.3. EverWeb version 3,4 adds the new Hyperlink to Current page feature which means that you can now add a Go to Top feature within your Master Pages which will save you lots of time and effort.

Adding a Go To Top of Page Feature

  1. First go to your Master Page and add your ‘Go to Top’ of page icon, image or TextBox. In this example, the Master Page has a responsive page layout. It is, therefore, a good idea to place the Go to Top TextBox in a Responsive Row widget within the Footer area. If you are using a Centered Page Layout, add the TextBox button directly in to the Footer area.
  2. Once you have added your own Go to Top object, keep it selected and go to the Hyperlinks Inspector. Click on the checkbox to ‘Enable as Hyperlink’. This will make all of the Hyperlink options available to the object.
  3. Set ‘Link to’ as ‘One of my pages’, set ‘Behaviour’ to ‘Default’ and set the ‘Page’ field to ‘Current’.
  4. You have now finished the set up of the Go to Top featue.

Attach the Master Page to a regular page, if you have not done so already, then preview or publish your site to test. Any page that uses the Master Page will now include the Go to Top of page button.

Using Scroll Position with Hyperlink to Current Page

As mentioned above, you can also use Hyperlink to Current Page with Scroll Position in a Master Page.

  1. If you have not done so already, create a Master Page. In this example, the Master Page will have a Responsive Page Layout.
  2. Remove any unwanted objects from the Master Page. In my example, my Theme Template contains a Full Width Navigation which I will keep and place at the top of the page.
  3. Next, add a Responsive Row widget to the page, below the Navigation Menu widget.
  4. With the Responsive Row widget still selected, add a TextBox button to the Responsive Row. In my example I have added the text ‘Contact’ to the button. When the ‘Contact’ button is pressed, the page will scroll down to the Contact section of the page.
  5. Add a Contact Section to the Footer area of the page containing information that is to appear on all of the pages of my site.
  6. The page structure is now complete. The Contact button in its responsive row and the full width Navigation Menu widget form the ‘header’ of the Master Page.
  7. There is nothing below the ‘header’ until the Footer area. This area will be where content is inserted when the Master Page is attached to a regular page.
  8. Set the Minimum Content Height of the Master Page to 500 pixels.
  9. The ‘header’ and Footer area sections are now adjacent to each other. This is not a problem because when you add content to your regular page (with the Master Page attached), a gap will open up between these sections to allow for content to be added. Remember that the Content Height setting is a minimum setting and expands as you add content as needed.
  10. To create a hyperlink to my Contact section of the Master Page, go to the Contact section of the page. This is where we are going to create a Scroll Position.
  11. Click in the Contact section to select it, then click on Scroll Position in the Toolbar and choose the ‘Set Shape As Scroll Position’ option. Name the Scroll Position ‘Contact’ then click OK to finish.
  12. Now go to the Contact button at the top of the page to attach the hyperlink. Double click on the word ‘Contact’ to select the text.
  13. Go to the Hyperlinks Inspector and click on the checkbox to ‘Enable as Hyperlink’. In this example, set ‘Link To’ as ‘One of My Pages’, the ‘Page’ field to ‘Current’ and set ‘Position’ to ‘Contact’. The Position field is used for Scroll Position names on the page.
  14. The set up is now complete.

Now create a blank page, or use an already existing page, and attach the Master Page to it.

In this example, the page appears to have no content in it. If you drop a Responsive Row widget on to the page, for example, the widget will be placed between the ‘header’ section (i.e. the Navigation Menu widget and the button responsive row) and the Footer area.

One the content that you want has been added, preview the page to test the Contact button.

EverWeb on Social Media

You can also find EverWeb on the following social media platforms:

Facebook

Flipboard

YouTube

Twitter

Instagram

EverWeb’s NEW Set Shape as Scroll Position Feature!

Thursday, April 23rd, 2020
EverWeb's Set Selected Shape As Scroll Position Feature

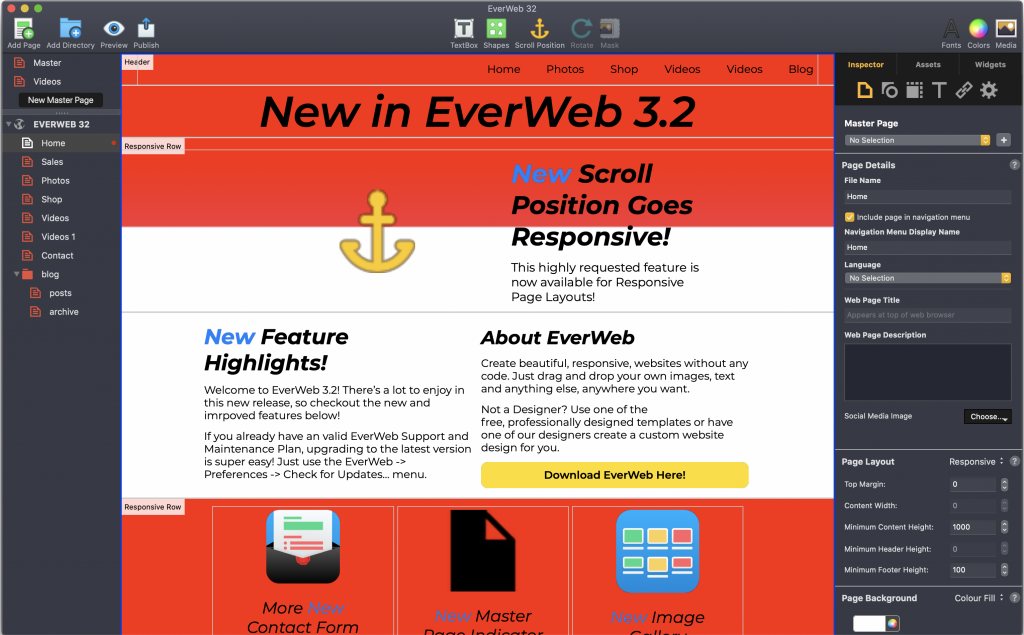
If you have designed a responsive website in EverWeb, you will be delighted to know that in EverWeb 3.2 you can now attach anchor links to any shape in your website. Scroll Position debuted in EverWeb back in version 2.6 when the product only featured the fixed width (center and left aligned) page layout designs. When EverWeb 3.0 debuted it introduced the new Responsive page layout design which was not compatible with Scroll Position… until now that is!

The ‘Insert Fixed Scroll Position’ Feature

The new EverWeb 3.2 makes a minor change to the existing labelling of ‘Scroll Position’. In the Toolbar and in the Insert menu the feature is now called ‘Insert Fixed Scroll Position’. The renaming makes it clear that this type of Scroll Position is only for use in fixed width pages i.e. those using either a centered or left aligned page layout.

Although the labelling has changed, ‘Insert Scroll Fixed Scroll Position’ functions exactly the same way as ‘Scroll Position’ in previous versions of EverWeb. To find out more check out our blog ‘EverWeb’s NEW Scroll Position Feature‘.

If you are website has a responsive page layout, do not use ‘Insert Fixed Scroll Position’, instead use the new ‘Set Selected Shape as Scroll Position’ feature.

The New ‘Set Selected Shape as Scroll Position’

EverWeb 3.2 adds the option ‘Set Selected Shape as Scroll Position’ to the Toolbar and also to the Insert menu. This feature can be used on both Fixed Width and Responsive page layouts.

Essentially, you can add a scroll position to any shape. This also includes widgets such as the Responsive Row widget. Simply click on the object that you want to set the scroll position to, then either use the Toolbar-> Set Selected Shape as Scroll Position option or the Insert-> Set Selected Shape as Scroll Position menu option.

You will be presented with a dialog box where you name the Scroll Position. The dialog box also includes instructions on how to name the Scroll Position. The most important thing to remember is that the name must be unique to the page that it is on. Therefore, you can use the same name on different pages if you want to. Once you have entered the Scroll Position name, click on the ‘OK’ button.

You will notice that in the top right hand corner of the object a small anchor symbol appears indicating that the shape has a Scroll Position attached to it. You can now use the Scroll Position in the Hyperlinks Inspector.

The Shape Options-> Scroll Position Section

If you want to change the name of the object’s Scroll Position, you do so in the Shape Options tab of the Inspector window. Use the new ‘Scroll Position’ section to change the name of the Scroll Position. If you delete the name altogether, this will remove the Scroll Position from the object.

The Widget Settings tab is not used in this instance for the Scroll Position, as the Widget Settings are reserved for use by the object itself. For example, you may want to attach a Scroll Position to a Responsive Row widget. In this case, the widget has its own settings that occupy the Widget Settings tab so the object’s Scroll Position uses the Shape Options tab instead.

If you are using a Fixed Scroll Position line in a fixed width page layout, change its name by first selecting the Fixed Scroll Position line. Next go to the Widget Settings tab in the Inspector Window and change the name in the ‘Unique name’ field. To delete the scroll position line, first select the line before using the backspace key on your keyboard to delete it.

Using Scroll Position

Once you have set up your object with a Scroll Position you can attach the ‘anchor’ to a hyperlinked object. For example, you could create a rectangle shape on your page to be used as a button. Once you have created the button…

  1. Make sure the button is selected.
  2. Go to the Hyperlinks tab in the Inspector Window and check the ‘Enable as Hyperlink’ to activate the Hyperlinking settings.
  3. Use the Page field to select the page you want to Hyperlink to which contains the Scroll Position.
  4. Select the Scroll Position you want using the Position field.
  5. Your Scroll Position is set up. Preview to test that the hyperlinked button works correctly before publishing.

Set Shape as Scroll Position is a great way to set up anchors in both fixed with and responsive page layouts in EverWeb!

If you have a question about this blog post, please let us know in the Comments Section below. We’re happy to help!

EverWeb on Social Media

You can also find EverWeb on the following social media platforms:

Facebook

Flipboard

YouTube

Twitter

Instagram

Introducing EverWeb 3.2! More Contact Form Advanced Features, Scroll Position Goes Responsive and Much More!

Friday, April 3rd, 2020

We’re delighted to introduce EverWeb 3.2 with more Contact Form Advanced widget features, giving you our most flexible and versatile contact form ever! There is also a new scroll position anchor feature for fixed and responsive pages, Master Page enhancements, pagination options for the Image Gallery Widget and much more!

The full list of what is new and updated is below as well as our ‘What’s New in EverWeb 3.2‘ video. Enjoy!

For a complete list of what’s new, improved and fixed, as well as how to upgrade to the new version, please see below!

Which Version of EverWeb is For You?

EverWeb is available in the following versions:

  • If you are running OS X 10.10 or macOS Yosemite, El Capitan, Sierra, High Sierra, Mojave or Catalina, EverWeb version 3.2 is available for you.
  • If you are running OS X 10.7 – 10.9 (Lion, Mountain Lion, Mavericks) EverWeb 3.1 is available for you.
  • If you are running OS X 10.6 EverWeb version 2.5.2 is available for you.

When updating to EverWeb 3.2, the update process will automatically download the correct version of EverWeb for your operating system.

The EverWeb 3.2 Video

We’ve highlighted the main features of the release of EverWeb in our ‘What’s New in EverWeb 3.2‘ video. See below for the full release notes.

EverWeb 3.2 Includes…

[NEW] Contact forms can now send a confirmation email to the website visitor. The message is customizable and can include variables based on what the visitor has entered in the form. The default confirmation email includes an example. You can use any form control variable. This feature requires the Contact Forms Enhanced Addon and reCaptcha SPAM protection.

[NEW] Contact forms can forward the visitor to any page on your website after the form has been submitted.

[NEW] Contact forms can remove the “branding” in the submission emails (i.e. the links that ask you to upgrade or login to your account to download file uploads). This features requires the Contact Forms Enhanced Addon but it does not have to be selected in the Inspector or used in the form.

[NEW] Blog posts now include the ability to customize the previous/next post links at the bottom of the blog posts widget.

[NEW] Draft blog posts can now be sorted.

[NEW] You can now set an anchor name from Shape Options-> Scroll Position in the Inspector Window. Any object can be an anchor that you can link to in the Hyperlinks tab.

[NEW] You can set an anchor on any object using the Scroll Position Toolbar.

[NEW] The new Insert-> Set Selected Shape to Scroll Position… menu option can be used in both Fixed Width and Responsive page layouts.

[UPDATED] The Insert-> Scroll Position menu has been renamed to Inert-> Insert Fixed Scroll Position for clarity.

[NEW] Preferences-> Backup-> Manage EverWeb Cache option. EverWeb may have left over published cache and preview cache. You can now easily delete these cache files.

[NEW] Master Pages can be dragged in to the regular page list. This will create a copy of the Master page in the regular Web Page List.

[NEW] If you select a Master Page, all pages in the Web Page List that use that Master Page will be highlighted.

[NEW] The Image Gallery Widget now has pagination at the top, bottom and top and bottom.

[NEW] The Image Gallery Widget now includes similar styling options to the blog pagination feature.

[IMPROVED] Content area separators are now thicker so you can better see them between each section of the page.

[IMPROVED] If your project file has only one page in it, you are not allowed to delete that page as a project file must always contain at least one page.

[IMPROVED] More FTP failure error messages have been added.

[FIX] There was a social media image bug if you had a subdirectory included in the URL field. This has been fixed

[FIX] Various internal bug fixes.

[FIX] Fixes to enable the loading of some damaged projects.

[FIX] Issues where opening projects moved from other computers could lead to a ‘Cannot Connect to Network’ error message.

[FIX] PayPal widget issues causing generic PayPal error message to be displayed when the widget is used.

[FIX] When scrollbars are set to always be showing the Widgets tab list would jump from 3 to 2 columns.

[FIX] The Video Widget on responsive pages was not working properly after clicking the ‘Full Screen’ button then returning to regular size.

[FIX] Fixes for shadow not working correctly for rotated objects in fixed and responsive pages.

The following list of improvements and maintenance fixes were introduced in EverWeb versions 3.1.5 thru 3.1.7 and are incorporated in EverWeb version 3.2:

EverWeb versions 3.1.6 & 3.1.7

  • [FIX] Fixes an issue where the page color remained red (unpublished) in the Web Page List after a website has been published
  • [FIX] Fixes aContact Form submission issue experienced by some customers
  • [FIX] Fixes a rare crash when opening a project file
  • [FIX] Fixes issues when scrolling in the Inspector

EverWeb version 3.1.5

  • [IMPROVED] Significant improvements to Responsive websites on older browsers
  • [IMPROVED] Significant improvements to importing iWeb blogs
  • [IMPROVED] Fixed Width blog post page improvements when using background colors
  • [IMPROVED] Internal improvements for better compatibility with macOS Catalina
  • [IMPROVED] Improvements to Google Fonts and blog posts
  • [FIX] Fixed issues with some widgets using background images that were broken in EverWeb 3.1
  • [FIX] Undo after making a change to a widget under Inspector->Widget Settings updates the widget properly and the Inspector
  • [FIX] Fixes an issue for macOS Catalina users not being able to drag multiple files from the Assets list at a one time
  • [FIX] Fixes for rollover underline for hyperlinks
  • [FIX] Text Section widget fixes when placed within a responsive row
  • [FIX] Simple Contact form can have letters with accents in labels
  • [FIX] Fixed an issue with full width Contact Form Advanced Widget

How To Update To EverWeb 3.2

You can easily update EverWeb by either:

  1. Launching EverWeb then going to the EverWeb menu at the top of the screen and selecting ‘Check for Update’ or by
  2. Downloading EverWeb from the EverWeb website.

After downloading EverWeb, double click on the EVERWEB.DMG file. A window will open. Drag the EverWeb icon on to the Applications folder icon. Once the file has been copied, you can close the installation window, delete the .DMG file and eject the EverWeb disk on the desktop by dragging it to the Trashcan.

Remember, you won’t lose any previous data when updating as your website project files are stored elsewhere on your computer.

The update is free for EverWeb + Hosting users and EverWeb Standalone users who are within their 1 year of free upgrades and support period.

You can easily check your EverWeb Standalone free update period from EverWeb’s Preferences window or from your client area.

If you have passed your one year of free EverWeb updates, you can purchase 1 more year of upgrades and support from your client area.

You can easily re-download earlier versions of EverWeb from your client area if you are not ready to purchase an additional year of updates and support.

Login to your client area and go to the ‘Manage Product’ page. On the left of this page, select ‘Downloads’ and choose the version of EverWeb that you need.

More Information About EverWeb

For more information about the new version of EverWeb, please check out the following resources:

  • The EverWeb website which has up to the moment information in it’s new blogging section
  • New EverWeb videos on YouTube
  • The EverWeb User Manual in EverWeb’s Help-> User Manual menu
  • The EverWeb Discussion Forum

If you can’t find what you need, or have any other questions, comments or feedback please let us know. We’re happy to help.

EverWeb on Social Media

You can also find EverWeb on the following social media platforms:

Facebook

Flipboard

YouTube

Twitter

Instagram

Adding Scroll Position to Your Blog Posts

Thursday, December 21st, 2017

Using Scroll Position in Blog Posts


The new Scroll Position feature introduced in EverWeb 2.6 is a great way to hyperlink to anywhere in your website, from any position. In addition to using Scroll Position on regular web pages, you can also use it to link to specific places in your blog post pages. Here’s how to do it…


Before You Start…

  1. Make sure that you are using EverWeb version 2.6 or higher and
  2. You have created a blog with one or more posts in it.
  3. If you are not familiar with Scroll Position yet, please read the EverWeb’s NEW Scroll Position Feature blog post first.


Overview

In this example, we are going to set up some hyperlinks on the Home page of the ‘Woody’ Theme Template that will link to different paragraph titles of different blog posts using Scroll Position. The Woody Theme Template is new in EverWeb version 2.6.


The Blog Posts

The blog in ‘Woody’ website project file contains two blog posts. One post is called ‘Sanding & Finishing’ and has two paragraphs, one titled ‘Sanding’ and one titled ‘Finishing’. The second blog post is called ‘Polishing’ and has only one paragraph titled ‘Polishing’. In this example, we want to hyperlink each paragraph title to its corresponding button on the Home page.


The Website Home Page

There are three sections in the Home page with salmon colored buttons containing the text ‘READ MORE’. When clicking on the ‘READ MORE’ text for the ‘Sanding’ section, the hyperlink will go to the ‘Sanding’ paragraph title of the ‘Sanding & Finishing’ blog post. For the ‘Finishing’ section on the Home page, clicking its button will hyperlink to the ‘Finishing’ paragraph title, again in the ‘Sanding & Finishing’ blog post. Finally, the button for the Polishing section will hyperlink to the ‘Polishing’ paragraph title of the ‘Polishing’ blog post.


Setting Up ‘Sanding’ and ‘Finishing’ Scroll Positions

Let’s start with creating a hyperlink from the Sanding section on the Home page to the Sanding paragraph title in the ‘Sanding & Finishing’ blog post.

  1. Go to the blog Posts page of the project
  2. Select the ‘Sanding & Finishing’ blog post.
  3. Note that the Blog Post Preview Window is where Scroll Positions are added, edited and deleted for blog posts.
  4. Add a Scroll Position to the the top of the Sanding paragraph title by clicking on the Scroll Position button in the Toolbar or by using the Insert-> Scroll Position menu option.
  5. Drag and drop the Scroll Position to the just above the title of the ‘Sanding’ paragraph.
  6. With the Scroll Position still selected, go to the Widget Settings and give the Scroll Position a ‘Unique Name’, in this case  ‘Sanding’.
  7. Add another Scroll Position, this time for the Finishing paragraph.
  8. Drag and drop the Scroll Position at the just above the title of of the Finishing paragraph. Again, give it a Unique Name, in this case ‘Finishing’.

You now have two Scroll Positions set up in the Blog Post Preview Window.


Setting Up The ‘Polishing’ Scroll Position

With the two Scroll Positions set up for the ‘Sanding & Finishing’ blog post, now we need to add the last Scroll Position for the ‘Polishing’ blog post.

  1. Select the Polishing blog post.
  2. Important! The Scroll Positions we set up for the ‘Sanding & Finishing’ blog post are still visible in the Blog Post Preview Window. This is because the Blog Post Preview Window acts like a Master Page. Anything placed on the Preview Window appears, and is available, to all the other posts in the blog. This is also the reason why we gave each Scroll Position a Unique Name so it is easy to determine which Scroll Position relates to which blog post.
  3. Add a new Scroll Position and drag and drop it to the top of the ‘Polishing’ paragraph title.
  4. Name the Scroll Position as ‘Polishing’.

You have now set up all the Scroll Positions you will be using for the three buttons on the Home page.


Hyperlinking the Buttons on the Home Page

  1. Go to the Home page to set up the three Hyperlinks.
  2. First click on “READ MORE” text for ‘Sanding’ section.
  3. Go to the Hyperlinks Inspector and tick the ‘Enable as Hyperlink’.
  4. Set the ‘Link To’ dropdown as ‘One of My Pages’.
  5. Set the ‘Page’ as the ‘Sanding & Finishing’ blog post page.
  6. The ‘Position’ dropdown shows the Scroll Positions that have been set up. Select ‘Sanding’, which is the Unique Name we set up earlier. The first hyperlink has now been set up.
  7. Next, select ‘READ MORE’ text for the ‘Finishing’ section and ‘Enable as Hyperlink’ in the Hyperlinks Inspector.
  8. Again, set the ‘Link To’ dropdown as ‘One of My Pages’ and the ‘Page’ dropdown to the ‘Sanding & Finishing’ blog post page.
  9. The ‘Position’ dropdown should be set to the ‘Finishing’ Scroll Position. The second hyperlink has now been set up.
  10. Lastly, select the ‘READ MORE’ text for the ‘Polishing’ section of the Home page.
  11. Again ‘Enable as Hyperlink’ in the Hyperlinks Inspector and set the ‘Link To’ as ‘One of My Pages’.
  12. This time, set the ‘Page’ dropdown as the ‘Polishing’ blog post page.
  13. Set the ‘Position’ dropdown as the ‘Polishing’ Scroll Position. The last hyperlink has now been set up.


Preview and Publish!

Once the hyperlinks have been set up, test the links using Preview. Click on the ‘READ MORE’ text for each button you have hyperlinked to see how the Scroll Position works.


Using Scroll Position in blog posts is very useful for focusing your visitors on hyperlinked objects and text. When using this Scroll Position for blog posts, remember that the Blog Post Preview Window shows every blog post’s Scroll Positions on the Preview Page at the same time. As such. using a Unique Name for each Scroll Position is usually a good idea so you can keep track of each Scroll Position. It’s also worth remembering to be careful when moving or deleting Scroll Position lines in the Blog Post Window as you don’t want to inadvertently move or delete a blog post’s Scroll Position!


Video Walkthrough

There’s also a video walkthrough of this blog post, Scroll Position and Blog Posts which takes you through the whole process of linking buttons on your Home page to specific sections of your blog posts.


If you have any questions about this post, please do let us know in the Comments Section below, we’re happy to help!


EverWeb on Social Media

You can also find EverWeb on the following social media platforms:

Facebook

Google+

Flipboard

YouTube

Twitter handle @ragesw


EverWeb’s NEW Scroll Position Feature

Thursday, December 7th, 2017

EverWeb Scroll Position Feature


EverWeb version 2.6 introduces a great new feature, Scroll Position, which allows you to hyperlink an object such as a button, text or image to any location on any page in your website. For example, you could set up three buttons on a page, each button taking you to a different paragraph on the same page, or set up a ‘Back to Top’ text link at the bottom of your page to smooth scroll back to the top of the page. There are many case uses for this feature!


Using Scroll Position

There are two ways to set the Scroll Position, either by the Scroll Position button in the Toolbar, or by using the Insert -> Scroll Position menu option.

When you add a Scroll Position, a horizontal turquoise line is added to the page across the Editor Window. The currently selected Scroll Position line appears turquoise, otherwise the lines appear dark blue. Notice that the Scroll Position line does not have any selection handles as it is a different type of object to those that do have selection handles.

Once you have added a Scroll Position you will want to move it to where you want it on the page e.g. at the top of a paragraph. To do this, simply click and drag the line up and down the page as required. Release the mouse button when finished with positioning.


Naming Scroll Position Lines

If you are using more than one Scroll Position on your page, it is a good idea to name each Scroll Position. This makes things easier when hyperlinking the Scroll Position to an object. Each Scroll Position is identified by the number of pixels it is down from the top of the page, so adding a user friendly name will help save time especially if you have many Scroll Positions on your page. To name a Scroll Position, first make sure it is selected, then go to the Widget Settings in the Inspector Window. Enter the name you want.  You can change the name later if you want.


Hyperlinking To The Scroll Position

Once you have the Scroll Position in the place you want it  you will need to link it to an object. For example, you may have set up a button at the top of the page that when pressed takes you to a Scroll Position further down the page, such as a specific paragraph. To do this:

  1. Click on the text label inside the button at the top of the page.
  2. Next go to the Hyperlinks Inspector.
  3. Tick the checkbox to ‘Enable as Hyperlink’.
  4. Make sure that the ‘Link To’ drop down is set as ‘One of My Pages’.
  5. In the drop down for ‘Page’ select the page that you are currently on as this is where your Scroll Position is.
  6. For ‘Position’ click on the drop down arrows and change ‘Top of Page’ to your Scroll Position location.
  7. The button and the Scroll Position are now linked.


When you have set up the link, Preview to test the button. When you press the button, the page should smooth scroll to the Scroll Position.


Relocating and Removing Scroll Position Lines

To relocate a Scroll Position to another location, simply click on the Scroll Position line and drag it to its new location. If you need to delete a Scroll Position line, click on the line so that it changes from dark blue to turquoise then press the delete (backspace) key on the keyboard.


Video Walkthrough

To watch a video walkthrough of this blog post check out our “EverWeb’s Scroll Position Feature” YouTube video.


If you have any questions about this post, please do let us know in the Comments Section below, we’re happy to help!


EverWeb on Social Media

You can also find EverWeb on the following social media platforms:

Facebook

Google+

Flipboard

YouTube

Twitter handle @ragesw

Introducing EverWeb Version 2.6: Lightning Publishing, Scroll Position and Much More!

Thursday, November 30th, 2017

We’re pleased to announce the immediate availability of EverWeb version 2.6 which features up to 5x faster publishing and the new Scroll Position feature. We have updated and improved lots of features as well as some updating of EverWeb’s User Interface graphics. This release is packed full of improvements so check out the full list of what’s new and updated below. You will also find instructions on how to update your version of EverWeb to version 2.6 as well…


EverWeb 2.6 is available in two versions:

  • OS X 10.7 – 10.8 (32-Bit): Snow Leopard, Lion, Mountain Lion, Mavericks
  • OS X 10.9 and higher (64-Bit): Mavericks, Yosemite, El Capitan,  Sierra, High Sierra

EverWeb version 2.5.1 will remain the current version for users of OS X version 10.6 for now.

When updating to EverWeb version 2.6, the update process will automatically download the correct version of EverWeb for your macOS.


EverWeb version 2.6 Includes…

[NEW] Fast Publishing for EverWeb+Hosting, FTP and FTP over SSH. In EverWeb’s Preferences you can specify how many files can be uploaded at once.

[NEW] Scroll Position lets you insert an anchor position and from Inspector->Hyperlinks you can select one when you select ‘Link to one of my pages’

[NEW] 20 new Theme Templates have been added, many using scroll position and some with themed blog pages.

[NEW] Type Ahead for Theme Templates. When adding a page, if you know the Theme Template your want, just start typing the name of the Theme and EverWeb will take you to the Theme as you type.

[NEW] Server Preview Preferences. You can view previews on any local device on your local network. Use EverWeb-> Preferences-> General to turn Server Preview on or off as desired.

[NEW] New Widget icon ‘covers’ for all inbuilt widgets.

[NEW] New Insert Button icons which can also be scaled as reqiured.

[NEW] New Instagram button.

[NEW] PayPal widget now lets you specify height/width of custom buttons so you can add retina buttons.

[NEW] PayPal widget now uses updated style default ‘Buy’ buttons.

[NEW] PayPal widget now includes a ‘Donate’ option.

[NEW] Animations now work with shadows.

[NEW] Scroll Position Anchor icon added to the Toolbar.

[NEW] Insert -> Scroll Position menu option.

[NEW] A ‘New’ label is included in the Theme Template Chooser when new Theme Templates have been added.

[NEW] URL of published website will be shown if you are overwriting one when publishing. Only for the English version of EverWeb at present.

[IMPROVED] Working with a project file with full width images should be faster when resizing the window or the design canvas.

[IMPROVED] Previewing a website will only export the image for the screen type e.g. only a retina image on retina Macs is exported.

[IMPROVED] Page shadow background uses CSS now so it looks better when you specify a top margin.

[IMPROVED] Shadows are exported as CSS unless you are using a PNG or shape that is anything other than a rectangle.

[IMPROVED] Renaming pages or directories no longer creates a new XML file in the project file, preventing project files from growing very large, very quickly.

[FIX] When duplicating directories with sub pages, the sub pages are now also duplicated.

[FIX] The FaceBook Page Timeline widget now respects the ‘Show Timeline’, ‘Messages’ and ‘Events’ checkboxes.

[FIX] Full width scale to fill images should be exported properly with the scale to fill effect in the browser. The images are exported at the highest possible size.


How To Update To EverWeb version 2.6

You can easily update to EverWeb version 2.6 by

  1. Launching EverWeb then going to the EverWeb menu at the top of the screen and selecting ‘Check for Update’ or by
  2. Downloading EverWeb from the EverWeb website.

Remember, you won’t lose any previous data when updating since your website project files are stored elsewhere on your computer.

EverWeb version 2.6 is free for EverWeb + Hosting users and EverWeb Standalone users who are within their 1 year of free upgrades and support period.

You can easily check your EverWeb Standalone free upgrade period from EverWeb’s Preferences window or your client area.

If you have passed your one year of free EverWeb upgrades, you can purchase 1 more year of upgrades and support from your client area.

You can easily re-download earlier versions of EverWeb from your client area if you are not ready to purchase an additional year of upgrades and support.

Login to your client area and go to the ‘Manage Product’ page. On the left of this page, select ‘Downloads’ and choose the version of Everweb that you need, either the OS X 10.6 version,or OS X 10.7 and later, version.


More Information About EverWeb version 2.6

If you need more information about EverWeb version 2.6 please check out the following resources:

  • The updated EverWeb website which has up to the moment information in it’s new blogging section
  • New EverWeb videos on YouTube
  • The updated EverWeb User Manual under EverWeb’s Help menu
  • The EverWeb Discussion Forum


If you can’t find what you need, or have any other questions, comments or feedback please let us know. We’re happy to help.


EverWeb version 2.6 Video Walkthrough

Click on the link for a video walkthrough of some of the important new features of EverWeb 2.6.


EverWeb on Social Media

You can also find EverWeb on the following social media platforms:

Facebook

Google+

Flipboard

YouTube

Twitter handle @ragesw