
All You Need to Know About EverWeb Master Pages
September 10th, 2015Master Pages were introduced in EverWeb version 1.2 and remain one of the product’s key features. That’s because they save time and effort as well as giving your website a consistent look and feel that’s vital for your own, or your company’s, image on the Internet. Our Q&A below tells you all you need to know about Master Pages…
What is a Master Page?
A Master Page is a template, or pattern, you create that can be applied to some, or all, of your web pages in EverWeb. A Master Page usually contains objects such as company logos, social media buttons etc., that you want to use on all your web pages, or on specific groups of pages. Master Pages are also great for setting defaults such as your Page Settings, so that all of your web pages have the same header, footer and content height and width.
Why Use a Master Page?
Master Pages are extremely useful as they give you a simple, easy way to create a uniform look for your website. For example, you may want to put your company logo in the same position on all of your webpages. Why place the logo on each page when with a Master Page you only need to do it once to get the same result? Master Pages allow you to design your web page layout once and apply it to as many pages as you want. With everything in the same place on each page, your website is immediately more professional and consistent in it’s look. Master Pages also minimise the risk of making mistakes that duplicating objects page by page may incur.
If you need to change your Master Page design, it’s simple and easy. For example, if your logo needs updating all you have to do is update the Master Page and the changes will ripple through all the web pages using that Master Page.
When To Use a Master Page
You will soon discover if you need to use Master Pages when you start designing your website. As you sketch out ideas and think of things to include in your website you will undoubtedly find that many of your web pages will have common elements or themes. If this is the case then using Master Pages will be of benefit e.g. if you have a website about Television, you may want to create Master Pages for specific genres such as Comedy, Drama, Reality TV, Kids, Non-Fiction etc.
What You Should Add To A Master Page?
Usually you will add objects that you would typically place in the page header and footer such as
- Company Logo
- Company Name
- Navigation Menu
- Social Media Buttons such as Facebook, Twitter, Google+ etc.
- Copyright symbol, year ad your company name
- Site Maps
You may also want to place design elements that reflect your website’s color scheme in the Master Page. This may result in adding shapes to the Master Page that are coloured and placed appropriately to provide create an appropriate page background. When placing such objects on your Master Page, EverWeb features such as ‘Always On Top’, ‘Fixed Position’ and ‘Full Width’ may be useful in your design. Check out the blog ‘Creating Fixed Headers in EverWeb’ for more on these features.
What Settings Can Be Applied To a Master Page?
The Master Page is a great place to set page defaults. Again, this helps create a consistent design. Remember to look to set the following in your Master Page:
- Top Margin
- Content Width
- Content Height
- Header Height
- Footer Height
In addition, don’t forget to set the Page and Browser Background colors in your Master Page.
What Not To Exclude From a Master Page
Do not use any objects that are page specific. This usually means body text, audio, video and page specific images. As a rule of thumb any content that you would typically use in the body of a page.
How To Create and Use a Master Page
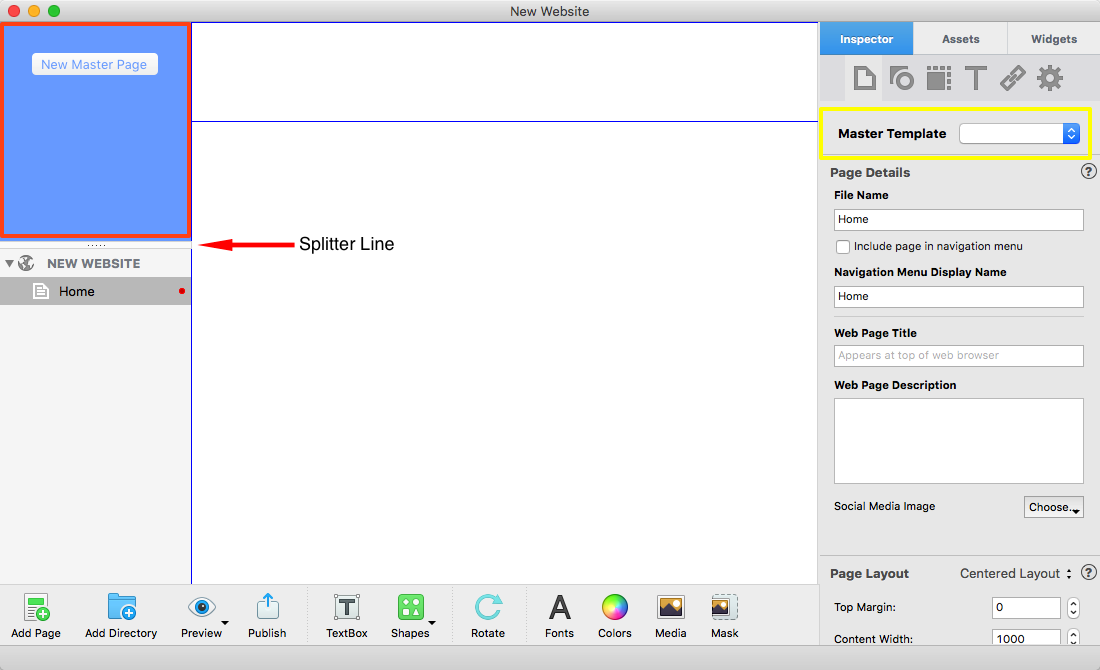
Master Pages that you create are shown in the blue box (highlighted in red) and attached to regular we pages, such as the ‘Home Page’, using the Master Template drop down in the Page Inspector. If you cannot see the ‘New Master Page’ button, just drag the Splitter line down further.
1. First click on the New Master Page button in the blue section of the Web Page List, as highlighted in the red box in the above screenshot. If you don’t see the button, grab and drag the splitter down until it appears. Alternatively, use the menu File-> New Master Page, or the short cut key Cmd+Ctrl+Shift+N.
2. Select a theme for your Master Page, or use the blank theme to create your own Master Page from scratch.
3. Once created, the new Master Page appears in the blue Master Page area. To change its default name just double click on the name, enter the name you want and then press Enter to finish.
4. Now you can edit your Master Page in just the same way as you would for a normal web page.
5. Once you have finished your Master Page you will want to attach it to one or more of your regular web pages. To do this, click on the page you want the Master Page attached to in the Web Page List.
6. The first option on the Page Inspector of the Inspector Window is ‘Master Template’. This is highlighted by the yellow box in the above screenshot. If a Master Page Template is not already attached you will see ‘No Selection’ in the drop down box. If a Master Page is already attached you will see its name in the drop down. Click on the drop down box’s up/down arrow and select the Master Page you want to attach.
Editing a Master Page
The beauty about Master Pages is that they can be edited in exactly the same way as your normal web pages. There is no extra learning to do! You will find that some features of the Master Page in the Inspector Window may be greyed out as these features only apply to your ordinary web pages.
When you attach the Master Page to your ordinary web page, you may also find some features in the Inspector of your ordinary page are greyed out as they are only set in the Master Page (e.g. top margin, header height, content width etc.)
What’s the Black Page Symbol on My Web Page?
When you attach a Master Page to an ordinary web page, you will be able to identify the objects that belong to the Master Page as they have a black Page symbol in the top right hand corner of the object (see screenshot below). You can only edit these objects by editing the Master Page itself.
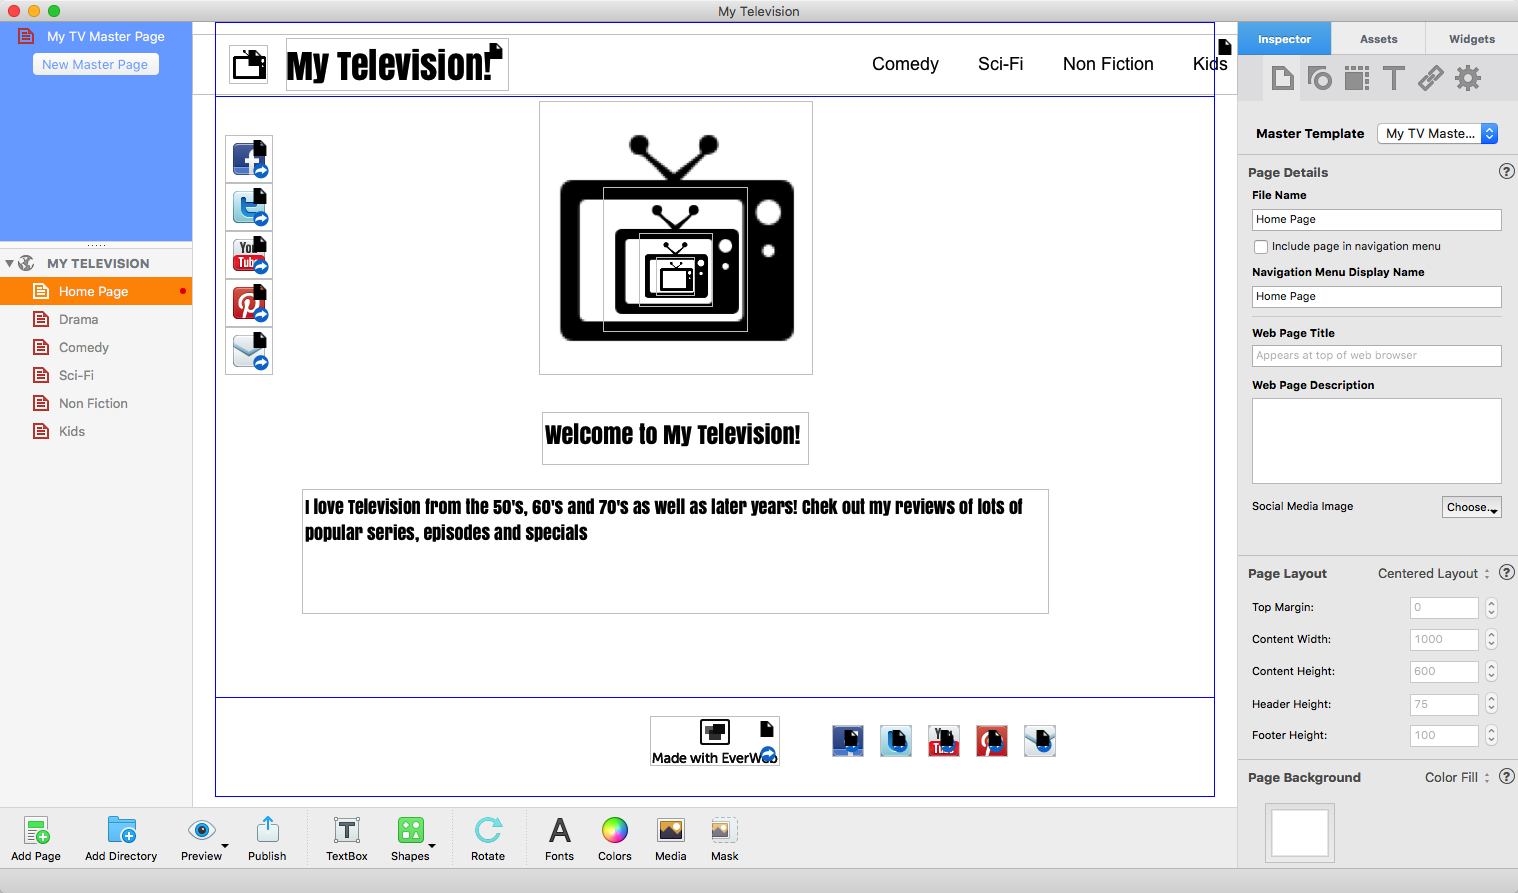
Example Home Page layout with a Master Page attached. You can see the Master Template name in the Inspector. Master Page objects on the page are indicated by the black Page symbol in the top right hand corner of the object.
Converting a Web Page In To a Master Page
Just drag and drop the web page you have made into the Master Page area. This will create a Master Page ‘copy’ of the web page. If the web page you have copied already has a Master Page attached, this is stripped out when it is copied. Whilst you can copy regular web pages as a Master Page, you cannot convert a Master Page into a regular web page.
Master Pages are an essential tool for all EverWeb users even if your website only has a few pages.
To find out more check out the video tutorial ‘Master Templates in EverWeb‘ on YouTube, or if you have any questions let us know in the Comments section below or on the EverWeb Discussion Forums.
EverWeb on Social Media
You can also find EverWeb on the following social media platforms:
Twitter handle @ragesw