
Getting Started With EverWeb 3: Master Pages
April 1st, 2016One of the key features of EverWeb that any new user will want to quickly take advantage of is Master Pages. A Master Page is like pre-printed stationery that you design yourself – effectively a ‘template’ that can be attached to your web pages to give them a uniform look and feel. If you update your website at a later date, t’s easier as you just need to edit the Master Page and the changes will be applied to all the web pages the Master Page is attached to. Master Pages are an essential time saving tool as well as giving your website a consistent look and feel throughout.
Why Use Master Pages
Master Pages are useful as much of the work you do to build your website is focused on the ‘template’ pages you create. Once attached, you can focus on the regular web page’s content as the ‘background’ work has been done already. You can create more than one Master Page if you have specific requirements. For example, a website for a media company may require a Master Page for each specific part of it’s business such as music, television, film, podcasts and so on. In this case it may be advantageous to have a specific Master Page for each section of the website.
Master Pages are great for setting page layout defaults e.g. header height, content width, background colors etc. Pages with predefined defaults create design consistency for you and your website visitors e.g. you probably want your company logo in the same place on every page. Placing the logo on a Master Page achieves this goal quickly, easily and consistently.
Master Pages enable you to make global changes from one place. Any changes made to your Master Page will be reflected in all the web pages that use it e.g. you may have a Google+ button on your Master Page. If Google updates the button, you can easily update your website by updating the Master Page and republishing. All the your web pages using that Master Page will be automatically updated.
How do Master Pages Work?
Master Pages work in the same way as regular web pages so editing them is done in exactly the same way. A Master Page is like a layer underneath a regular web page. As such, all the objects on a Master Page lie beneath the objects of the regular web page that it’s attached to. You’ll notice that when you attach a Master Page to a regular page all it’s objects are ‘locked’ with a black page symbol. The only way to edit these objects is to edit the Master Page itself. Sometimes it may be necessary to ‘float’ Master Page objects on top of the regular web page objects instead of underneath them. This can be done using the ‘Always On Top’ option in the Arrange menu or from the Metrics Inspector. For more information please take a look at the Blog Easily Create ‘Sticky’ Buttons in EverWeb.
Once created, a Master Page is ‘attached’ to one or more regular web pages.
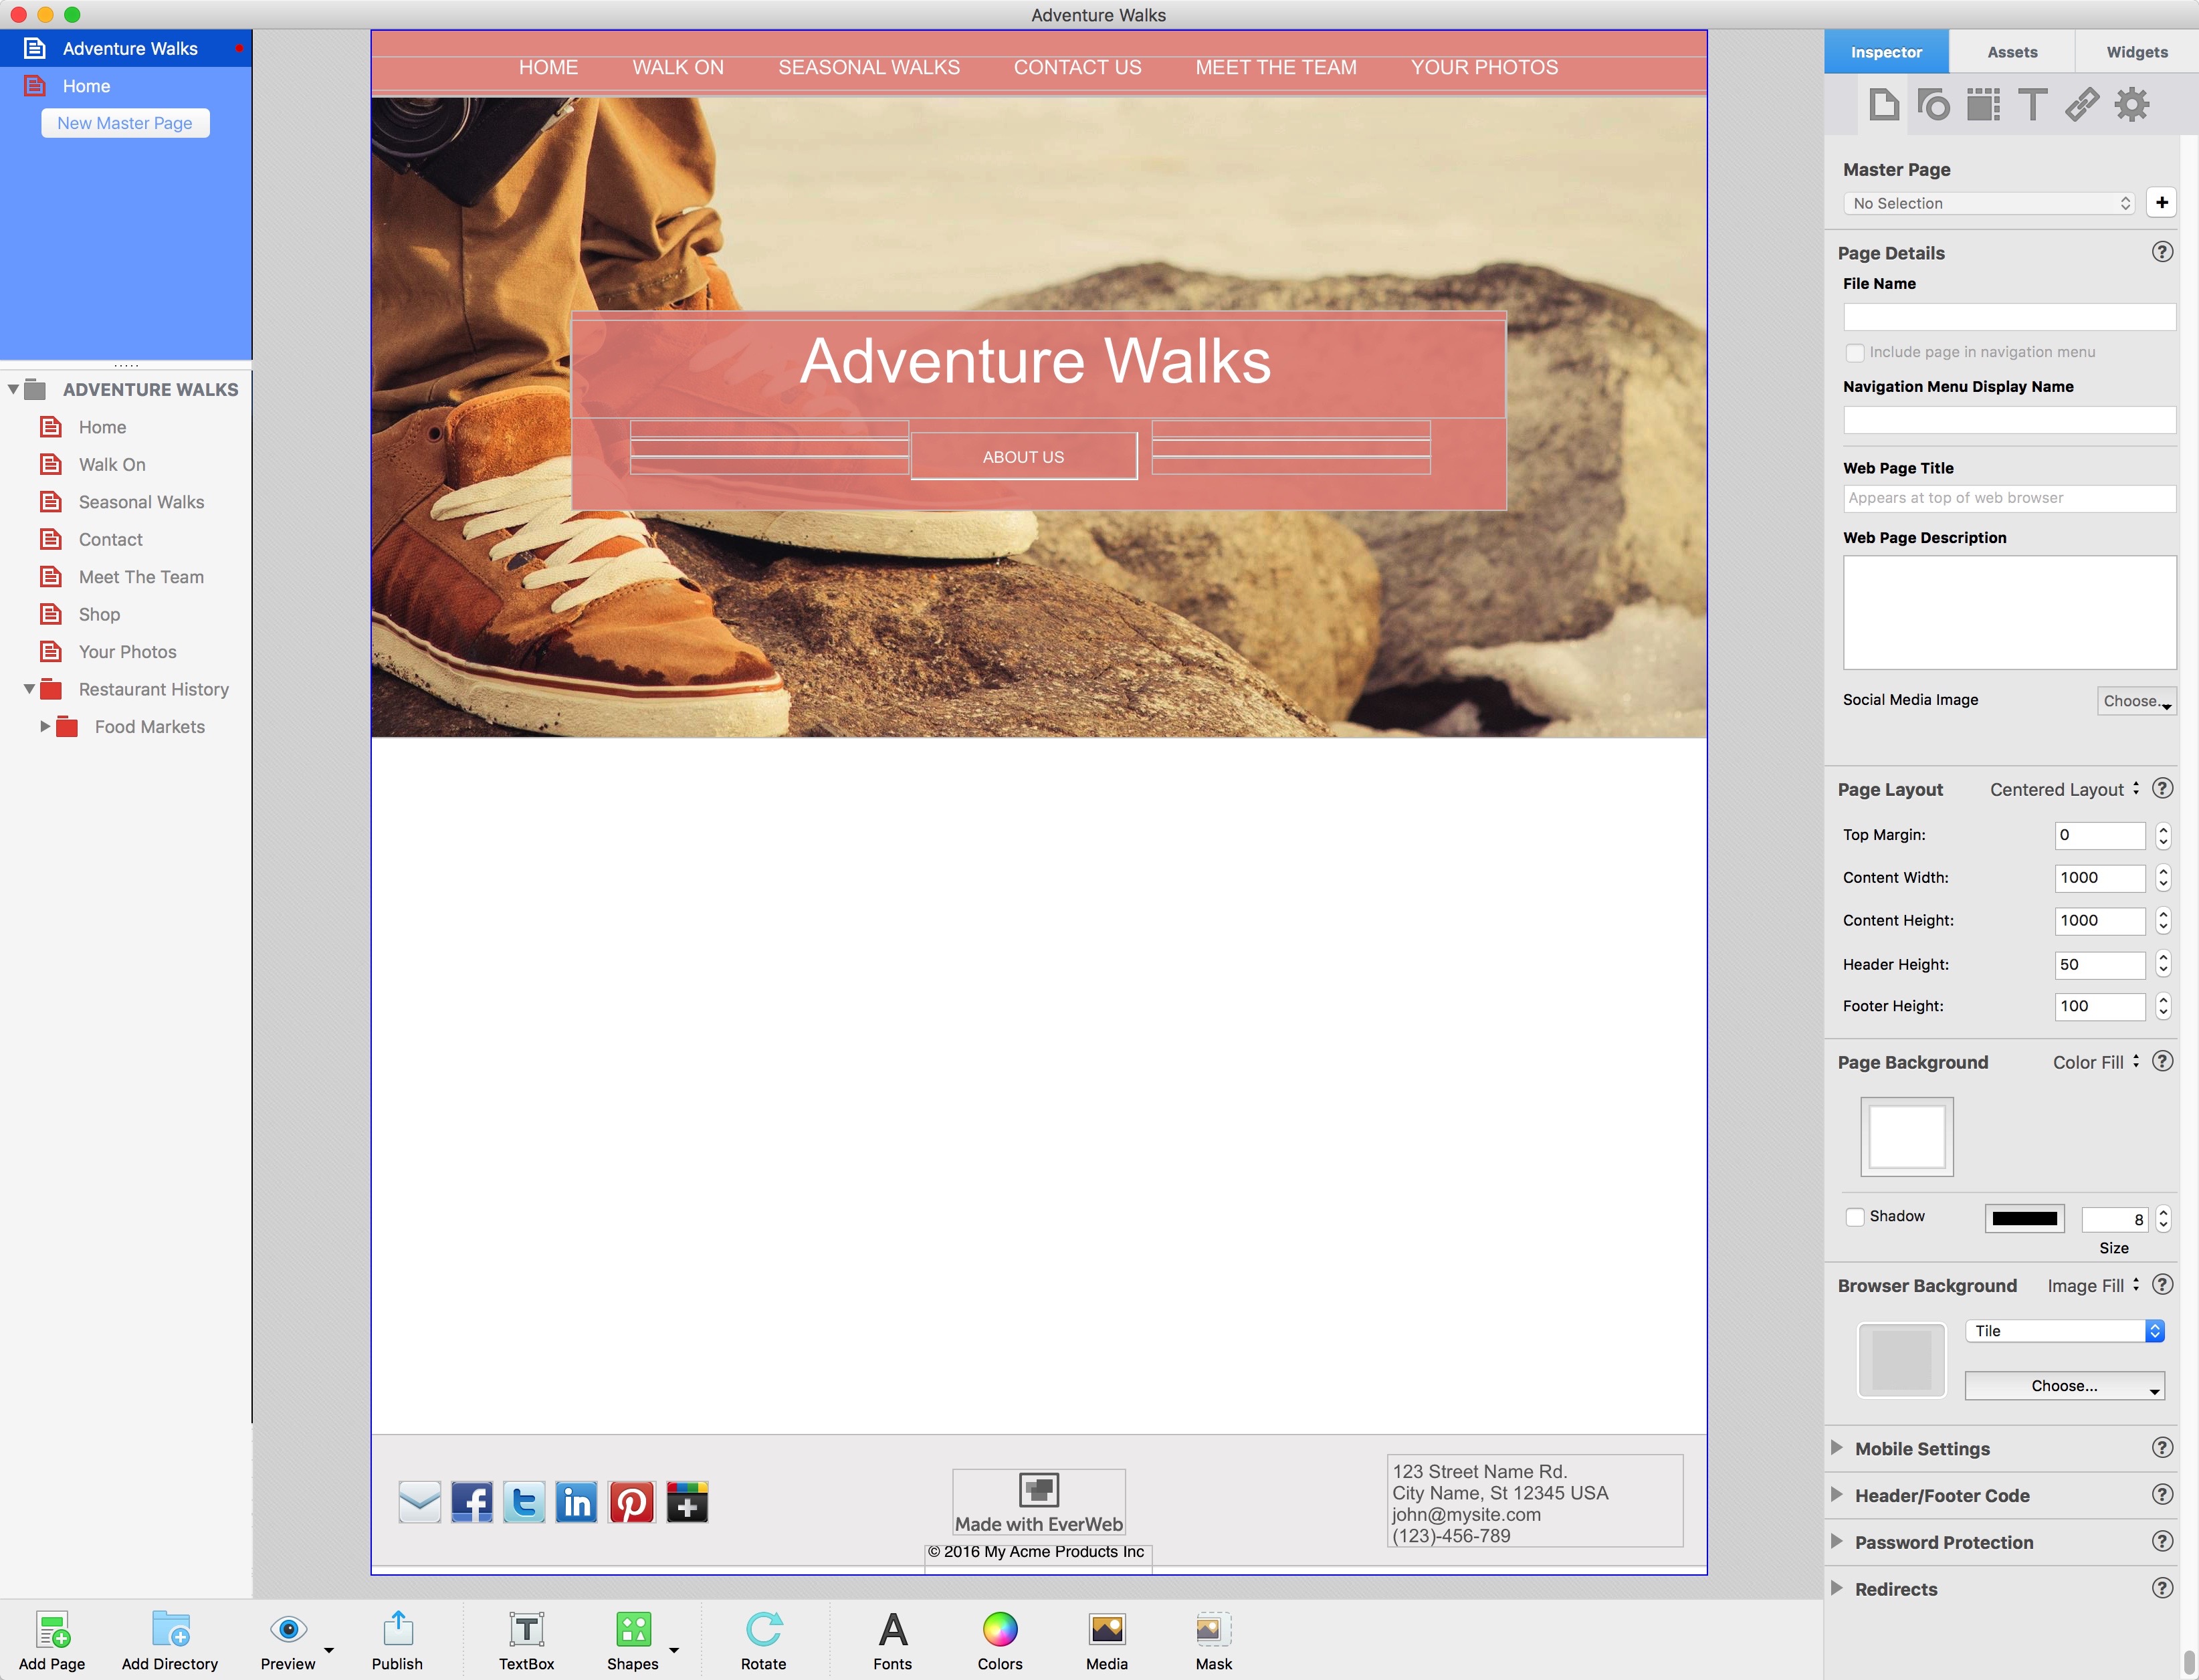
An example Master Page with a Navigation Menu Widget in the Header, a photo backdrop and company logo in the Body area, and Social Media buttons, contact details, copyright info and the Made with EverWeb logo in the Footer.
What to Include in a Master Page
It’s best to include objects in a Master Page that you want to appear on every page, or on a group of pages, in your website e.g. Social media buttons, navigation menus, company name, logo, copyright information etc. (See screenshot above.) Before adding objects to your Master Page it’s worth taking time to note down which objects you expect to appear regularly on your website pages. From this exercise you may find that you only need to use one Master Page. You may also find that you could benefit from more than one Master Page!
Remember to include any defaults that you want to apply to all pages such as Page Layout settings and styling options such as backgrounds, shapes, logos or color schemes. Additionally, Master Pages do not usually contain any page related content as this is usually added in the regular web page itself, although sometimes you may need to add some headings in to the Master Page. As such, the body area of the Master Page is usually empty of content.
Creating a Master Page
Master Pages can be created in a number of ways:
- Using the ‘New Master Page’ button in the blue Master Page area of the Web Page List. If you do not see the blue area, or the button, it may be hidden from view. Drag the separator line down the Web Page List until the blue area becomes visible again.
- Using the File -> New Master Page… menu option.
- By right clicking in an empty part of the blue area and selecting ‘New Page’ from the menu that appears.
- Using the ‘+’ button in the ‘Master Page’ section of the Page Inspector.
Using a Master Page
When creating a Master Page follow the instructions by either selecting a Theme Template style or a blank style. Once created your Master Page is added to blue area of the Web Page List. Next…
- Name the Master Page in the same way you would for a regular web page by double clicking on it’s name and overtyping the old name with the new one and pressing the Enter key to finish.
- Set up the Page Layout and Page and Browser Backgrounds as you want using the Page Inspector.
- Add the objects and Widgets you want e.g. a Navigation Menu Widget in the Header, a rectangle as a background shape, logos, buttons etc.
- Once you have completed the Master Page layout, create a new regular web page using the ‘Add Page’ button in the Toolbar. Name the regular web page in the same way as described above.
- To attach the Master Page to the regular web page, go to the Master Page section of the Page Inspector. Click on the drop down list and select the Master Page you want.
- You should now see the Master Page objects appear on your regular web page. As mentioned before, Master Page objects have a black page symbol in their top right hand corner and cannot be edited from a regular page.
- You may also notice that some options you used on the Master Page are greyed out in the Page Tab of the Inspector Window e.g. Page Layout options, Page and Browser Backgrounds etc. Again, these options can only be altered by editing the Master Page itself.
- Conversely, some Page Inspector options cannot be used on Master Pages e.g. Header/Footer Code and Mobile Settings sections are only available for use on regular web pages.
With the Master Page attached, you can now add objects to your regular page as desired.
Making Changes to a Master Page
You can make changes to your Master Page whenever you want. However, bear in mind that if you do make changes you should check all of the regular pages that use that Master Page afterwards using EverWe’s Preview button in the Toolbar. Any changes you make may affect the way in which the regular page looks e.g. be aware of any overlapping content or objects that encroach upon your page margins!
Getting the Most from Master Pages
There are a couple of EverWeb features that you can use effectively on Master Pages. Check out the Blogs Easily Create ‘Sticky’ Buttons in EverWeb and ‘How To Make Fixed Headers in EverWeb for more information on the ‘Always On Top’ and ‘Fixed Position’ features.
If you have created a regular page instead of a Master Page by mistake, you can easily ‘convert’ it by dragging and dropping the regular web page from the grey area of the Web Page List into the blue area. The will create a copy that can be used as a Master Page.
Master Pages are an essential tool for all EverWeb users. Getting to know them at the start of your website project will save you a lot of work both now and in the future!
If you have any questions about this blog please let us know! We’re happy to help. And don’t forget there are plenty of other useful resources available on all aspects of EverWeb.
- The EverWeb User Manual: The PDF User Manual can be found on the Help-> EverWeb Manual menu.
- Built in Video Links: Wherever you see a ‘?’ within a circle in EverWeb there’s a link to a video that relates to the feature next to the symbol
- www.everwebapp.com: EverWeb’s own website is a great portal to a variety of help options, from tutorials to videos to the Discussion Forum.
- This Blog: There are many different articles about EverWeb and it’s features functionality and usage to be found here.
- Social Media: EverWeb can be found on the following social media:
Twitter handle @ragesw
Next Time: Using Search Engine Opimization (SEO) in EverWeb.