
Contact Form Advanced Widget For Beginners: Form Controls
August 20th, 2023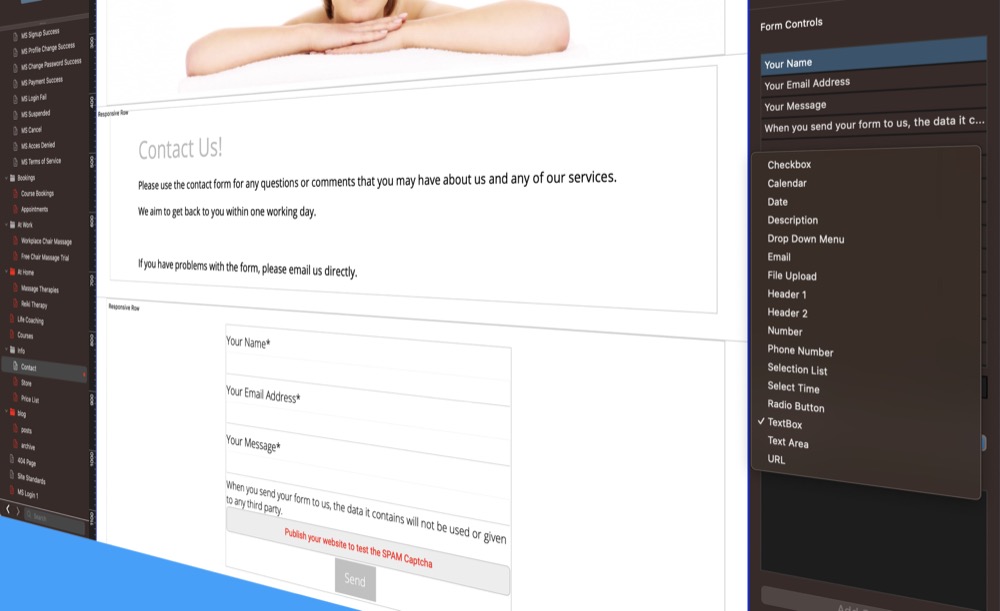
Building a contact form for your EverWeb made website is a straight forward activity for most website designers. When EverWeb 3.0 launched with the new Contact Forms Advanced widget, designing a contact form became turbocharged both in terms of the scope of what a contact form could be used for and the ways in which you could customize the form.
Since its initial release, the Contact Form Advanced widget has added plenty of new features to give you even more flexibility and customization options.
If you are new to EverWeb, you may have noticed that there are two widgets available for creating contact forms: The Contact Form widget and the Contact Form Advanced widget. We always recommend using the ‘Advanced’ widget as it offers more security from spam through using reCAPTCHA in your form and it also has more built in security features for you and your website visitors. Furthermore, the widget’s customization options far exceed the very basic Contact Form widget, which is kept as a legacy widget if really needed in your website.
Setting Up Your Contact Form
Setting up the contact form is the first thing that you should do before starting your form design. As the Contact Form Advanced widget can be customized for multiple purposes you may want to use it as a contact form, as a survey form, as a newsletter or even as a multi-choice menu! Remember also that you can have more than one contact form in your site or even multiple forms on one page in your site!
To start, go to the page where you want to add your contact form. In this example, we are going to use a contact form on a Contact Us page. Drag and drop the Contact Forms Advanced widget on to the page and fill in the first field in the Widget Settings. This is the ‘Email Address to Send Form to’ field. The next field is optional depending on whether you have purchased EverWeb’s Contact Forms Enhanced Addon. If you have purchased the Addon, select the addon from the dropdown menu. This will make form Controls such as File Upload available for use.
You can name your form in the Contact Form Name field which is important if you are using the Contact Forms Enhanced widget or where you have more than one form in your website. To allow your form to interact with the outside world, select the option in the Mail Sending field that applies to you: SMTP Details, PHP Mail or EverWeb. If you have EverWeb+Hosting we recommend using the EverWeb option. If you are using SMTP, complete the details required in the SMTP Settings section.
Once you have finished these fields you can start your form design, however, you may also want to complete the SPAM Protection section of the Widget Settings first. This section uses Google’s reCAPTCHA as a way to stop your contact form from being spammed. To use this feature, click on the ‘Sign Up for reCaptacha v2’ button. This will take you through a set up so that you can add a reCaptacha Site Key and Secret Key to your contact form.
Once finished, you can start designing your form!
Form Controls: The Heart of Contact Form Design
The heart of form design in the Contact Form Advanced widget is the Form Controls section. This is where you add fields to the Form Controls list that define the form itself. When you start a new contact form, you will see three fields in the Form Controls list by default: Name, Email and Message. Click on the control called ‘Name’ and you will see the options available for it under the Form Controls list. The first option is the Control Type. If you click on this field, you will see a list of seventeen different ‘Controls’. In the upcoming EverWeb 4.0, this list will expand to nineteen. More about that later….
Select the type of form control that you want to use. The ‘Name’ form control uses a TextBox type control but you can change this to a different Control Type if you want. All control types have their own options as well so that you can customize how the person filling in the field inputs their data. As well as changing the type of control, you can also change the Form Control’s name. Double click on ‘the’Name’ in the Form Controls list. As with all other fields in EverWeb you can now edit ‘Name’ to be whatever you want e.g. ‘First Name’. When you press enter, you will see the Form Control name is updated as is the widget in the Editor Window. Let’s duplicate this control. With the ‘First Name’ control highlighted, click on the Duplicate button which is just below the Form Controls list. ‘First Name 1’ now appears at the bottom of the Form Controls list. Double click on the ‘First Name 1’ label and rename it as ‘Last Name’. Once you have done this, drag and drop the ‘Last Name’ control to under the First Name control.
The Form Controls list works like all other Assets Lists that you find in the Widget Settings of a Widget. So you can easily move controls up and down the list, delete controls and rename them as above with ease. You can even select multiple controls and change their Control Type, e.g. if you select both First Name and Last Name controls, you could change their Control Type to e.g. Text Area.
To complete the look of your Form Controls, use the Fonts and Styles section of the Widget Settings so that the look of your form matches the rest of your page and website.
Form Design Considerations
The power of your contact form comes in determining which fields to include in your contact form and which Form Control to apply. Our advice is to plan out the form beforehand so that you can then just use your preprepared design when using the Contact Form Advanced widget. Learning more about the different types of Form Control will also be of great benefit to you as well, both now and in the future.
EverWeb’s Contact Form Advanced Widget is a great way to go beyond just creating a Contact Form. Gaining knowledge of the different types of Form Control available will prove invaluable for expanding what a contact form can do for you. There is also EverWeb 4.0 to look forward to which will include some new Form Controls and also some new powerful options for some Form Controls. EverWeb 4.0 will be available in the near future so stay tuned for the forthcoming announcement!