
Creating Your EverWeb Membership Site Frontend!
February 2nd, 2024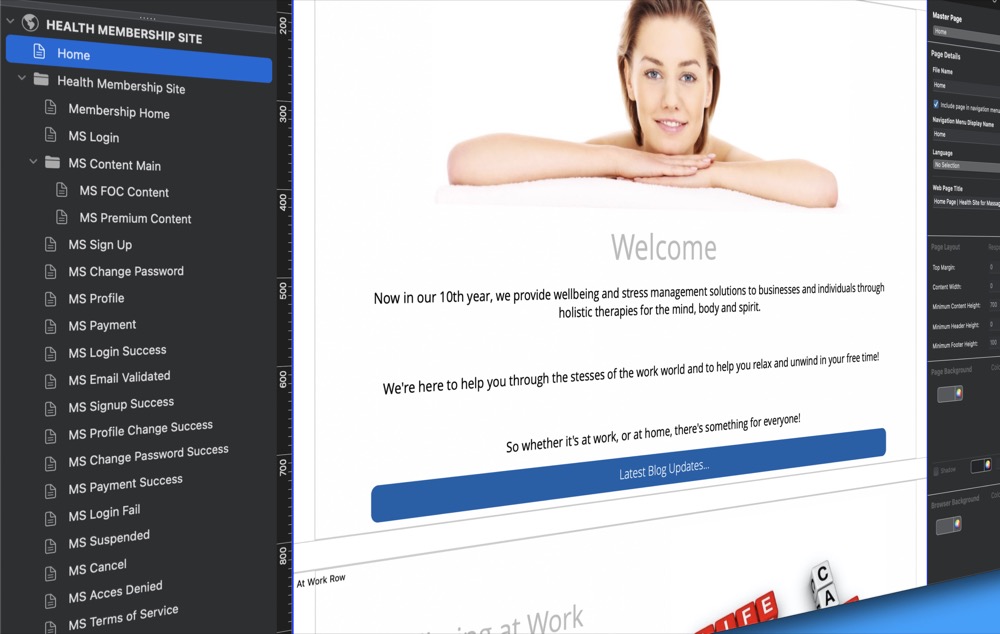
In our previous blog post about EverWeb Membership Sites, we covered how to set up all of the backend features that you will need for your own membership site in your EverWeb Client Area. In this post, we turn our attention to how to set up your membership site’s frontend features in EverWeb itself.
Before You Begin…
We are going to assume that you have already done the following:
- You are using EverWeb version 4.0 or Higher for macOS or Windows
- You have already signed up EverWeb Membership Sites, either the free or paid for version
- You have already set up your EverWeb Membership Sites Backend in your EverWeb Client Area
Installing EverWeb Membership Sites Widgets
When you sign up to EverWeb Membership Sites, you will receive an email with a link in it to download a set of widgets specifically for use in your membership site.
- Use the link to download the set of Membership Sites widgets to your computer, for example to your desktop, or your regular downloads area on your computer.
- Next launch EverWeb and open the project file that you want to build your membership site in.
- After opening your project file, click on the Widgets tab in the Inspector Window.
- Drag and drop the Membership Sites set of widgets from their location on your computer on to the widgets in the Widgets tab.
- The Membership Sites widgets will be installed.
Creating Your Membership Site’s Structure
When you create your membership site in EverWeb, you have two options as to how to begin
- You can create your membership site within an existing EverWeb Project file which is probably how most users will begin.
- Alternatively, you can create your membership site in a new Project file and link it back to your main website Project file. This may be more suitable if your main website is very large, and it would be more manageable to have the membership site as a separate project.
For most users it is probably better to create your membership site within your existing project file which is what we will be doing in the following scenario.
When creating your membership site, we recommend that you create a directory in which to store your membership site’s page. To do this, simply click on the ‘Add Directory’ button in the Toolbar. Select the Theme Template that you want to use, or select the Blank, or Blank Responsive, Home page if you are creating your membership site’s pages from scratch.
If you are using a blank page to create your membership site’s pages, you may also want to consider creating and using a Master Page which you can attach to your blank page. This will make creating the pages of your membership site much easier, quicker and consistent.
Name the directory appropriately, so that you will easily know it is your membership site’s directory. Remember to store all of your membership site’s pages within this directory.
If you want to change the name of the folder at a later time, all you need to do is either double click on the folder in the Web Page List then rename the folder, or select the folder in the Web Page List and use the File-> Rename menu option to rename the directory.
Creating Your Membership Site’s Pages
You will probably want to start building your membership site’s pages by first creating pages such as the Sign Up or Login pages. With the directory that you have just created still selected, click on the ‘Add Page’ button. Select the Theme Template that you want to use, then press ‘OK’ to create the new page. You should see this page under, and to the right of, your membership site’s directory. Name the page appropriately e.g. Sign Up Page.
Next, drag and drop the widget that is appropriate for the page on to the Editor Window e.g. click on the Widgets tab. If the Membership Sites widgets you have downloaded are not displayed, click on the Categories menu, then choose your membership sites widget category. In this example, we are going to create a Sign Up page, so drag and drop the Membership Sign Up Form widget on to the page from the Widgets tab.
Common Widget Features and Settings
Set Your Membership License
Once you have placed the widget on the page, you will first of all need to select your Membership Site license in the Widget Settings, if is not already selected. Most of the Membership Sites widgets require you to do this when you first add the widget to the page. Once you have chosen your membership site from the dropdown, the widget’s Widget Settings will be available for you to use.
Membership Site Settings…
The first setting of note is the Membership Site Settings… button which becomes available once you have set your Membership Sites Licence in the widget. This button appears in a number of different Membership Sites widgets. It is used to link together specific pages within your membership site.
When you click on the button, you will see your Membership Sites Account and nine different labels each with a corresponding dropdown menu. Click on the dropdown menu to select the corresponding page of the label. As you create your membership site’s pages, remember to go back to the Membership Sites Settings to complete these settings. e.g. my ‘Sign Up Page’ corresponds to the Sign Up Page label.
There are nine fields that you can complete, but only the first six are mandatory. If you do not want to fill in the other three fields, EverWeb will create an automatic response for you which you can edit in the Client Area Email Templates section. Once you have finished editing your Membership Site Settings, click on the ‘OK’ button.
Success Pages and Other Membership Site Associated Pages…
Success Pages are also a common feature that you will find in many Membership Sites widgets. Just as the name implies, these are pages you create to tell your member that what they have just done has been successful. In this example, I would create a Success Page telling the member that they have successfully signed up to my membership site. When creating a Success Page, remember to include a button to take the member back to your membership site’s Home page, or another relevant page e.g. for the Sign Up Success page, you probably would want the button to take the member to your membership site’s Login page and not the membership site’s Home page.
Our advice is to work your way through the Widget Settings until you have completed the settings. In this way, you will discover the additional pages that you should, or might want to, create e.g. in the Membership Sign Up Form widget, you can also create a Terms of Service page in addition to a Success Page.
We also recommend that when you find that there are extra pages to create, such as those described above, that you add these pages to your membership site immediately as ‘skeleton’ pages, but continue to work on the page your are on, until it is complete. After completing e.g. my Sign Up page, I would then work next on my Sign Up Success page, then on the Terms of Service page.
The Membership Sign Out Button Widget
The other feature that you generally will want to add to most of your membership sites pages is the ‘Membership Sign Out Button’ widget. This typically will appear on all of your pages except for the Sign Up and Sign Up Success Pages.
Next Steps…
Once you have completed one page, and any additional pages that it may link to, create a new page and add one of the other widgets to it. Use the same process as described above to develop the pages that your membership site will need.
Summary
Creating a Membership Site in EverWeb is easy and actually quite intuitive. Just create a page, add one of the Membership Sites widgets then follow the Widget Settings. Style and add text and images to your pages as appropriate.
In a future blog post, we will look at how to use Password Protection to enforce membership levels in your membership site. In the meantime, if you have any questions about this post, please let us know in the Comments Section below.
EverWeb on Social Media
You can also find EverWeb on the following social media platforms:
Twitter / X