Archive for the 'Company Info' Category

Choosing A Professional Domain Name

Tuesday, April 19th, 2011

Coming up with a domain can be a difficult challenge. Determining whether to use keywords, or business names in your domain name can be a tough decision. This tutorial will discuss this issue, and hopefully guide you in the right direction. Even if you already have a domain name, it can be a good reference for any future domain names you plan on purchasing. Remember to register to view the entire SEO course, and to ensure you are watching the most updated video tutorials.

Video Transcript

Many of you may already own your own domain name, but for those who don’t, or for those who are considering buying a new one, there are a few things that I want to discuss with you.

When choosing your domain name, you have two options. The first option is to make your domain name something along the lines of your company name. The other option is to have your domain name contain one of the key-terms you have recently researched. You will see that as I flip through these websites, some have company names as domains, while others have key-terms. Some sites even have a combination of both.

If your company name is already branded, it will make most sense to include the name in your domain. If you are able to include keywords in your domain, it certainly will not hurt you when it comes to rankings. Including a key-term in your domain will give search engines another indication as to what your website is all about.

I wouldn’t put too much debate into deciding whether to use a company name or a key-term as the domain. The domain is something you will not be able to change. If you can’t make up your mind, I would suggest using your company name over a key-term. The reason for this is because your company name most likely won’t change, similar to how you won’t be able to change your domain.  You also want something that has the potential to become a branded name. A key-term doesn’t not give you that opportunity.

While it may be an added bonus to have the key-term in your domain, it won’t make too much difference in the long-run. And like mentioned earlier, you can always do the combination of both company name and key-term.

When you are deciding on what domain to use, you can use the domain checker on our site at www.ragesw.com. Although they are not easy to remember, domains with dashes separating the words are easier for search engines to differentiate between the words in the phrase.

If you already have a domain, and have been concerned with its brand-ability, don’t worry about getting a new one. It may benefit you to use the one you already have as many people believe new sites struggle to rank for the first 6 to 9 months, almost as if they must pass a probationary period before search engines trust them.

How To Use MapDesign With RapidWeaver

Wednesday, March 9th, 2011

In this video, we’re going to show you how you can add an image map made in MapDesign to a RapidWeaver 5 website.

Video Transcript

There are two types of image maps that you can make in MapDesign. A Simple map, and an Effects Map. This tutorial is going to show you how you can add a Simple Map to your RapidWeaver website.

After you have created your image map, you will need to export the image map by pressing the Export To Web Site button. Make sure Simple Image Map is selected and press the Next button and save your image map.

Once you save your image map, you will notice that you have an index  file, as well as an images folder that contains your image.

Open RapidWeaver and add a new page. Make sure you select the HTML Code page. Next, open the images folder, and drag and drop the image into the Resources section.

Now open up the index file in an HTML editor so that you can see the code. Highlight all of the code that is within the opening, and closing body tags. Copy this code, and go back to RapidWeaver, and paste the code in your HTML Code page.

Locate the image path, and replace images with resources just like I have done.

When you press the preview button, you will see your image map, and you can test to see if it works by clicking on the hotspots.

Success at Macworld Expo 2011

Friday, February 4th, 2011

Macworld Expo 2011 was a great success for RAGE Software this year. The entire show was extremely well attended, it was difficult to walk through the hall at certain points. Our booth was packed for pretty much the entire 3 days, leaving very little time for rest. We heard that this year’s Expo had more companies exhibiting than last year which is a great sign for the future of the show.

Overall we are extremely happy with how the show went. We talked to existing customers, met some new ones and demoed some of our new software which will be released in the coming months. We got great feedback on our entire product line. It is always great to hear face to face stories on how our products have helped!

We have published a Macworld 2011 Photo album on our facebook page. Check it out to see how busy the show actually was. Hope to see everyone back there in 2012!

Come Visit us at Macworld 2011 – Booth 448

Tuesday, January 18th, 2011

Once again we will be exhibiting at Macworld Expo 2011 in San Francisco from Jan 27 – 29. Come stop by our booth (#448) to take a look at some of the great new products we have lined up for 2011.

If you have questions about our SEO Software, SEO Training Courses, or Web Hosting stop by and we would be happy to help!

We are very excited for this year’s Macworld and hope to see you there!

Add an Email Signup Form to Your iWeb Website

Sunday, January 16th, 2011

If you have an iWeb website and always wanted to start a mailing list, now you can with MailShoot, the fully featured newsletter and email management software.

MailShoot will let you instantly create an online sign up form for your iWeb website without any technical skills on your part. MailShoot can publish a signup form to your website with just a few clicks.

Once your sign up form is on your iWeb website you can start collecting emails. Then you can send email updates to all, or certain segments of your list. Check out this video tutorial which shows you exactly how to create your sign up form and publish it on your iWeb website.

If you have just started an iWeb website and are looking to get more visitors to your site, check out our SEO for iWeb Walkthrough tutorial.

How To Wrap Text Around An Image In iWeb

Monday, December 13th, 2010

To wrap your text around an image in iWeb, you must remember to insert the image into the textbox. The following video tutorial will demonstrate this, along with the common mistake that many users make when trying to wrap text around an image in iWeb. Remember to check out our SEO For iWeb video tutorial to learn how to make your iWeb website rank higher in search engines.

Video Transcript

In this video tutorial, I am going to show you how to wrap text around an image in iWeb. Before I show you the proper way of doing it, I am first going to show you a common mistake people make when wrapping their text around an image.

The first thing I am going to do is insert my image by selecting Insert in the Menu bar, and then going to Choose. This isn’t the only way to insert an image, but it will do for this demonstration.

Now that my image has been inserted, you will notice that I can move it around and place it wherever I want. I’ll open the Inspector and then the Text tab, and then the Wrap tab. Now you will notice that the Object Causes Wrap option cannot be selected. This is the problem that many users face. Here is how we solve it.

First, I’m going to delete the image that I just inserted, and now I will click within the text box, and reinsert the image again.

So now that the image is within the textbox, I will once again open up the inspector, and you will notice that the Object causes wrap option is no longer greyed out and I can now select it. I can also choose to align my image left or right.

I can also move the image in the textbox, and make it bigger or smaller.

And that’s how you wrap your text around an image in iWeb.

Local Business Owners, Target Your Local Customers in Google

Friday, November 5th, 2010

People from all over the world are using Google to find what they are looking for. Whether it is products, services or information, everything they want to know can be found by “Googling It”.

If you have a business located in Canada that can only service customers locally, what good does it really do you to show up for a searcher in Australia. They can’t use your products or services so you shouldn’t have to care whether or not an Australian user can find you when they search.

With your Google Webmaster Tools Account and your XML Sitemap file, you can actually target only local users. Meaning when a Canadian searches for your website you are more likely to appear for them than if an Australian searches for your website. You can do this by clicking a single checkbox in your Webmaster Tools account.

Watch our step by step video tutorial to find out how;

Make sure you have created and submitted your XML Sitemap file. If you want more tips and advice we have our step by step walkthrough SEO videos which explain everything you need to know about optimizing your website for the best possible search engine rankings.

iLife 11 Released; No Updates for iWeb

Wednesday, October 20th, 2010

Apple today announced an update for iLife with some very cool new features to iPhoto, iMovie and Garageband. However, iWeb has not been updated at all.

When you buy iLife 11 you will get iWeb v3.0.2, the latest official release from Apple. This has been posted on Apple’s website on the iLife 11 Store Page. Scroll down near the bottom of the page and you will see;

What’s in the Box

  • DVD containing iPhoto ’11, iMovie ’11, GarageBand ’11, iWeb (v3.0.2), iDVD (v7.1)
  • Electronic documentation

I know many people were waiting for an iWeb update, unfortunately nothing is new with iLife 11.

SEO For RapidWeaver – How To Optimize Your RapidWeaver Website For Google

Thursday, October 14th, 2010

Update: The SEO for RapidWeaver Walkthrough Video Tutorial has been released. The tutorial will walk you through the entire process for optimizing your RapidWeaver website. The tutorial will be a huge time saver as it will teach you about the SEO methods, while also showing you how to accomplish them very quickly.

Optimizing a RapidWeaver website for search engines can be challenging, but can also be fairly easy when you know what to do, how to do it, and where it can be done.

Whether you are a beginner to RapidWeaver, or you’ve been using it for a long time, search engine optimization (SEO) can be a brand new subject to many webmasters. This article is meant to push you in the right direction for making your RapidWeaver website more search engine friendly. Read each step carefully, and follow the tips and advice accordingly.

Page Titles

Page titles (also known as ‘Title Tags’) are one of the most important SEO elements. They can really give search engines a great understanding of what a website is about. Page titles are found at the top of your web browser. A good page title is keyword rich and accurately depicts the content of each web page.

RAGE Software Title Tag In Safari

Changing your page titles in RapidWeaver is very easy to do. Simply highlight the page that you wish to update, and click on the Page Info button in the top right corner of RapidWeaver.

Under the General tab, locate the Browser Title field box, and enter your title tag. Remember to repeat this process for all of the pages on your website.
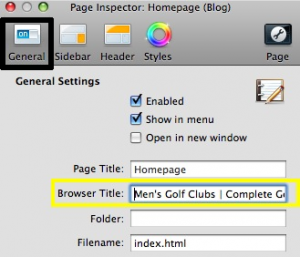
Title tag in RapidWeaver

Here are a few tips to keep in mind when making your title tags:

  1. Do not make your title tags excessively long
  2. Make sure your title tag is relevant to the actual page
  3. Each page should have a unique title tag

Did you know?

Your title tag is not only important for search engine optimization, but it is also very important for getting users to click on your website in the search results? The title tag also appears as the clickable link in the search results, making it an important factor for encouraging visitors to go to your site. An uninteresting title tag will certainly turn away potential visitors, while an attractive, and relevant title tag will surely increase your traffic.

Title tag in the search result

Page Description

The page description, much like the title tag, can be a very important factor for getting visitors to click on your website in the search results. A large majority of the snippets you see beneath the title tag in the search results come from the page description.  Because of this, it is very important for us to create exceptional page descriptions that are keyword rich and are convincing to people who are viewing them in the search results.

Meta Description In HTML Source Code

Description in the search result

To change your page description in RapidWeaver, highlight the page that you wish to update, and click on the Page Info button. Ensure that the Header tab is selected. The next thing you are going to do is press the ‘Plus’ button which is located on the right hand side of the window, almost half way down.
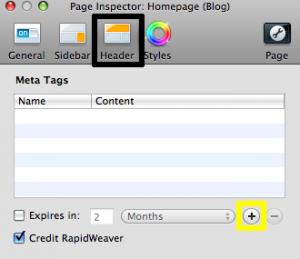
page description in rapidweaver

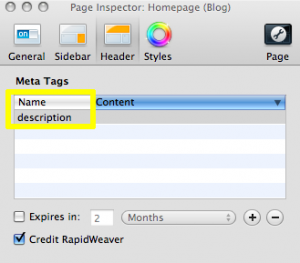
In the name field, type the word ‘description.’
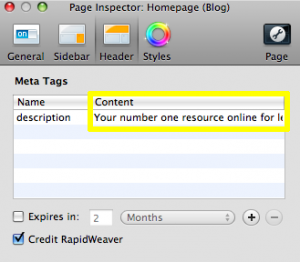
In the content field, type in your desired page description. Remember to make the description enticing enough for visitors to be interested in going to your website and learning more.  Since every page on your website is unique, so should each page’s description. Keywords are bolded in the search engine snippet when they match up with the users search query, so make sure to use good keywords in your description.
Anchor Text

The text we use to link to other pages on our website (or to external sites) can play an important role for search engine optimization. You have probably seen many websites use the phrase “click here” when linking to one of their pages.

Using “click here” for the anchor is wasted opportunity. Whenever linking to pages within your website, it is best to use keyword rich anchor text. Search engines rely on anchor text to identify what a page may be about.

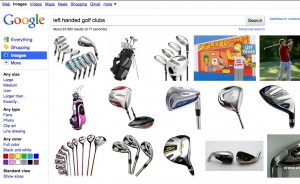
For example, let’s assume a website sells left handed golf clubs. There are many different websites linking to this website using the anchor text “Left handed golf clubs.” Search engines now know to relate this website to left handed golf clubs. The end result will be better rankings for this website for that exact phrase.

Alternative Text For Images

Image search engines have become increasingly popular over the years. While it may be difficult for search engines to understand what a picture is about, there are ways that we can help. Utilizing an images alt attribute can help us accomplish this. The benefit of this optimization is two-fold: Gaining more traffic from image searches, and being useful to users who are using browsers that do not support images.
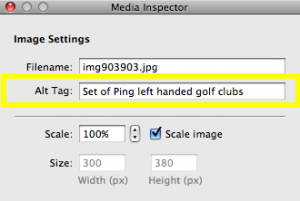
In RapidWeaver, select an image, and then press the Media Inspector button. In the Alt Image field, type in your Alternative Text for your image. Remember to be descriptive, while not keyword stuffing. Avoid making your alt text misleading in any way.
Meta Keywords

While many people are aware that meta keywords are not important to Google, there still may be some search engines that do take this attribute into consideration. Because of this, it is always a good idea to add some keywords to every page of our website.

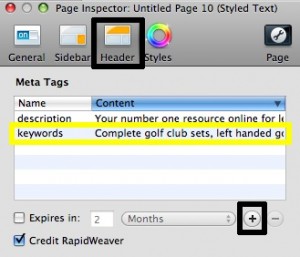
This process is going to be very similar to the page description process. Press the Page Info button, and make sure you are on the header tab. Press the ‘Plus’ button, and under the Name heading, type in ‘Keywords.’

In the content section, type in your keywords. Remember to separate each keyword or phrase with a comma. Do not add keywords or phrases which are irrelevant to your page. Keep this section to a minimum. Adding a bunch of keywords and phrases will not help your efforts. As an example, if this page was about left handed golf clubs, it wouldn’t make sense to add the phrase ‘Right handed golf clubs’ in the meta keywords. It would be more appropriate to save that phrase for your right handed golf clubs page.
Header Tags

In HTML, there are 6 header tags;

  • H1
  • H2
  • H3
  • H4
  • H5
  • H6

H1 is the “highest” and H6 is the “lowest.”

In search engine optimization, text within an H1 tag lets search engines know that the webmaster considers that text to be important. This gives a good indication to search engines as to what the page may be about.

RapidWeaver does not offer the most flexible way for putting unique H1 tags on every page. Instead, we are able to add one H1 tag, and one H2 tag that is constant across all pages on our website.

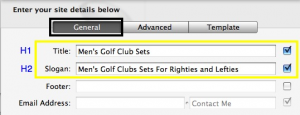
Click on the Setup button.

On the General tab, the Title is where our H1 tag goes, and the Slogan is where our H2 tag goes.
There are ways around this header situation, however, they are beyond the scope of this tutorial. For the time being, place any keywords you feel are appropriate for a header consistent throughout your entire site. If a business name is most appropriate, then that is what you should put as the header.

Add e-commerce to iWeb Website with Paypal

Wednesday, September 22nd, 2010

Have you ever wanted to use your iWeb site to sell products or services? Maybe you want to start your own business and don’t know how to get started selling products online.

It’s actually very easy to set up an e-commerce store with iWeb and Paypal. The benefit of using Paypal is that you don’t need to worry about having a secure server, setting up a merchant account, fraud, chargebacks and everything else that comes along with accepting payments online.

Even if your customers don’t have paypal accounts, although many do, they can still use their credit cards to make a purchase online. You are notified instantly once the payment is added to your account.

We have posted a step by step video explaining how to add Paypal to your iWeb site so you can start selling online.

Building Trust Online

There are still many people who are nervous to purchase something online. Another benefit of using Paypal is people know they can trust them. But how can you let them know that they can trust you? Here are some tips for building trust online;

  • Have a real domain name and avoid using your web.mac.com name if you are using MobileMe. Domain names are cheap, they only cost a few dollars a year, and they show you are serious about your online business. You can get a business domain name here.
  • If you are using MobileMe to host your website, be aware that it is not meant for business websites, just personal sites. Consider a real web host for faster servers, the ability to handle an increasing number of visitors and more options with what you can do with your website (see for example our URL shortening video for iWeb sites.
  • Include a privacy policy so your customers know what information you collect from them and how you use their information.
  • Include your address and an easy way for customers to contact you.
  • If possible, provide some kind of money back guarantee. If your products are good, you shouldn’t expect many people to want a refund.
  • Remember that search engines are always the best way to at attract new and targeted customers to your website. Check out our step by step SEO for iWeb instructional course which provides a complete walkthrough on how to optimize your website.