
Create Your First Blog Post in EverWeb 2.0!
November 30th, 2016Probably one of the first things you’ll want to do once you have downloaded the new EverWeb version 2.0 is to try out the new blogging feature. Here’s a primer to get you started…
Creating Your First Blog
Start your first blog either by opening an existing website project or creating a new one from the Projects Window.
If you opened an existing project, select ‘Add Page’ from the Toolbar at the top of the EverWeb UI in version 2.0.
If you created a new project file, EverWeb will automatically the adding new page process for you.
In both instances you should now see the Theme Template Chooser. Select the ‘Blank’ Template Theme at the top of the left hand column.
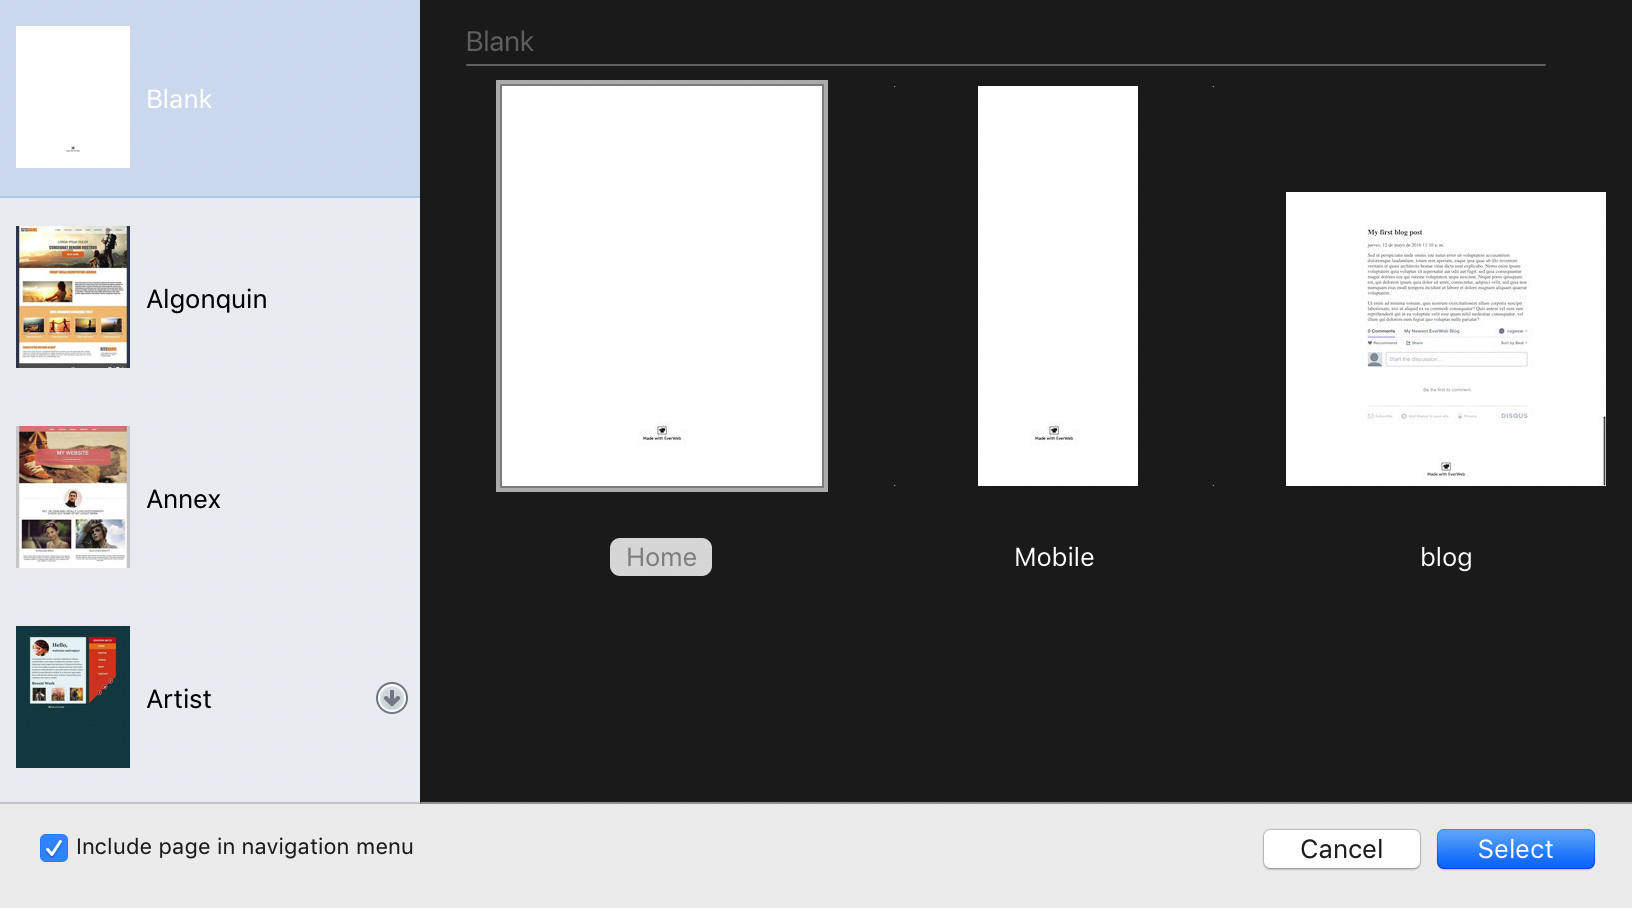
EverWeb 2.0’s Theme Template Chooser. Use the Blank theme on the left, then select the ‘blog’ page style on the right.
On the right hand column, select the ‘blog’ page theme and click on the ‘Select’ button to finish.
TIP!: If you want the Theme Template Chooser to display the pages in a row as shown above, you can resize the window. Click and drag the bottom right hand corner of the Theme Template Chooser window until the template pages display how you want them to.
You’ve now created a blog in EverWeb!
The Blog Structure
In the Web Page List you will see the blog as a folder icon. The ‘blog’ directory is always displayed open by default when you create a new blog. For those new to blogging, the blog has a specific structure.
The ‘blog’ directory page is like an ‘index’ page of your most recent blog posts. The first post in the list is the most recent followed by the remainder in reverse date order.
The blog directory contains two pages: ‘posts’ and ‘archive’. ‘Posts’ is a special page in that it contains all of the blog posts you create. It’s the heart of EverWeb’s blogging experience! The ‘archive’ page is lists older blog posts that you no longer want listed on the ‘blog’ index page.
Creating Your First Blog Post
To create your first blog post, click on the ‘posts’ page in the Web Page List. The Blog Posts Editor Window is displayed in the Editor Window in the center of the screen. This is where you will create, import, edit and delete blog posts.
EverWeb automatically creates the first post as ‘New Blog Post’. Rename the post title by double clicking on ‘New Blog Post’ in the Blog Post List in the top part of the window. Enter the title you want and press enter. All blog posts that you create will be listed in the Blog Posts List Window.
A red or green button to the left of the blog post title indicates if a blog post has been changed since last published (red) or not (green).
To select the blog post you want just click on its title.
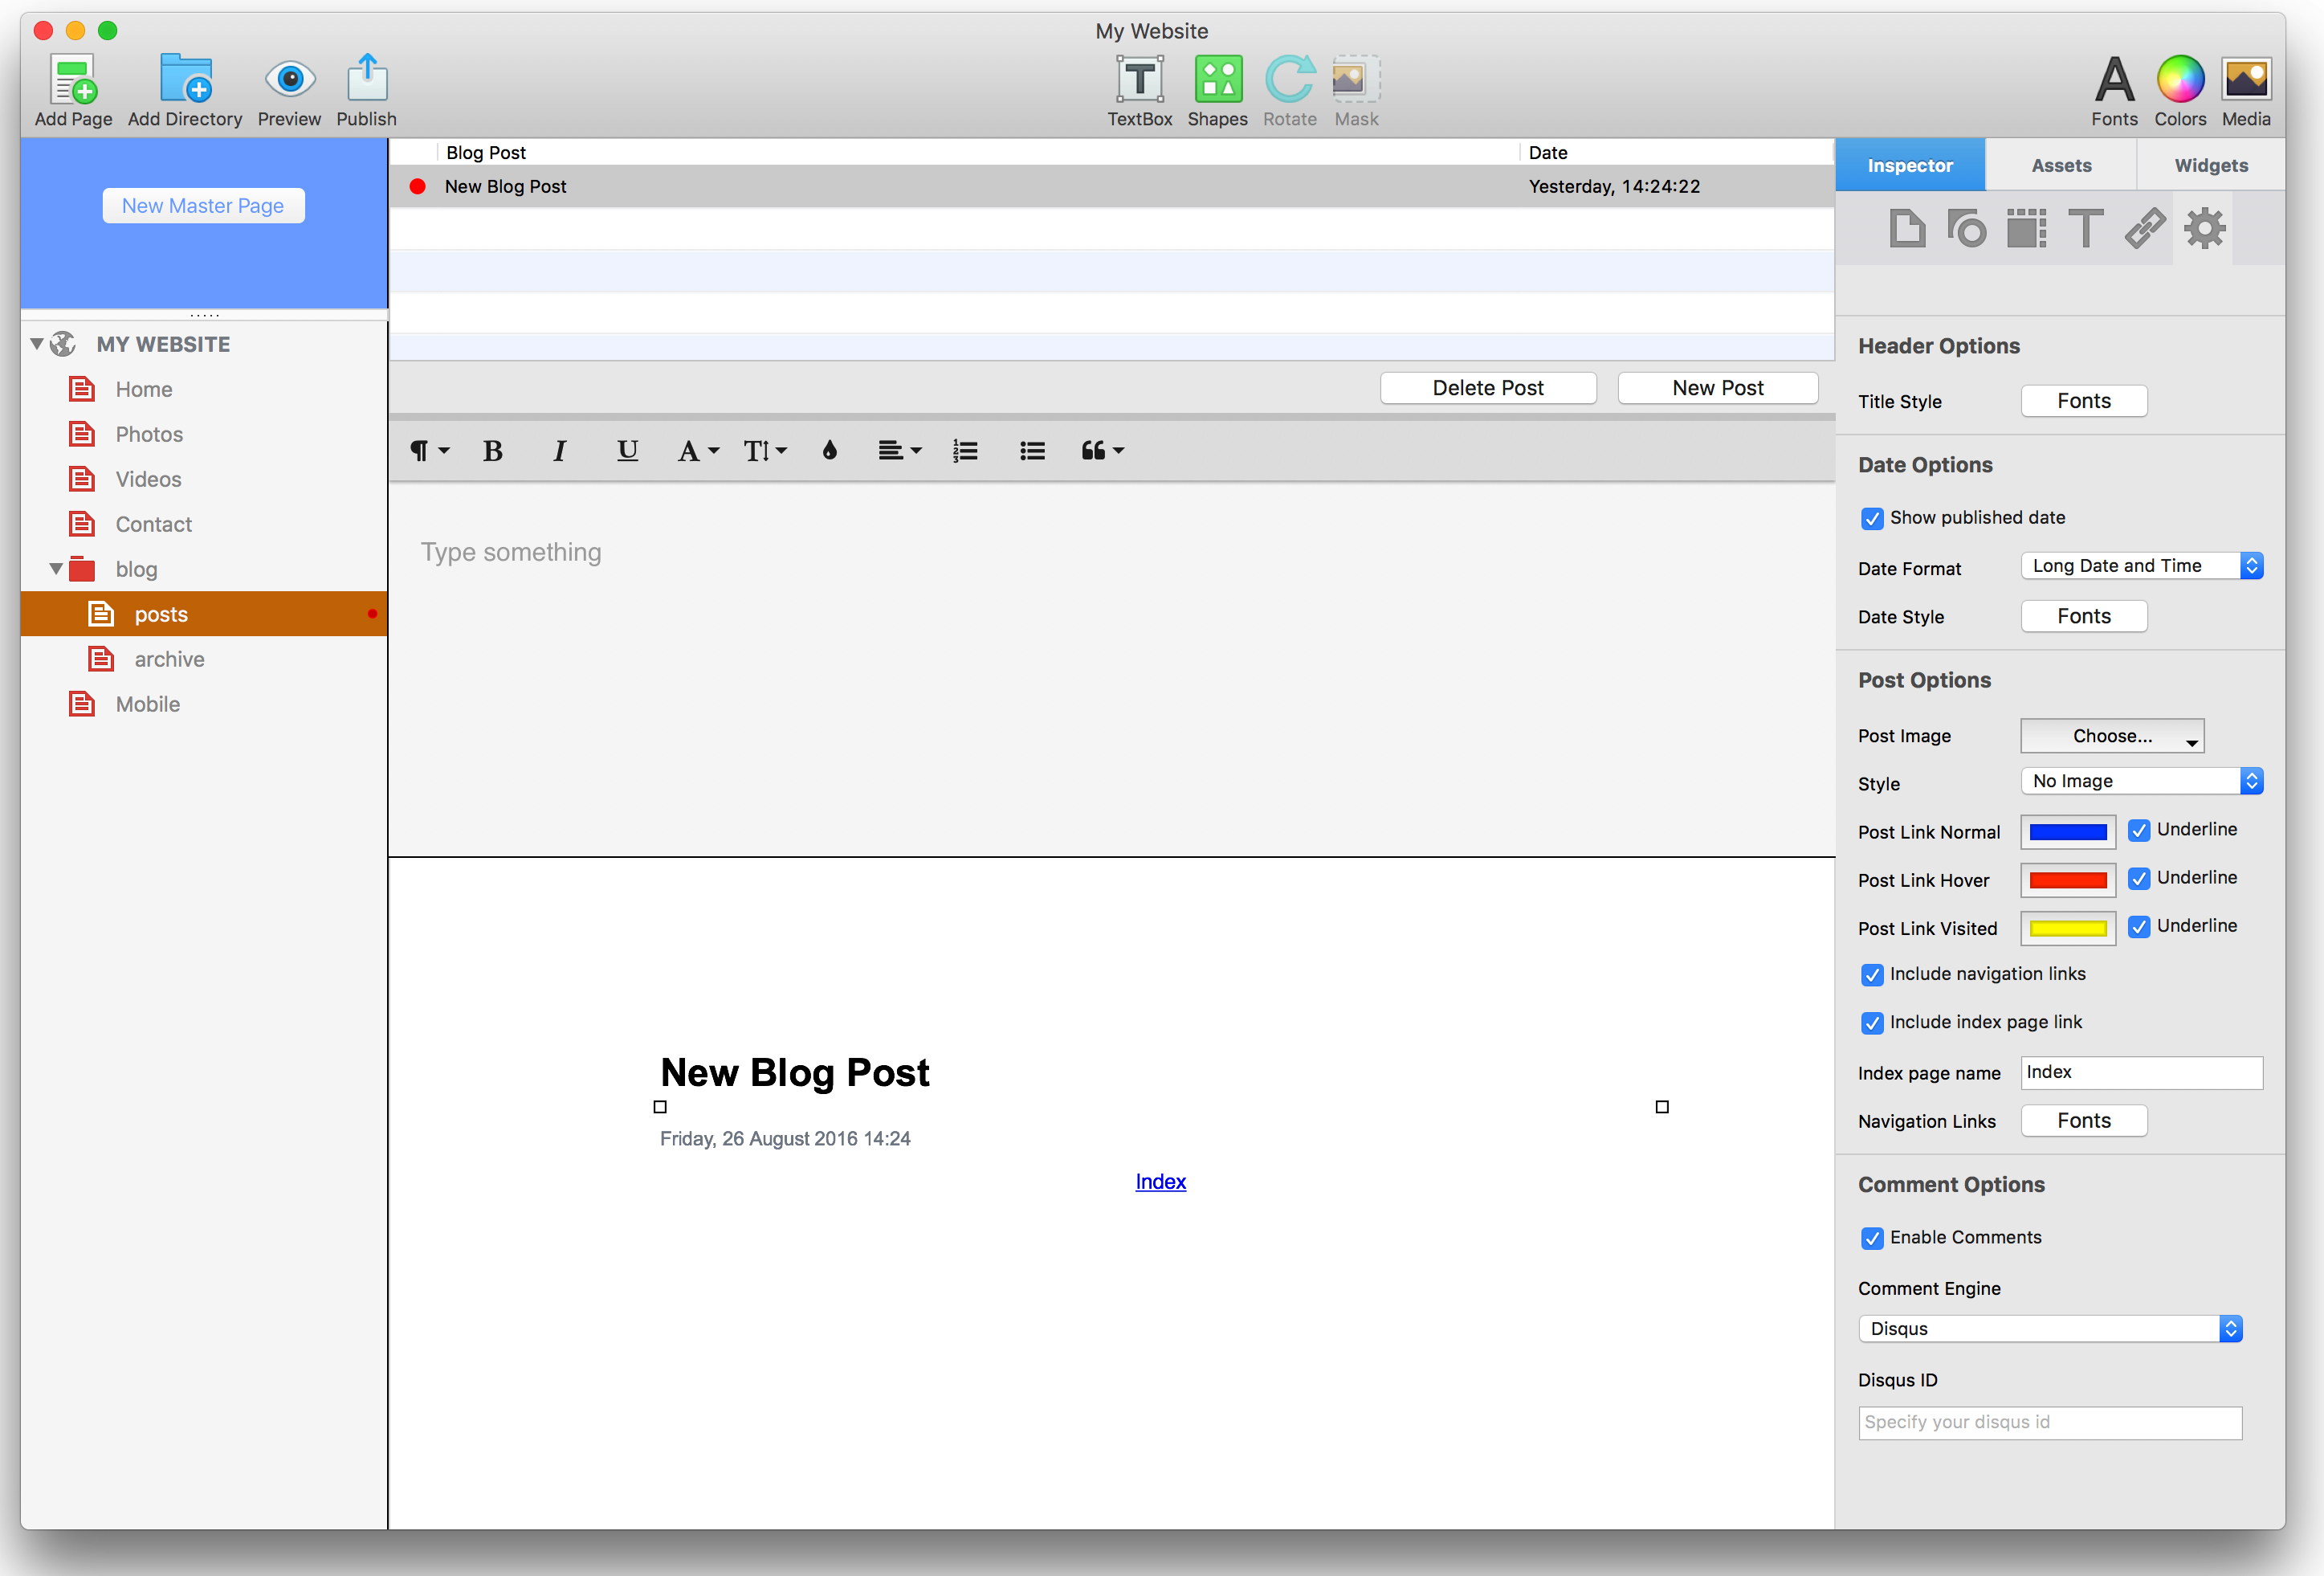
EverWeb 2.0’s blogging interface. In the center column, at the top is the blog posts list, in the middle the blog posts editor window and in the bottom section is the blog posts preview window.
Below the Blog Posts List, the words ‘This is a sample blog post’ are displayed in the Blog Posts Editor Window. Select the words and type over them with your own, or paste text in from the clipboard.
Editing Your Blog Posts
The Editor Window is where you enter your blog post text and apply formatting. For example, highlight the text you want and use the Editor Toolbar options to style your text how you would like it. Alternatively, use the Color Picker and Fonts Panel from the Toolbar.
You can also insert images, video and hyperlinks in to the Editor Window. These media apply only to the blog post itself.
TIP: Use the Blog Post Preview Window to see how the blog post will look when published. The final published post may look different than what you see in the Editor Window due to the settings you use in the Blog Post Preview Window.
A splitter bar between the each section of the Blog Posts Editor Window can be clicked and dragged up and down to display more of less content of each section.
TIP: There’s also a vertical splitter between Blog Post and Blog Date in the Blog Posts List.
The Blog Posts Preview Window
The Preview Window in the bottom part of the screen is where you see the formatted results of your work. The text from the Editor Window displays in a widget that you can position where you want in the Preview Window. Adjust the width of the widget using the selection handles. The widget height is set automatically.
The Preview Window works in a similar way to Master Pages so you can add objects such as a company logo to the Preview Window which will then display the logo in all of your blog posts.
Use the Widget Settings tab to set defaults for all the blog posts. At the bottom of the screen is where you add in your Comment Engine, either from Disqus or Facebook. For more information on using Comment Engines please look at the EverWeb User Manual via the Help-> EverWeb Manual menu.
Blog Post Formatting Tips
The Widget Settings also allow you to set the font style and sizing of the blog post title, add and define date format and styling, add Navigation Links and add an image for the post.
In addition, use the Page Settings Tab in the Inspector Window to set the page background color, page dimensions etc. as you would any other page that you create in EverWeb.
You can also use a Master Page for blog posts if you prefer or a combination of Master Page and Preview Window objects depending on what effect you want to achieve.
Once you have finished, preview or publish your results.
More About Blogging in EverWeb 2.0…
There’s lots more to explore with blogging in EverWeb version 2.0. Here are some suggested resources to help:
- Check out the Easy Blog Post Editing and Importing Your iWeb Blog Entries blogs on this website
- The updated EverWeb website which has up to the moment information in it’s new blogging section
- The new EverWeb 2.0 videos on YouTube
- The updated EverWeb User Manual
- The EverWeb Discussion Forum
If you can’t find what you need, or have any other questions, comments or feedback please let us know. We’re happy to help.
You can also find EverWeb on the following social media platforms:
Google+
Twitter handle @ragesw
December 1st, 2016 at 9:14 am
It’s really not easy to make blog. I did my on WP. Im not sure if it’s ok but I hope it will be better. Posts like yours are really helpful! Thank You Im waiting for more.
December 7th, 2016 at 2:17 pm
Thanks! We will have more on how to do lots of great things with blogging soon.
December 30th, 2016 at 3:56 pm
I am in the process of creating my website with everweb (currently my website is made with iweb) and I would like to add a blog. What I cannot figure out is: how do I link to a specific blog post in everweb. I will write about dog behavior and want to create an index where it will be easy for people to see all the articles/blog posts that I have written on certain subjects of dog behavior without having to dig through a huge list of blog posts. I would also like to be able to link to certain blog posts by way of my facebook page. Please help.
January 2nd, 2017 at 2:42 pm
Hi Jackie
Thanks for the comment. In EverWeb, first create a blog by adding a new page and then selecting the ‘blog’ page type from the ‘blank’ theme template. Once this has been created, you will see the blog displayed in the Web Page List down the left hand side of your website project. The ‘blog’ page is the index page that will link to the posts that you create. From your comment it looks as if you want to select only certain posts to display. You can create links to specific blog posts by using the Hyperlinks Inspector. You would need to create and manage your own blog main page however for this. When using the Hyperlinks Inspector you will see all of the blog posts listed when you link to ‘one of your pages’ and then select the page you want (i.e. the blog post you want). From your comment it looks as if you want to categorise your blog posts on the index page by theme so you would have to do this manually.
The other alternative is to use a search function so that your visitors can enter the keywords that they want in a search box. There are third party widgets that can do this for you and you can find out more about these at http://everwebcodebox.com/widgetbox/basic-widgets/website-search.html
I hope that helps, please let me know if you need more help!