
Using The Fonts You Want in Your EverWeb Website!
June 23rd, 2023
In the early days of personal computing, the emergence of websites was limited by restrictions in the choice of colors and fonts that you could use. The choice of fonts that you could use in a website was extremely limited. There was also the problem of font compatibility between Mac and Windows PC. Fortunately such days are long past so using fonts in EverWeb to build your site is much easier and simpler. Using fonts in your website can be done in three basic ways as described below:
Web Safe Fonts
The compatibility issue that we mentioned above led to the creation of a set of fonts that are ‘web safe’ i.e. can be used on both Windows and Mac platforms. The fonts were chosen to make sure that websites developed on one platform would look the same on a different platform. The list of fonts include stapes such as Arial, Impact, Times New Roman, Comic Sans and Courier amongst others.
The advantage of using web safe fonts in your website is that they are reliable on Mac and windows and on mobile and desktop. The disadvantage is that there are relatively few fonts to choose from. Fortunately for website developers there are two solutions to this… the first is to use External Fonts and the second is to use Google Fonts…
Custom Fonts Make Web Design More Interesting!
It became quickly apparent that there was a desire for web pages to be presented in fonts other than the limited set of web safe fonts and this led to the development of more fonts for the web. These fonts would have to be loaded on a server so that they could be downloaded for use on a visitor’s browser as needed. Such custom fonts can also be used in your EverWeb website. When using custom fonts, make sure that you have the rights to do so before installing and using them online.
Fonts on a Mac are usually either True Type Fonts (rtf) or Open Type Format (oft). Your system fonts are located in the following system (not user) folder:
/Library/Fonts/
- Add the .ttf and or .otf fonts that you want to use in to your /Library/Fonts/ folder.
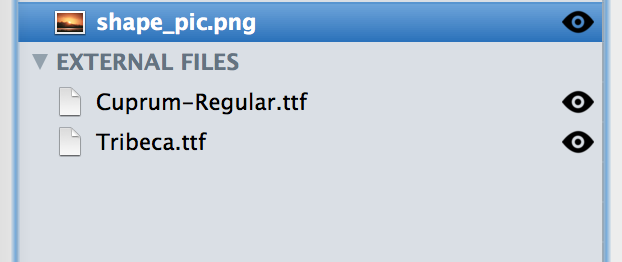
- To install your custom fonts, drag and drop your .ttf and/or .otf font files into the Assets List of your EverWeb Project. The fonts will be listed in the External Files section at the bottom of the Assets List.
- Next create a TextBox on a page in EverWeb, then use the open open the Fonts panel either using the Toolbar, or by using the Cmd+T shortcut key.
- Select your custom font. Remember that you must have your font installed on your computer for this to work.
- Make a note of the Font name as it is listed in Font Panel. You will use this name in the code you will be entering in the step below.
- Apply the custom font from the Font Panel to your TextBox.
- The final step is to make sure that EverWeb publishes your website with the custom font file(s). Click on your Project file name in the Web List or use the File-> Edit Publishing Settings menuto go to your Site Publishing Settings.
- Go to the Head Code field and enter the following code:
<style>
@font-face {
font-family: “FONTNAME”;
src: url(“FONTFILE”);
}
</style>
Replace the word FONTNAME with the Font name that you made a note of in the Font Panel. It must be exactly the same in the code as it is in Font Panel.
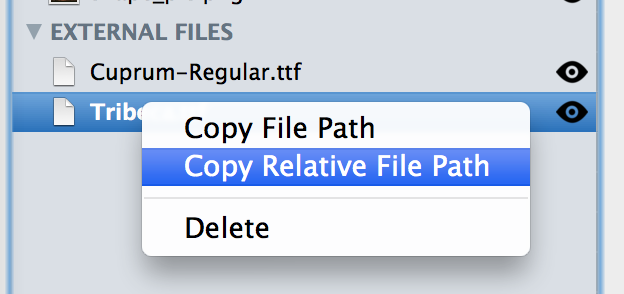
Replace the word FONTFILE with a reference to the actual font file in the Assets List. To do this, go to the Assets List. Right click on the Font file in the External Files section. From the dropdown menu, select ‘Copy Relative Path’.
Now go back to the FONTFILE reference in your Site Publishing Settings and replace FONTFILE with the reference you copied to the Clipboard. For example your code may look something like this…
<style>
@font-face {
font-family: “Tribeca”;
src: url(“{!-ASSETSPATH-!}External%20Files/Tribeca.ttf”);
}
</style>
Publish your site to test.
Using Google Fonts
The final type of custom font comes from Google in the form of Google Fonts. Google provides hundreds of free to use fonts that do not require installation on your website’s server in order for them to work. For many website developers this is makes adding custom fonts to their websites easy.
- Start by going to the Google Fonts website at www.fonts.google.com
- If you know which Google Font you want to use, simply search for it in the search box.
- Alternatively, browse the fonts and choose those you want to use in your website.
- One you have found the font I want to use e.g. Open Sans, click on the font, click on the Download Family button to download the Open Sans font family to your computer.
- The downloaded fonts will be in a .ZIP file format.
- Once the fonts have been downloaded, go to your Downloads folder on your computer and click on the ZIPfile. A finder window will open showing you the .ttf and/or .otf font files.
- Next, I will click on the arrow on the right hand side, to download the fonts. In the popup window that appears, I will click on the .zip file to download these fonts.
- To install the fonts locally, just double click on the .ttf file, then click on the Install Font button on the popup window appears. Repeat this process for all the fonts you want to install
Once the fonts have been installed, you can use them in EverWeb as you would any other font.
Adding fonts to customize your EverWeb site is easy to do, and you have great choices to suit your needs, internal fonts, custom fonts or Google Fonts!