
Better Form Designs with EverWeb’s New Contact Form Advanced Widget’s Features
March 21st, 2024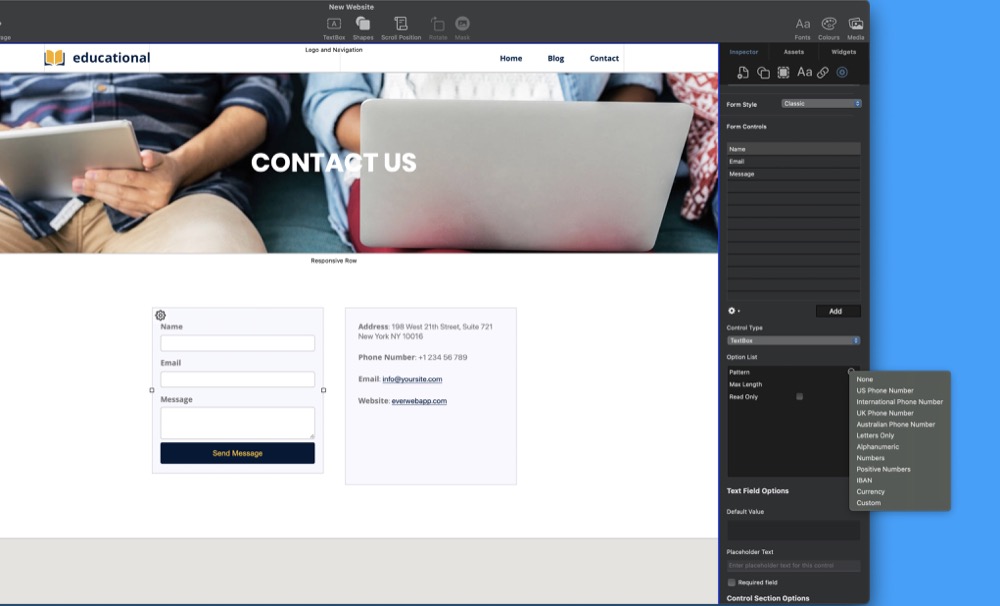
Some of the new features in EverWeb 4.0, which we introduced back in November 2023, may appear to be only minor updates, but they can have a great impact on your website’s design and its workflow. If you are using EverWeb 4.0 or higher, you may have noticed that our Contact Form Advanced widget gained a couple of new Form Controls, whilst some Form Controls garnered new options. In this post, we take a look at these new features and how they can positively impact your contact form design.
About Form Controls and Control Types
EverWeb’s Contact Form Advanced Widget uses Form Controls to create your contact form’s fields and styling elements. Each Form Control has different properties that you can change to create the form that you want. One of the Form Control’s properties is Control Type. There are currently nineteen different Control Types to choose from.
Set the Control Type to match the Form Control’s purpose, for example, if you add a ‘First Name’ Form Control to your contact form, you would probably want to make its Control Type a TextBox Control Type. If you have an ‘Email’ Form Control, then the Control Type should be set to Email.
Control Types not only control data input in to your form but also styling elements such as dropdown menus and headers. Additionally, if you use EverWeb’s Contact Forms Enhanced Addon, you also now have the ability to select which file types your form submitters can upload.
New Divider and Columns Form Controls
In our recent EverWeb 4.0 (and higher) macOS and Windows releases, we added two new Form Controls to the Contact Form Advanced widget: Dividers and Columns. These two new Form Controls are easy to use and add additional design flair to your form. Let’s start by looking at the Divider Form Control. In the examp[le below we have assumed that you have already added the Contact Form Advanced widget to your page and configured the widget for use.
- Once you have set up your contact form’s basic settings, click on the ‘Add’ button below the Form Controls list to add the new Divider Form Control to your form.
- Name the Form Control as e.g. ‘Divider’ and set the Control Type property to Divider.
- You will now see a thin line across the form at the bottom of the form, just above the Submit button.
- Move this ‘Divider’ Form Control up the Form Controls list to where you want it in order to separate one part of the form from another part.
- Once you have positioned the Divider Form Control, use the styling properties in the Options List to customize the look of the line.
- The Style option lets you choose the line style: Solid, Dashed or Dotted. Use the Size option to change the thickness of the line and the Color option to change the color of the line.
The second new Form Control is the Column Form Control. In this example, I have a ‘First Name’ Form Control and a ‘Last Name’ Form Control on my form. At present these Form Controls are on two separate lines on my form. I would like them side by side instead, so I can use the Columns Control Type to make this possible.
- Add two Form Controls to your page: ‘First Name’ and ‘Last Name’. Both Form Controls should have their Control Type set to TextBox.
- The ‘First Name’ and ‘Last Name’ Form Controls should be listed one after the other in the Form Controls list.
- Next, add a new Form Control to the Form Controls list. Name this Control as ‘Two Columns’.
- Change the Control Type to Columns.
- In the Options List, you will see that the number of Columns is already set by default to two, which is what is needed. If you want to add more space between the two columns, increase the value of the Spacing field.
- Now move the ‘Two Columns’ Form Control to immediately above the First Name field. You will now see the ‘First Name’ and ‘Last Name’ Form Control’s side by side.
Notice that the Columns Form Control only affects the Form Controls directly below it. In our examples the Columns Form Control is set to two columns so it only affects the next two Form Controls beneath it, before reverting back to the form’s one column default.
New TextBox and Text Area Form Control Options
In addition to the two new Form Controls introduced with EverWeb 4.0, there are a couple of useful additions to the TextBox and Text Area Form Controls. For the TextBox Form Control three new options: Pattern, Max Length and Max Length have been added to its Options List. The Text Area Form Control gains the Pattern option.
The Pattern option allows you to choose how you want input to be specified. When you click on the Settings button for the Pattern option you will see a list of ten predefined options for phone numbers, IBAN, and alpha-numeric input. You also have an eleventh option where you can create your own custom pattern. If you do not want to specify a pattern at all, choose the None option.
The second option, Max Length limits user input in the Form Control to the length specified. Set the value to zero if you do not want to set a value.
The last option is Read Only. If you check the box for this option, your visitors will not be able to enter any data in to the field. This can be useful for you, if the Form Control is time sensitive, or you want to block visitors temporarily from e.g. adding comments in to the TextBox or Text Area.
New File Upload Options
The last new option for the Contact Form Advanced widget is for those users who also have the Contact Forms Enhanced Addon. The addon allows your to add file uploading to your forms so your visitors can send files to you. In EverWeb 4.0 and higher, you can now specify the type of files that you want to accept for uploading e.g. PDF files, Word documents, images, ZIP files and so on. There are ten different choices available, plus options for you to customize your choice, or to accept any file type.
Contact forms in our latest release of EverWeb bring you greater design control and more Form Controls options than ever before. We hope you like these additions. Please let us know if you have any requests on features to add to the Contact Form Advanced widget in the Comments Section below!