Archive for the 'web site optimization' Category

Creating a Call To Action Container in EverWeb!

Saturday, January 17th, 2026
Create a Call To Action Container in EverWeb

EverWeb’s new Container feature is a powerful design tool, especially when used in the Responsive pages of your site. Introduced in EverWeb 4.4, Containers let you create horizontal, vertical and free format designs easily, with more flexibility than ever before, allowing you to add more features that you want, taking what you conceive into reality on your page!

A Container is an object that contains objects within it. In this post, we will explore one design possibility, other possibilities are down to your imagination!

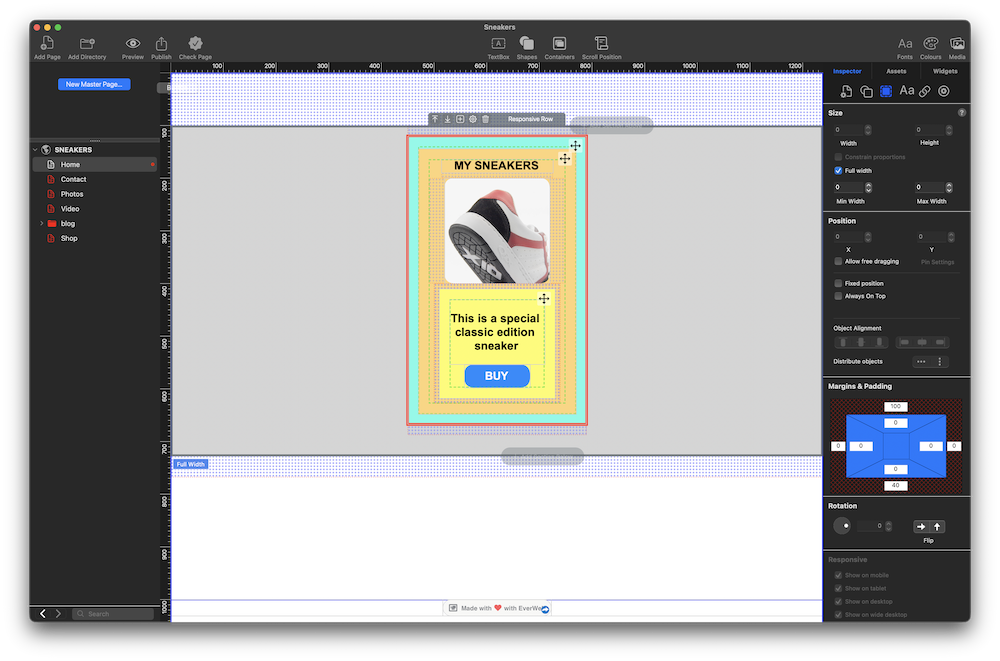
The Design Concept: Creating a ‘Call To Action’ Container

Our design has two goals to achieve: The first is to explore EverWeb 4.4’s new Container feature, whilst the second goal is to create a ‘Call To Action’ (CTA). The image at the top of the post shows these goals in action. which is to create a Container that contains an item for sale, and a buy button which is our Call To Action. The aim of the CTA is to encourage our visitors to click on the button to purchase the sneaker shown in the image in the Container.

Containers: A Quick Overview

Although you can use Containers in a fixed width environment, we recommend using them in a Responsive Page Layout as this is where their full potential can be realized.

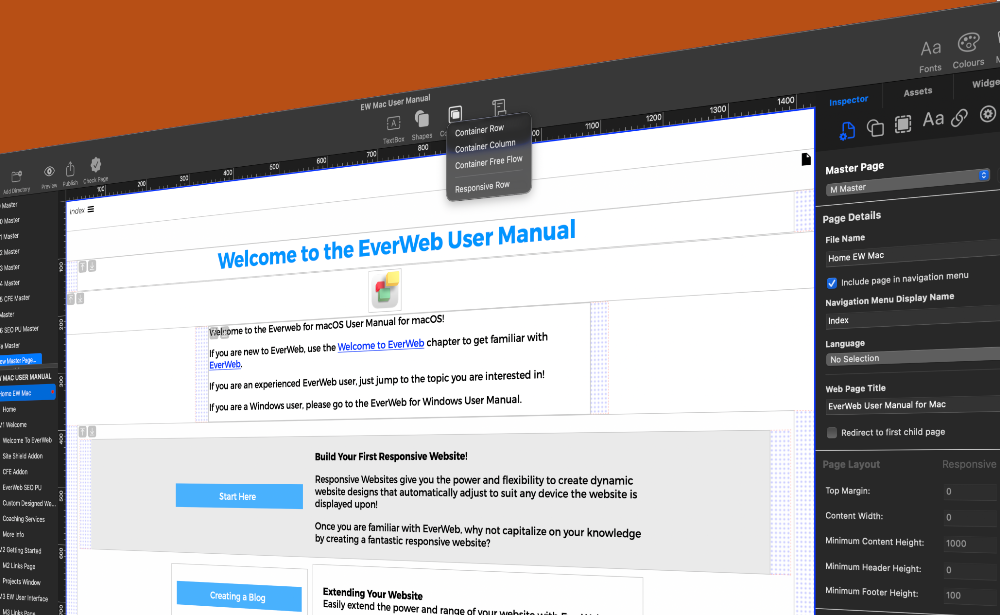
Adding a Container to a page in your site is easy, just click on the Containers button in the Toolbar. Note that there are also other ways of adding Containers to your page.

There are three types of container:

  • Container Row – Use this Container type then you want to organize objects horizontally
  • Container Column – Use this Container type when you want to organize objects vertically
  • Container Free Flow – Use this Container type when you want objects arranged in a free format way

You will also see that the Responsive Row widget is also listed. This widget is included here as it is another form of container that you can add to your Responsive page design.

Additional Container Features

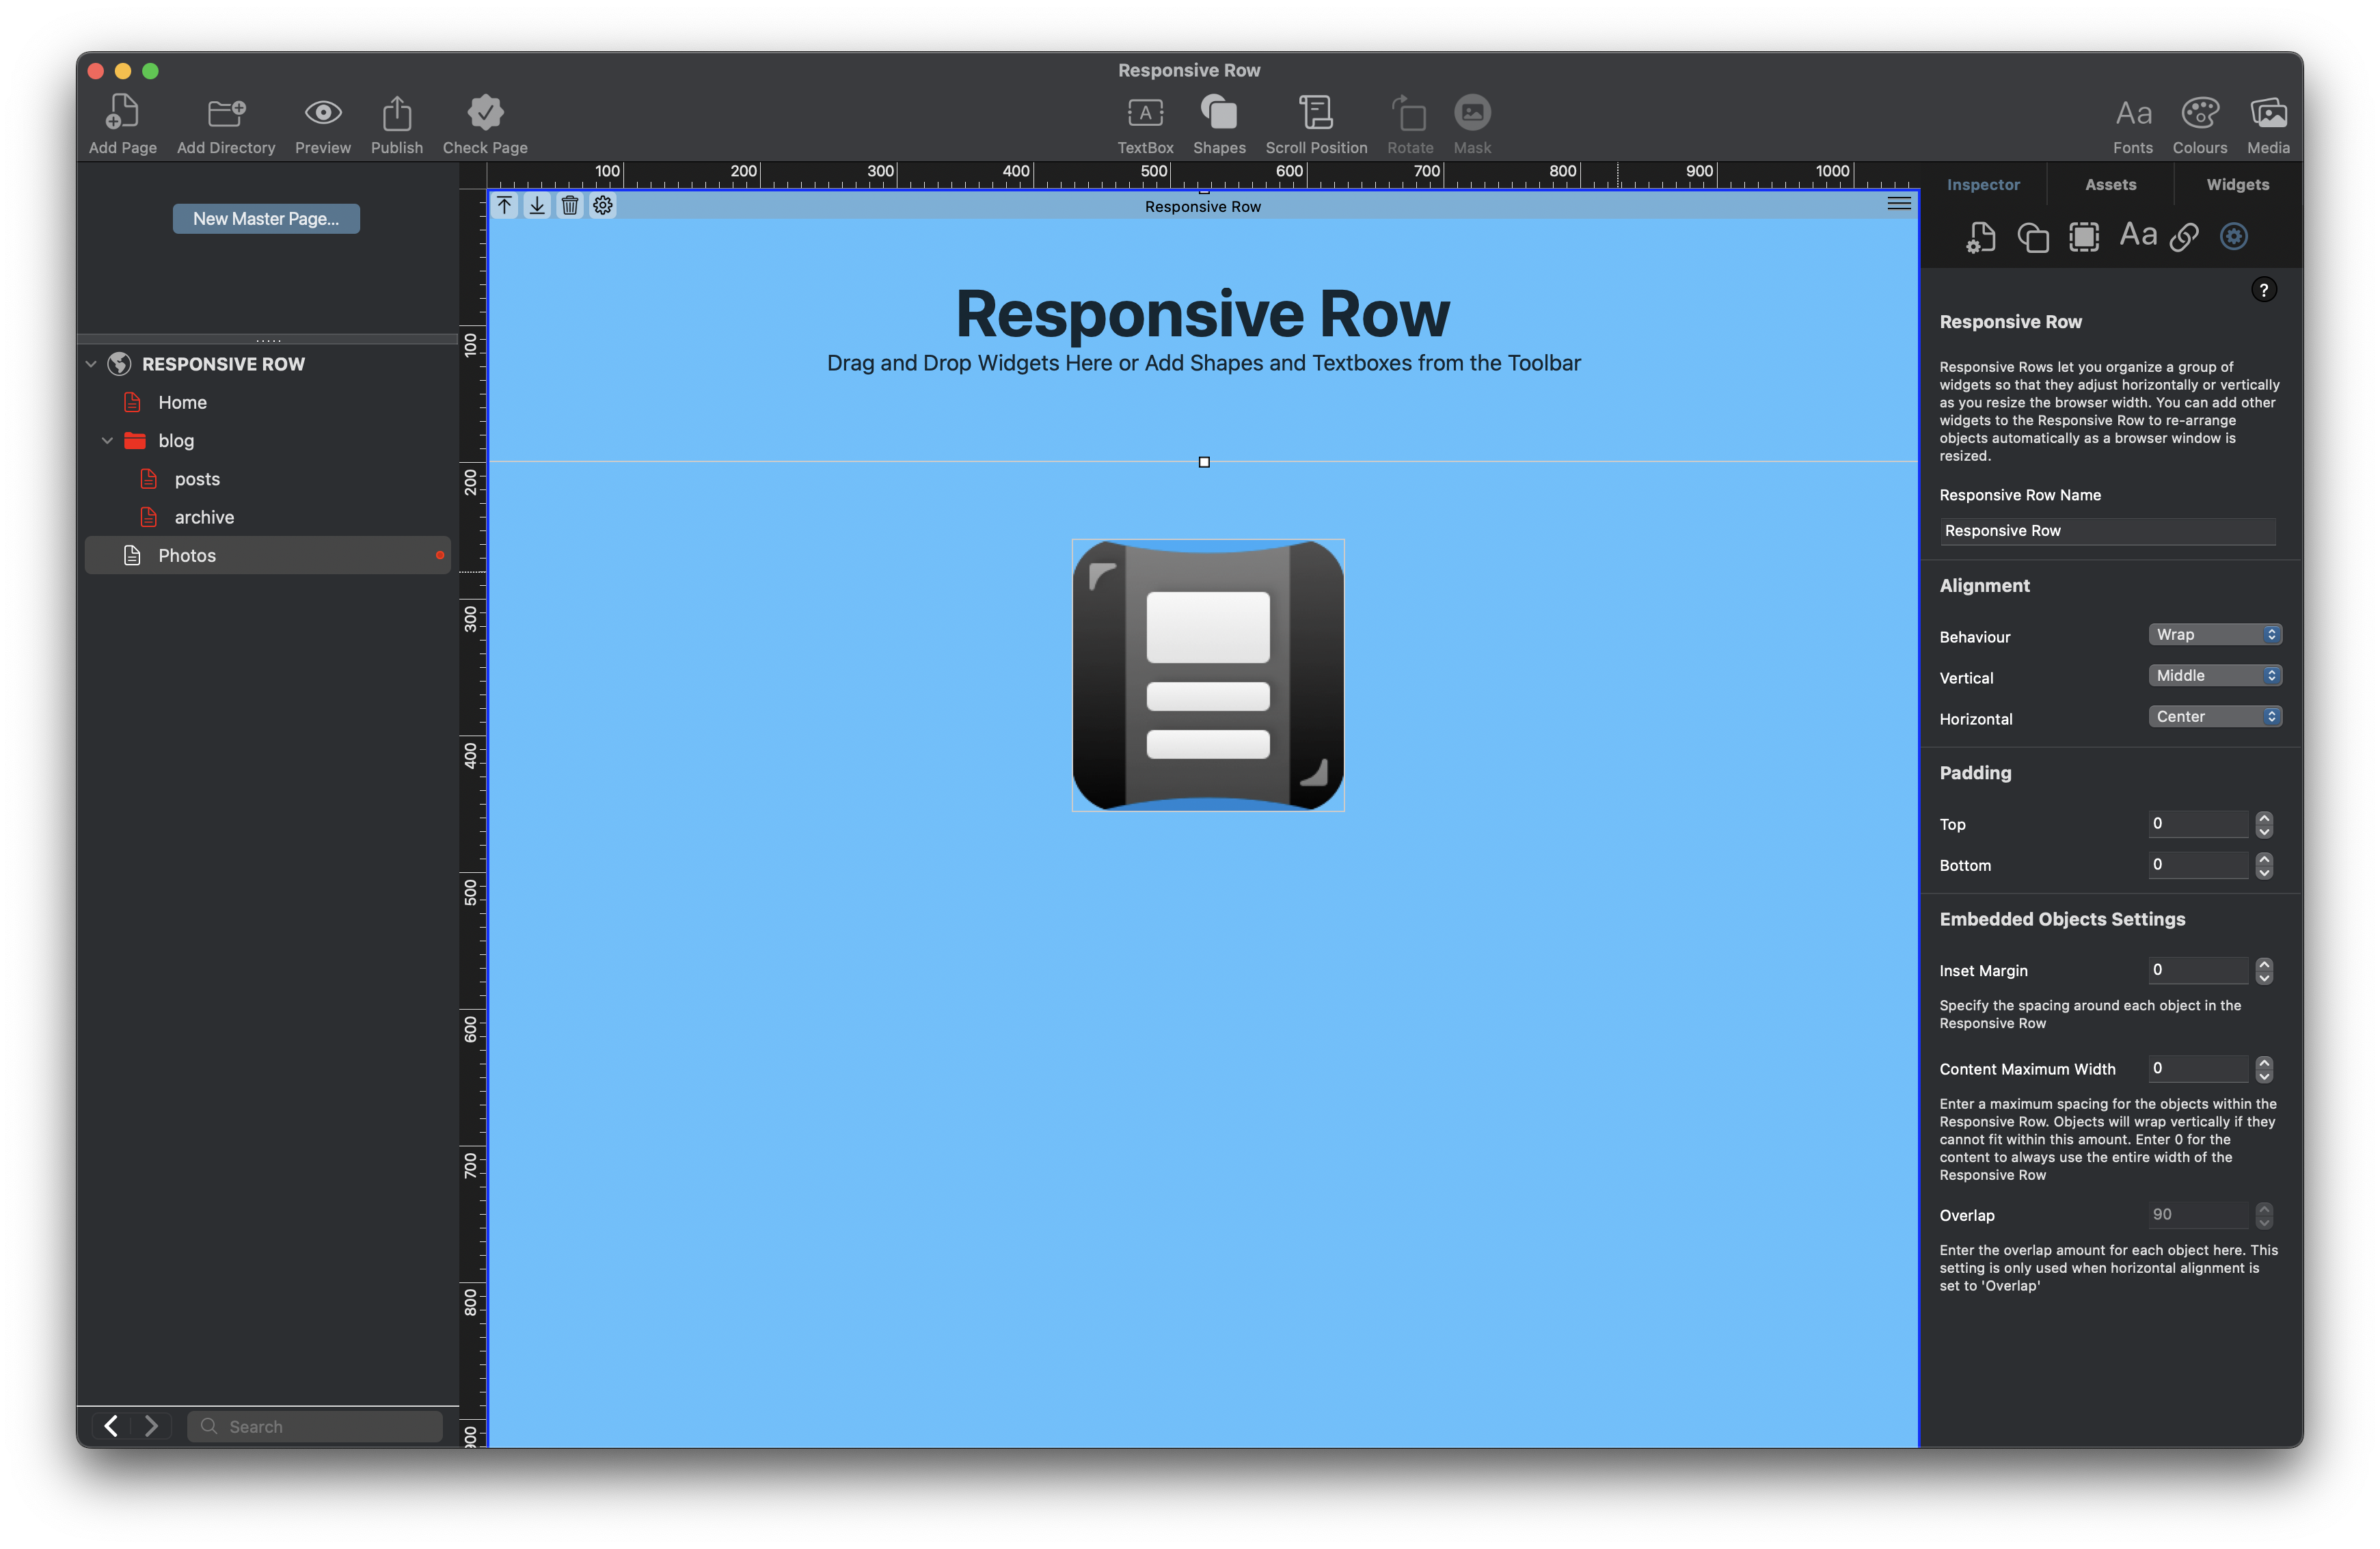
All Containers have a Toolbar positioned either above center or below center, depending on where the Container is on the page. The Toolbar accesses various Container settings. For example, use the Settings Cog to name the Container. You can also set the alignment of objects inside the Container Row or Container Column types. If you find that you want to change the Container type, you can do that as well. Any objects in the Container will automatically adjust.

You will also notice that all containers have a Move icon in their top right hand corners. This compass type icon helps you drag and drop containers without mistakingly moving their contents.

Nesting Containers

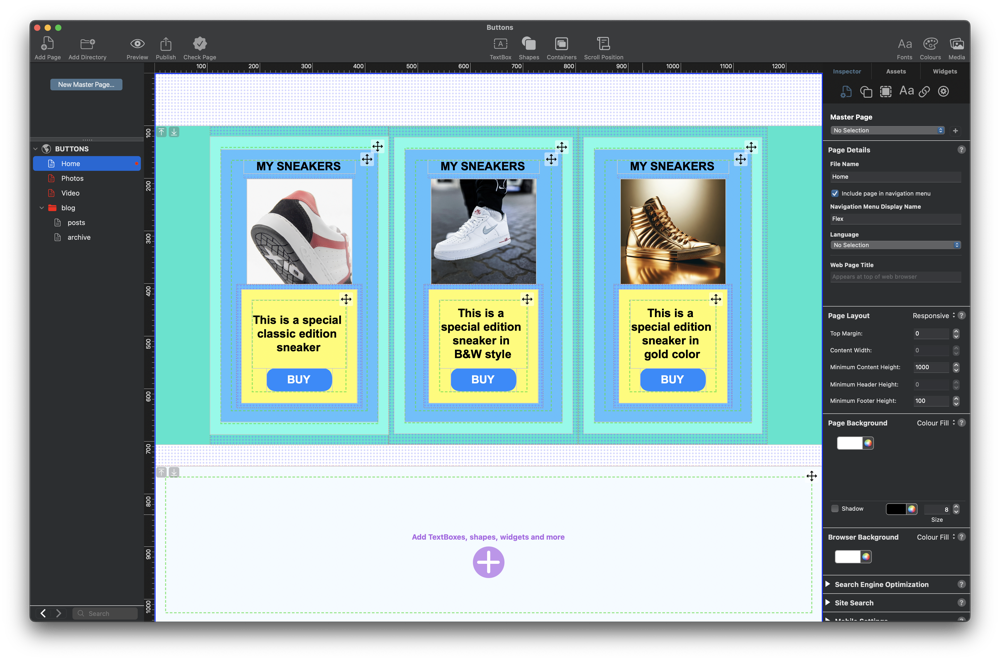
Containers are versatile so can be added in to a Responsive Row widget, and can also be nested inside each other, so if you need to you can, for example, have a container within a container with in a container. This will give you a lot more design options. Before starting any design, we recommend that you look at its purpose and how to structure it from a design perspective. For example, you do not want to over design so that you have more nested containers than you need. Keeping your design ‘efficient’ will also mean it will work better, and quicker as it uses less code, when you publish your site later on.

Creating a ‘Call To Action’ Container

In this example, we are going to create a design that will incorporate an image, text and a button which will be our ‘Call To Action’ to encourage our visitors to click on. In. this post, please refer to the image above to see what we are aiming for.

For this design we are using a Responsive page, so either create a new responsive page for your site, or use an existing one.

The next step is to add a Responsive Row widget to the page where you want to add the Call To Action container. Click on the Containers button in the Toolbar, then choose the Responsive Row menu item. Alternatively, go to the Widgets tab and drag and drop the Responsive Row widget on to the page.

A Responsive Row will be added to the page. The next step In our example is to add a background color to the widget. To do this, first make sure that the widget is selected on the page. Next, click on the Shape Options tab. If none of the settings are activated, you will need to select the Responsive Row widget to activate them. In the Fill section, click on the dropdown menu which is set currently to ‘None’. In our example we are going to use Color Fill, and choose a light grey color from the color swatch.

Now that we have our full width widget with a light grey background, we can add margins and padding. to the Responsive Row. This will make the Responsive Row and the objects it contains look better on the page, especially when the page is built out to completion. To add top and bottom margins, use the Metrics Inspector.

In the Margins and Padding section, set the top and bottom margins to 40, using the top and bottom outer fields to do so. You will see a grid appear above and below the Responsive Row when you apply the margins.

After adding the margins, we will add some padding to the inside of the Responsive Row. Using the inner box of settings in the Margins and Padding section, add padding of 20 pixels to all of the sides of the Responsive Row.

We can now proceed to add a Container inside the Responsive Row. In this example, we are going to use a Container Column as this suits our design best.

Adding and Styling Objects In The Container

First make sure that the Responsive Row is still selected. Click on the ‘+’ button in the center of the Responsive Row. A menu will appear. Click on the Container Column menu option A Container Column will be added inside the Responsive Row.

This Container will be the ‘background’ on which objects such as TextBoxes, images and shapes will be placed on top of. So we will first color this background Container, in the same way as did for the Responsive Row widget. using the Color Fill option in the Shape Options tab. In this example, we are using a pastel green color.

Next we are going to change the margins of the Container. Make sure the Container is selected, then go to the Metrics Inspector and change the margins from the default setting of 20 to 10.

We are also going to name the Container as it will make it easier to reference it later if we need to. To do this, click on the Settings Cog in the Containers Toolbar then choose the Name option. In our example, the Container will be called ‘Sneaker One’. Click on OK to finish. You will see that the name of the object has changed in the Toolbar.

We want the Container to be wide enough to be displayed on mobile devices. To change the width of the Container, go to the Metrics Inspector, and set the width of the Container to 320 pixels.

You may find that as you add objects in to a Container that its width changes automatically, so check every so often that the Sneaker One container remains at 320 pixels wide. Readjust the Container width as necessary.

Now we are going to add a second layer to the Container. Click on the ‘+’ button in the Sneaker One Container. From the menu, choose Container Column. Again, we are going to change the color of this Container. This time use the Color Fill menu in the Shape Options tab to set the color to a pastel orange. Name the Container ‘CTA Background’.

Adding Text, an Image and a Button To The Container

We now have the background style for the Container Sneaker One set up, we can now add an image in to the CTA Background container. This will be an image of the product that we are selling, in this example, a sneaker.

Again, click on the ‘+’ button inside the Container, then choose ‘Image’ from the menu. Alternatively, click on the ‘+’ button in the Container’s Toolbar. A placeholder image box will appear inside the Container. To add the image of the sneaker that we want to the Container, go to the Shape Options tab in the Inspector Window and click on the Choose button in the Fill section. Select the sneaker image that you want to use. Resize the image within the Container if you want to.

As we are going to be adding more objects in to the ‘CTA Background’ Container, we will take the time now to add a bottom margin of 10 to the image. Use the Metrics Inspector to do this in the same way as we did earlier.

After adding the Image to the Container, we can add a text title above the image. To do this, we will add a TextBox in to the CTA Background Container. First, we will make sure that the CTA Background Container is selected.

Click on the CTA Background Container’s + button in its Toolbar. Choose TextBox. A TextBox will appear. Replace the default text ‘Enter Text’ with the title text that you want, then style the text as desired, preferably using a Paragraph Style. Make sure that you resize the TextBox itself so that it fits properly within the Container. Drag and drop the TextBox so that it sits above the image if required. To finish, set the bottom margin of the TextBox of 10 so there is enough space between the TextBox and the Image beneath it.

Adding a CTA Button

The last objects to add to the Container are a text description below the image, and a Call To Action button.

Click on the CTA Background Container to select it. Next, click on the + button in its Toolbar and choose Shape, then the Rectangle shape. This will be added to the objects inside the CTA Background Container. If the shape is not under the image, drag and drop it so that it is. Next, change the color of the shape’s background. In our example, we made this yellow, and we also rounded the corners of the shape using the Borders settings in the Shape Options tab.

Set the width of the rectangle shape so that it is the same width as the image.

Within the rectangle shape, we are going to add a some text. Click inside the yellow rectangle shape and type in a description of the sneaker. Remember that shapes can always include text inside them. When finished style the text as desired, preferably using a Paragraph Style to do so.

The last step we need to take is to add the CTA button to the CTA Background Container. Select the CTA Background Container if it is not already selected. Use the + button in its Toolbar to add a rectangle shape, which will be used for the button. Style as rectangle shape as desired so that it looks like a button. Add a hyperlink to the button text which will take the visitor to a payment page, or a more information about the sneaker page.

Remember to add a top margin to the button (or a bottom margin to the text description shape) one you have to finished styling the button.

Check to make sure that the outermost container, Sneaker One, is still 320 pixels wide.

The design is now complete. Preview, before publishing, to test.

EverWeb on Social Media

You can also find EverWeb on the following social media platforms:

Facebook

Flipboard

YouTube

X

Instagram

Get Your EverWeb Made Website Ready For 2026!

Wednesday, December 31st, 2025

As we closeout 2025 and enter 2026, all of us here at #TeamEverWeb wish all of our customers a very happy and prosperous 2026! Here’s a look ahead at what you can expect from EverWeb and website trends in 2026!

More Big EverWeb Releases in 2026!

EverWeb 4.5 is coming soon and we’re super excited! It’s going to be another big release like EverWeb 4.4 for macOS and Windows was. We are currently testing out new features and expanding on some existing features before we’re ready to release a public beta. We are very excited about this release, and we have lots of other plans for future 2026 releases and beyond!

Check out @everwebapp on X which is where we will be teasing out some of the new EverWeb 4.5 features such as fully customizable popup windows!

Stay tuned on this blog too as we will be updating you as to when the EverWeb 4.5 Public Beta will be available for you to try out before the official public release comes out.

EverWeb’s Perfect For 2026’s Website Design Trends

EverWeb 4.3 and 4.4 features marry up to design trends 2026, which pundits predict, will be focused on more human-centric design. This means a more organic approach to site design rather than the structured approach we have seen over the last few years. In reality we are talking about irregular layouts flowing sections, layered gradients and soft masks.

EverWeb 4.4’s new Containers feature is ideal for creating such layouts as you can create row, column or free-flow designs suitable for responsive environments. You can add a gradient fill type to your Containers as well to create the look that you want. To give your page a softer look, you may also find EverWeb’s Borders useful to soften sharp edges!

Check out our posts early in 2026 for exciting EverWeb 4.5 features that will also have a big impact on this 2026 design trend!

Oversized Typography

Oversized typography in your site will also be a key trend for 2026, with highly oversized headlines creating high contrast with the regular sized body text of your pages. EverWeb’s revamped Text Inspector that came in EverWeb 4.0, makes this a breeze to achieve, especially if you have set up Paragraph Styles, which will make supersizing your Headlines just a one click operation!

Tactile Design

Also flagged for 2026 is a more tactile approach to website design. Take for example, the humble Call to action buttons that are found in most websites. Why not animate these types of buttons when your visitors mouse over them? Or change the color of the button? Find out more about Mouse Actions and Transitions from EverWeb’s Shape Options tab.

It does not stop there though, as you can also use EverWeb’s Scrolling Effects to pin CTA buttons and shapes to where you want them on the page. Keep what is important front and center for your visitors at all times with this easy to use feature.

Retro Design Is Back…

Retro design styling is back as is brutalist design. Even anti-AI design style that employs non-perfect, rough textured designs will be a 2026 design trend. Designs though will also need to focus on accessibility as well as part of the mix, for example, designs that help reduce eye strain will gain traction.

Videos Are In For 2026

Adding video backgrounds to your pages, or objects on your page, will be a trend in 2026. EverWeb already makes it easy to add a video background to your page using the Video Fill option in the Browser Background section of the Page Settings tab. To add video fill to objects on the page, use the Video Fill options in the Shape Options tab instead.

Website Speed and Performance Remain Crucial

Whatever approach you take to your site’s design in 2026, you should always test your site out to make sure that its speed of page loading and the performance of each page is good. Over the last year, EverWeb’s continued to optimize these aspects of its code generator so that when you publish your website it will be as best optimized as it can be. However, when creating your page designs, you should make sure that performance draining objects, such as large image files and large videos, are avoided, especially when your site is viewed on a mobile phone.

For image files there are some quick wins here, for example, instead of using .png format image files, use .jpg format files where possible. This will save you a lot of time when the page loads. You can also use fewer images on the page which, again, is an easy solution. Another option is to use EverWeb’s Lazy Load Image option in the Shape Options tab which will only load the selected image when it is required, so avoiding having to load it at page loading time.

For video files, it is often best to use a service like YouTube or Vimeo which your site will link to, rather than having a video directly embedded in your site. This will save you bandwidth and will help speed page and video loading times. If you do need to use a video directly from your site, you may want to consider using a Poster Image which is displayed whilst the video loads in the background. You will find this feature in EverWeb’s Video Widget.

2026 will be an exciting, groundbreaking year for website design and EverWeb in 2026 will give you need design tools and features to make it even easier, and more fun than ever, to create just the site you have always wanted. Now and in the future!

Stay tuned as we will soon be covering the upcoming EverWeb 4.5 early in the new year!

EverWeb on Social Media

You can also find EverWeb on the following social media platforms:

Facebook

Flipboard

YouTube

X

Instagram

EverWeb 4.4 Public Beta: Available Now, So Get Ready!

Friday, August 8th, 2025
EverWeb 4.4 Public Beta Available Now!

We are thrilled to announce the availability of the first public beta of EverWeb 4.4 for macOS and Windows. The upcoming EverWeb release will be one of our biggest, as it introduces Containers which will take your website designs to the next level. There will also be mouse transitions and animations, scrolling effects, borders, margins and padding, a new publishing framework and new options for the Navigation Menu widget. Plus a whole lot of other new and exciting features and improvements that will take your website building even more dynamic than it is today.

Before You Download The EverWeb 4.4 Public Beta Software…

As beta software is beta this means that it is likely that there are still bugs to be ironed out of the software. Although we have tested the software extensively before releasing the public beta, there is still scope for corruption of project files and crashes to occur. If you want to try out the new EverWeb 4.4 features in advance of its official release we advise the following:

  1. Do not use the beta test software on live project files. Only use beta software on test project files.
  2. Be aware that if you load existing project files in EverWeb 4.4 (beta), that you will no longer be able to open these project files in older versions of EverWeb anymore.
  3. If you install the public beta version of EverWeb, it will overwrite your existing product version. You may want to rename your currently installed version of EverWeb before installing the beta version, so that you have the current official EverWeb release available as well as the beta version.
  4. If you need to re-download the current, officially released version of EverWeb available to you, go to the Support-> Downloads area of your EverWeb Client Area to redownload it.
  5. When installing EverWeb software, your Project files will not be overwritten as they are stored elsewhere on your computer.
  6. Make sure you back up your EverWeb project files. You can do this within EverWeb itself which is recommended. We also recommend backing up your project files when you back up your computer.
  7. When running EverWeb Beta software, a backup will be made automatically the first time you open the project file in the new beta version.

Accessing the New EverWeb 4.4 Public Beta Version

As stated at the top of this post, the new public beta release of EverWeb is now available to current EverWeb users. To gain access to this beta test version

  1. Log In To your EverWeb Client Area
  2. Once logged in, click on the Support Menu, and select the Downloads option
  3. In the Categories section, Click on the ‘EverWeb Beta’ option.
  4. You can now select to download the EverWeb version of your choice, macOS, Windows, or both.

Installing the EverWeb 4.4 Public Beta

Once you have downloaded the version of EverWeb that you want to install, you will either have an everweb44b.dmg file (macOS) or an everwebsetup44b.exe file (Microsoft Windows) in your file download location.

Before installing the beta software, check the Before You Download… section of this post again. Once you have done that, just click on the .dmg file, or double click on the .exe file to kick off the installation process. Follow the prompts to complete the installation of the software.

Testing and Feedback

One of the most important things about issuing a public beta of EverWeb is to get your feedback. If EverWeb does crash at all, please make sure that you send in the crash report, so that we can fix the crash. If you find issues when using the product, use the EverWeb Forum to document the issue and we will report back to you. Sometimes, recording a video may help here, but it depends on the issue that you are experienceing.

Also, remember to check back regularly on the EverWeb Forum as we often issue updates to the public release based on our continued testing and your user feedback. These updates will appear usually in the Public Beta Announcement Post. Checking the forums is also a good idea to check on updates for any issues that you have previously reported.

The Official Release Version…

We are often asked the question about when will the next version of EverWeb be available. We are just as keen to get a new version out with new features, but we will only do so once we are satisfied that the new version is really ready for release and has been tested thoroughly, both internally and ‘out in the field’

If you decide to help us with the new EverWeb 4.4 Public Beta, thank you for taking the time to do so and to help us with testing the product. We’re looking forward to your feedback about all of the exciting new features that are being introduced!

Getting Started with EverWeb’s Responsive Row Widget

Friday, July 11th, 2025
EverWeb's Responsive Row Widget

In today’s web design world, responsiveness is essential. With users browsing on phones, tablets, laptops, and desktops, your website needs to adapt to every screen size. One of EverWeb‘s best tools for responsive layouts is the Responsive Row widget

First debuted in EverWeb 2.8, the Responsive Row widget was part of a larger debut, Responsive Website Design in EverWeb. That was back in back in 2018 and much has happened in the intervening years, with the upcoming EverWeb 4.4 release taking the next leap forward in responsive design. So remember to check back here over the next couple of months for more news!

What Is the Responsive Row Widget?

The Responsive Row widget is a layout tool that helps you arrange content horizontally in a way that automatically adapts to different screen sizes. Think of it like a flexible container for your content —TextBoxes, images, shapes, buttons, widgets and so forth. When the screen size gets smaller, the Responsive Row adjusts by wrapping or stacking the items inside it, so that there is no manual resizing needed!

Why Use the Responsive Row Widget?

There are a number of reasons for using the Responsive Row widget in your site”

  • Responsive by default – Your content looks great on all devices.
  • Drag-and-drop simplicity – Build layouts without writing code.
  • Full control – Adjust spacing, margins, alignment, and wrapping behavior.
  • Combine with other widgets – Use it with FlexBox, Text Section, or other responsive widgets for powerful layouts.

When Not To Use The Responsive Row Widget

Whilst the Responsive Row widget to use in Responsive Web Design, it is not always necessary to include it in your page design. Remember that when you are creating your page designs in EverWeb, when you come to publish your site, your design gets converted to code. If you use design elements that are not needed in your pages, your code will become less efficient. The following is a list of when you do not, or should not, use the Responsive Row widget in your pages:

  • When You Are Using A Fixed Width, Center-Aligned, Page Layout: If your page is not a Responsive Page Layout i.e. you are using a center-aligned layout, we do not recommend using the Responsive Row widget at all. In this layout style, elements are positioned manually and do not resize or stack for mobile devices so responsiveness isn’t a factor.
  • When You Only Need One Full-Width Object: If you’re adding a single object such as a full-width TextBox, image or Navigation Menu widget it is likely that you do not need a Responsive Row to hold it. You can set that object’s width to Full Width in the Metrics Inspector, and it will stretch across the screen on its own. It is a common trap to add a full width object in to a Responsive Row widget when it is not needed.
  • When You Are Using Widgets That Already Handle Responsiveness: Some widgets, such as the FlexBox, Text Section, or Responsive Image Gallery widget are already designed to be responsive on their own. If you’re using these, placing them inside a Responsive Row is optional—and sometimes unnecessary. Check the EverWeb User Manual for more details.

How to Use the Responsive Row Widget

  1. Add the Widget To The Page: From the Widgets tab in the Inspector Window, drag and drop the Responsive Row widget onto the page. you will see the Responsive Row widget on the page together with information on how to use it.
  2. Add Content Inside the Responsive Row: Once the widget is on the page drag and drop text, images, buttons, or other widgets in to the widget.
  3. Moving Objects Inside the Responsive Row: You can easily move objects inside the Responsive Row to a different location. Just drag and drop the object you want to move to its new location. As you do this, a blue vertical guide bar will display to help you correctly locate where to drop the object being moved.
  4. Deleting Objects from the Responsive Row Widget: To delete an object from the Responsive Row just select it then press the backspace key on your keyboard
  5. Moving Objects Outside Of The Responsive Row: You can move and object outside of a Responsive Row if you need to e.g. you may want to move the object in to another Responsive Row. In this case, just drag and drop the object from one Responsive Row to the other. There may also be times where you want to remove the object completely from the Responsive Row e.g. you might want to move a TextBox outside of the Responsive Row. In this case, right, or secondary, click on the object (in this example, the TextBox) then select the option ‘Remove from Responsive Row’. When you do this, the object becomes a fixed width object ‘floating’ on the page. In our example, the next step would be to go to the Metrics Inspector and check the ‘Full width’ box so that the TextBox becomes responsive.
  6. Moving the Responsive Row itself: As you build your Responsive page, you will have rows of full width objects that from time to time you may want to re-order. Use the Up/Down arrows attached to these full width objects to move them up and down the page.
  7. Adjust Settings: Use the Widget Settings and Metrics Inspector to:
    • Set top and bottom margins and padding
    • Choose left, center, right, justified, justified-center or overlap alignment
    • Enable or disable wrapping
    • Control how content flows as the screen resizes by setting the Maximum Content Width value as desired.
  8. Preview Your Page: Use the Preview button to test your design on different screen sizes.

More Tips on Using The Responsive Row Widget

We have looked at the basics of the Responsive Row widget in this post, but there is more to discover… Here are some tips to help you further:

  • Break your page into multiple Responsive Rows for better control.
  • Keep each row focused—avoid placing too many items in one row.
  • Combine with Full Width settings for edge-to-edge design.
  • Use the FlexBox and Text Section widgets as fixed width objects inside a Responsive Row for complex layouts.
  • Check out Show on Device for those times where you want to hide content e.g. you may want to hide a TextBox on a mobile device if its content is too long.
  • Check out the Responsive Websites chapter in the EverWeb User Manual for more information.

Next Steps…

If you want to build clean, modern, mobile-friendly websites in EverWeb, the Responsive Row widget is essential. It’s simple to use but incredibly powerful when used right.

Whether you’re designing a product page, portfolio, or homepage, learning how to use EverWeb’s Responsive Row widget will improve your site’s performance and user experience across all devices. There will be also be more responsive tools coming in EverWeb 4.4 for macOS and Windows, so stay tuned for some exciting developments!

EverWeb on Social Media

You can also find EverWeb on the following social media platforms:

Facebook

Flipboard

YouTube

X

Instagram

Easily Add SEO To Your EverWeb Site!

Friday, March 7th, 2025

SEO is one subject that we often come back to with EverWeb. For some SEO may not be important, whilst for others it can be the key to a successful online presence, typically for business ventures. EverWeb makes adding SEO to your site easy. When you complete fields in the Page Settings tab of a page in your site, you are already adding information that will be used for SEO purposes when you publish your site..

What Is SEO?

SEO stands for Search Engine Optimization and is used to improve your website’s visibility to search engines such as Google, Bing and Alexa. In turn this will drive more traffic organically to your site. Adding the right key words to the pages of your site optimizes them to help search engines better your ranking in search results.

The Benefits of Adding SEO To Your Site

  1. Adding SEO To Your Site Increases Organic Traffic: Using SEO effectively should help your website rank higher in search engine results. This will make it easier for potential customers to find your site without the need to use paid for advertisements.
  2. Gives Your Visitors a Better User Experience: When SEO is properly added to you site it should help improve your site’s speed, its mobile-friendliness, and navigation, all of which will enhance your visitors’ experience.
  3. Better Perceived Credibility & Trust: Websites that rank on the first page of search engine results pages are perceived to be more reliable and authoritative which in turn increases trust among visitors.
  4. Cost-Effective Marketing: Using SEO can help lead to more consistent traffic coming to your site over time without the ongoing costs that marketing may entail.
  5. Build a Competitive Advantage: If you are not using SEO but your competitors are, they could be attracting more traffic, leads, and sales than you.
  6. Targeted Audience & Higher Conversion Rate: SEO helps attract users who are actively searching for what you offer, increasing the chances of conversions (sales, sign-ups, etc.).
  7. Localized SEO for Local Businesses: If your business operates in one country only, localizing SEO may help attract more local customers as your SEO is relevant to where you are based.
  8. Long-Term Results: Unlike paid for advertising, where traffic will stop if you stop paying, SEO builds a foundation for long-term online success.

SEO and Your EverWeb Site…

As we mentioned at the start of this post, EverWeb has SEO baked in to it automatically. As you add information to the fields in the Page Settings tab of the inspector Window, EverWeb will use this for SEO purposes when your site is published. If SEO is important to your business there are three things that are important to bear in mind when starting to add SEO to your site’s pages :

  1. Filling in the right fields for SEO
  2. Adding quality information in SEO relevant fields
  3. Using the right key words and/or phrases in SEO related fields

Effective SEO For Your EverWeb Site…

The best way to make sure that you are filling in the right fields with the best SEO keywords or phrases is to either follow the SEO for EverWeb Video Course, or check out chapter 12 – EverWeb & SEO – of the EverWeb User Manual which can be accessed either from the Projects Window or via the Help Menu. These tools will help you gain an understanding of SEO in clear, concise steps. There are lots of great tips as well that will help to boost your site’s search engine results page ranking.

Additional SEO Tools To Give You The Edge Over Your Competition

EverWeb gives you the basic tools that you need to set up SEO effectively for your site. This is usually sufficient for most users but if SEO is business critical, you can tailor your SEO more specifically through the use of the EverWeb SEO Power Up addon, which includes the very useful Check Page feature, making implementing SEO even easier!

Keeping Your Site’s SEO Up To Date

Once you have added the SEO that you want to the pages in your site that require it, remember to review these pages on a regular basis. There are two reasons why this is important to remember: firstly, your pages may change their content over time e.g. the home page or products page of your site. If this is the case then do you need to update the page’s SEO to reflect these changes? The second reason to check your SEO every so often is that search engines such as Google, may change their algorithms from time to time. These changes to the search engine algorithms may have a positive or negative effect on your search engine result page rankings. So you may need to realign your SEO to account for these changes.

Adding SEO to your site is a good way to boost page rankings in search engine results pages. It is also a no, or low, cost option to promote your site that usually only requires reviewing, or updating, on a regular basis.

EverWeb on Social Media

You can also find EverWeb on the following social media platforms:

Facebook

Flipboard

YouTube

X

Instagram

Testing Web Pages on Mobile Has Never Been Easier Than With EverWeb Preview QR Code!

Thursday, January 23rd, 2025

Testing your EverWeb made website before you publish it to the Internet is one of the most important tasks you may have to do in your website building journey! The main reason for testing your site before publishing it is so that it is polished, reliable and user friendly. The best way to get all of those three aims checked off is through good design and thorough testing.

In EverWeb you have its Preview feature in the Toolbar which allows you to preview your site to popular web browsers such as Chrome, Firefox, Safari and Opera. This is all fine if you are working on your site on a desktop. As most people access web browsers from their phones, this is now probably the most important device type that you will want to preview your site on.

EverWeb 4.3 for macOS and Windows, now gives you an easy way to test your site on a mobile device with its new Preview QR Code feature. Although this is ideal for testing on a phone, it is also just as useful on a tablet device as well. And as you would expect, it is EverWeb easy to use!

Using Preview QR Code

All you need to get started with using Preview QR Code is EverWeb 4.3, or higher, for macOS or Microsoft Windows, an app that can scan QR Codes and of course, browser software on your phone or tablet. On your phone or tablet, Preview QR Code will support your default browser.

Now all you need to do in EverWeb is to go to the page in your website’s project that you want to preview and click on the Preview button in the Toolbar. From the dropdown list of browsers, choose the Preview QR Code option. EverWeb will generate a QR code on screen for you. With your phone or tablet, scan the code with your QR Code Reader.

You will now see a preview of the page as to how it will look on a mobile device.

Testing Your Site Using Preview QR Code

When testing your website on a mobile phone before publishing, you should ensure it provides a seamless and functional experience for mobile users. Here’s what to look out for:

1. Mobile Responsiveness

Confirm that your site adjusts correctly to different screen sizes and orientations (portrait and landscape). If you are site uses a Centered Layout, make sure that you have both desktop and mobile page counterparts set up and linked together before previewing.

If you are using a Responsive page, you may find that the page is too wide for the phone. If this is the case, check out our video on ‘Horizontal Page Drift‘.

In addition, check that elements like images, buttons, and text scale properly without overlapping or cutting off and also make sure that you have left enough left and right margins. If you need to add these in to your page, change the left and right margin values in the Metrics Inspector.

2. Navigation Usability

Test menus and drop down menus to ensure they are intuitive and easy to use on smaller screens. Also do not forget to verify that touch targets such as buttons and links are large enough to tap comfortably without accidental clicks, and that the links work correctly.

3. Page Load Speed

Ensure pages load quickly on mobile devices, even with slower internet connections. If you have a problem with page loading speed, optimize your images, and use Lazy Loading on them in the Metrics Inspector.

4. Text and Font Readability

Check that the font sizes, colors, and spacing you have used allow the text to be easily readable without the need for the visitor to have to zoom in. As such avoid small fonts and remember that the text should contrast well with the page background background.

5. Media and Content Behavior

All of your images, videos, and other media should display correctly and do not overflow or appear distorted. As you are testing on a mobile device, remember to test interactive elements such as sliders, and carousels to make sure they work properly on touch devices.

6. Form and Input Fields

Test your forms, such as those you can create with EverWeb’s Contact Form Advanced widget for usability, ensuring that any input field is easy to access and fill out. Also check that any validation that you built in to your fields works as you expect.

7. Compatibility Across Devices and Browsers

Although it may seem tedious it is important to remember to test your site on different mobile operating systems (iOS, Android) and on a variety of browsers (Chrome, Safari, Firefox, etc.). You should find that all core features of your site are consistent across all platforms.

8. Touch Gestures and Interactivity

Test swipe, scroll, pinch-to-zoom, and other touch gestures for proper functionality. Check whether interactive elements like accordions, tabs, and modals work well with touch input.

Using EverWeb’s new Preview QR Code feature together with a proper testing plan will guarantee you a polished, user friendly site that loads quickly!

EverWeb on Social Media

You can also find EverWeb on the following social media platforms:

Facebook

Flipboard

YouTube

X

Instagram

Get Your EverWeb Website Ready for 2025 with These Top Tips!

Friday, December 27th, 2024
Get Your EverWeb Website Ready for 2025

With the Christmas holiday season just in the rear view mirror, our attention quickly swings in to preparing for the new year! So now may be a great time to review your EverWeb made website to prepare it for 2025!

Reviewing Your Website’s Performance

It can be very difficult to critique your own website objectively. Perhaps the best way to start is to think about whether your site has met its objectives over the last year. You may want to measure this by the number of visits people have made to your home page in the last year, or by sales generated from your site, enquiries received from your contact form, newsletter signups and so on.

Once you have reviewed the metric, or metrics, that mean the most to you, or your business, you can decide whether you need to make any changes to your website or not to improve it for 2025.

What Works, What Doesn’t…

Once you have finished reviewing your site, make a list of what’s good about it and what you want to improve upon. This may also be a good time to get feedback from family, friends or colleagues as well, but make sure that this kind of feedback is honest and constructively critical. You may also have had some feedback over the last year from your customers or clients that can be added in to the mix as well.

After collecting your feedback and some self reflection, you will hopefully have an idea of what is good about your site and what needs to be updated, changed, removed or added! For example, if you are selling products or services, do you need to remove some products, update your product descriptions or images, or add in new products or services?

Getting Ready For Change!

Now that you have listed the things that you want to change in your site, it is time to get to work. This may be a simple task, for example, you may just need to collect together images and product descriptions then work through your site’s pages to update them all properly. You may also want to review your text too. If your existing text is time sensitive (e.g. includes event dates, time stamped blog posts etc.) you should update the text. There’s nothing worse than a site that looks like it has not been updated for a long time.

If you are adding new features, or wanting to revamp the look of your site you may need to look at your websites that inspire you, or to EverWeb third party widget providers to give your site a fresh look and better interaction with your site’s visitors. if you want to improve your site’s SEO you may want to look at EverWeb’s SEO Power Up Addon. To improve your site’s security checkout EverWeb Site Shield Addon and if you are looking to start a membership or subscription service, there is also EverWeb Membership Sites which you can start at no cost.

If you want to revamp your site look, consider changing the fonts and/or colors the site uses or update the images that your site uses e.g. check out EverWeb Free Stock Photo Library on the Media button in the EverWeb Toolbar for new images to use in your site.

When preparing to update your website, we recommend that you make sure that you are using the most up to date version of EverWeb. In this way, you will get all of its latest features (Check out our EverWeb’s 11th Anniversary feature for more on this!) Finally, do not forget to back up your EverWeb Project file at regular intervals and before you make any changes to your site.

Implementing Your Changes

Now is the time to implement your updates and changes! When doing so, we recommend that you implement EverWeb’s Paragraph Styles feature to your existing text. This will help save you a lot of time in the future. When you apply a Paragraph Style to your text, if you change the paragraph style at a later date, any text that uses the style will automatically update.

When adding new or updated images to your site remember that they should be optimized so as not to drag down your page load speed.

If you have updated your version of EverWeb, you may also want to check the built in widgets for any updates that may add new or updated features. In addition, check out newly introduced features to the product as well such as video backgrounds and new shape fill options such as Map Fill, Video Fill and Slideshow Fill. All such features may help you streamline your site whilst updating it for the new year!

Questions, Problems, Issues? We Are Here To Help!

When updating your website, it is possible that you may get stuck implementing some of your changes or you may have a question about how to achieve something in EverWeb. If you need help it is here for you! For a start there is the EverWeb User Manual that is updated for every release of EverWeb, both on Mac and Windows. Just go to the Help Menu in EverWeb, then choose the ‘EverWeb PDF Manual’ option. If you need more help. than the User Manual can give, you can always post your problem or question on the EverWeb Discussion Forum. There are also plenty of EverWeb video tutorials available on a wide range of subjects, but if you still need help, our Support Team is happy to help as well.

Final Steps! Publishing and Testing!

Once you have finished your changes and updates, we recommend that you preview your site before you publish it to the Internet. Don’t forget to run EverWeb’s spell checker through your site’s text before you publish to catch any possible typo’s!

Once you have finished checking your updated site with Preview, publish your site and go through its pages to check that everything has published properly, that your pages load speedily and that all of your page links work properly.

… oh, and don’t forget to update your copyright year to 2025 on the first day of the new year!

Updating you site for the new year helps keeps it fresh for you and your visitors and will hopefully generate new interest in your business in 2025!

Happy New Year!

EverWeb on Social Media

You can also find EverWeb on the following social media platforms:

Facebook

Flipboard

YouTube

X

Instagram

Working With Images in EverWeb

Saturday, November 30th, 2024
Working with Images in EverWeb

The expression “a picture is worth a thousand words” is truer today than ever before. Adding the right images to your EverWeb made website can save you time and effort that would be used on crafting text that perhaps, is unnecessary. When you have found the images that you want to use, adding them to your EverWeb website project, is easy, but before you do, there are some important things you may want to check first. Here are some recommendations for preparing your image before you import them in to EverWeb.

Optimizing Image Size

When choosing images to display in your website, always check to see if any of them should be optimized before adding them to your project file. Properly optimized images will display properly on screen and will avoid problems such as dragging on the page’s loading speed in the browser. As most display devices today are ‘retina ready’, i.e. can display high quality, high definition images, you can easily create retina ready images for your site.

Optimized images are those that are of the smallest file size possible, but in the highest quality possible. For example, you may have a photo file that you want to use that is 16MB in size, 4096 pixels wide and has a resolution of 600 dots per inch. This would be a large file to load on a page, and if I had many image files that had the same type of attributes, my page load time would seriously drag. Additionally, the consequence of using such large files would impact your website traffic, your SEO and your website’s server resources. 

The first step to optimizing the image is to decide how to scale the image width. In our example, the original width is 4096 pixels. To display this on my website I can reduce the width down to 400 pixels wide. However, as most displays today are retina image, I will make he image 800 pixels wide instead.

Use an image editor, such as Apple’s Preview app on a Mac, or just open the image file in Windows, to adjust the image’s dimensions. When changing the width dimension from 4096 to 800 pixels, remember to check the image editor’s ‘constrain proportions’ option. This will keep the image height in proportion to the image width during the resizing. 

In our example, the image is scaled down to 800 pixels wide, and not 400 pixels wide. This is so that it will appear properly on retina quality devices. 

Optimizing Image Resolution

Reducing image dimensions can bring down the size of the image file considerably. In addition to this, you can also check the image resolution. In our example, the resolution is set as 600 which is overkill when displaying an image on screen. Typically, this resolution would be used if you were printing the image. So, we can reduce the image resolution from 600 dpi (dots per inch) to, for example, 72 dpi or 144 dpi, which should be more than adequate for displaying the image on your website.

If you are using image editing software, see if the software has an ‘Export for Web’ option. This will optimize the image file when you save it. Remember to save the changed photo as a new file so you do not overwrite your original file as you may need it later.

When saving your changes, you can reduce its file size further if the image is in a PNG file format by saving it as JPG format instead. PNG files are useful if you want to preserve a transparent background, but if this is not necessary then a JPG file type will be preferable for display on the web. 

When you use you image on your page in EverWeb. resize it so that it is equal to, or less than, half the original saved size.

Use Image Optimisation Software

Use image optimization apps to further reduce the file size of your images. Many image optimization apps strip away non-essential data from the file without noticeable degradation in image quality. Obviously use such software before importing the image file in to EverWeb.

Using Edited Photos

Image editing software can be very advantageous for enhancing an original image file. When editing such your image, the end result can be a much larger file. Remember to check the file size of an edited file before importing it in to EverWeb. As we mentioned previously, check to see if your app has an ‘Export to Web’ option. 

Naming Your Image Files

Giving your image files good descriptive names has advantages. First, they will be easier to locate on your computer or in the cloud. Properly named files will also make it easier for you to find them in EverWeb’s Assets List.In addition, a descriptive file name will benefit your website’s SEO. Where possible name, or rename your image files importing them in to EverWeb. This will maximize your SEO. If you have already imported your images in to EverWeb, you can still rename them in the Assets List. Just double click on the file name in the Assets List to do so. Doing this will still be of benefit to your SEO although renaming the image file before importing it in to EverWeb is more efficient and effective.

Time To Publish…

When you come to publish your site, you can further optimize your images using the project file’s Site Publishing Settings. To access these features, either click on the project file name in the Web Page List or use the File-> Edit Publishing Settings option. Check the option ‘Export Optimized Images’. This will further optimize your project file images but requires EverWeb 4.1 or later.

You can also improve your page loading times when using images, but selecting an image on your page, then using the Shape Options-> Fill -> Lazy Loading option.

Optimizing image for the web is an important consideration when you use images in your website! Make sure that you do your best to make your images lean for the web!

If you have any questions about this post, or anything EverWeb, please let us know in the Comments below!

EverWeb on Social Media

You can also find EverWeb on the following social media platforms:

Facebook

Flipboard

YouTube

X

Instagram

How EverWeb Keeps Visitors Interested In Your Site: Part II

Thursday, October 31st, 2024

In the first part of this blog, How EverWeb Can Keep Visitors Interested in Your Site, we looked at how you should prepare before going live with your EverWeb made website. We also looked at how to create an SEO strategy so that your website’s chances of being found on the Internet are the best that they can be. In this second, concluding part, we look at things that you can do in EverWeb from a design and content approach that will help keep visitors interested in your site.

Create and Maintain a Dynamic Landing Page

Perhaps the most important page of your website is the Landing page, also known as your site’s Home page. This page, typically, will be the first page which new and returning visitors will access. So, it is important to keep it up to date. For example, anything that is time sensitive should only be on the landing page whilst it is relevant. If you have, for example, an event on your page that is three years old, chances are that your visitors will think that your site is no longer active and may stop visiting you!

New Content Creation Is Important for SEO

Adding new, fresh content to your website is an important ingredient in keeping visitors coming back to your website. Use the Home page of your site to highlight what is new and trending. Updating at least the Home page of your website on a regular basis is a simple, effective way of telling your visitors that your site is active and alive and kicking! How many websites do you know of that are not updated for years? If you are selling goods and services on your site, this is doubly important.

When creating content for the Home page of your site, make sure your message is clear and simple, typically with only one objective in the message. Clear and simple is always best. Avoid just updating your Home page just for the sake of it, and whilst using SEO Keywords on your Home page is great, do not sacrifice your content for the sake of SEO.

Blogging – Is It For You and Your Audience?

One great way to add new content is to add a blog to your site. This can become a tool that will hook your visitors on your site if you add content that is fresh, relevant and interesting to your audience. A regular blog is something of an investment and it is not for everyone but if it is right for your audience then it is worth trialling.

Remember To Keep EverWeb Up To Date!

One other vital factor in keeping visitors interested in your site is to keep EverWeb up to date. In addition to maintenance and stability releases, major point version releases of EverWeb will bring new features, or enhanced existing features, for you to use. EverWeb usually gets three to four major point releases throughout the year so don’t get left behind!

Consider Revamping Your Site From Time To Time

Sometimes keeping your visitors interested in your site can just come down to revamping your site from time to time. Changes in colors, fonts and layout can have a huge impact – both positive and negative – so figuring out what works for your target market is important. When it comes to design in EverWeb, remember to use Paragraph Styles in all of your pages. We also recommend that you assign Document Colors to your site as well. When it comes to revamping your site, you only need to update your Paragraph Style and Document Color defaults which will then ripple throughout your site, saving you lots of time and effort!

Spreading the Word About Your Website

One of the best ways of getting more traction to your website is by spreading the word through social media such as Facebook pages, Instagram, Pinterest, LnkedIn and other social media platforms that are appropriate to your business, or interest group. Linking your website’s content to social media is a good way of keeping visitors and customers informed and up to date about your site and business.

Remember as well that social media is not for everyone either, again think of what best suits your audience. For example, including an email newsletter sign up Contact Form in your website. Creating a regular newsletter may be a better alternative to social media and blogging for some audiences. If you choose to go the newsletter route, you can use EverWeb’s Contact Form Enhanced addon to manage the contact forms that are submitted to you from the Contact Form Advanced widget.

Keeping Visitors Interested: Final Take Aways…

There are a number of different tools within EverWeb that you can use to help keep your website live and fresh to your current visitors as well as potential new visitors. If you run a business over the Internet, remember that your website is your calling card so needs attention!

EverWeb on Social Media

You can also find EverWeb on the following social media platforms:

Facebook

Flipboard

YouTube

X

Instagram

How EverWeb Can Keep Visitors Interested in Your Site: Part I

Thursday, October 17th, 2024
How EverWeb can keep visitors interested in your site

When you build your website in EverWeb it’s a great feeling to finally publish it to the Internet for the whole world to see. All those hours of effort you put in to designing and building your site are rewarded when you ‘Go Live’. So does this mean that it is now time to sit back and let your site do the work that you intended it to do? It’s a tempting thought, but the reality is that going live is only really the start of the journey…

Is Your Website Achieving Its Objectives?

Anyone who builds a website is doing so for a purpose. Behind the purpose will be one or more specific goals or objectives that the website should meet, both now and in the future. Once your website has gone live, you should check if its goals are being met, or if they need to be modified, on a regular basis. It is also important to think about how your website will need adapt in the future to meet ongoing changes in business, or personal, goals and objectives.

Fix Issues Before They Become Problems

After going live, the most immediate task for any website developer will be to fix any issues that may have come to light after go live, as quickly as possible. The best test of how any website is going to work is when it goes live on the Internet. Obviously, it is important to test your site as thoroughly as possible before go live as this should help iron out most, if not all, potential issues or problems.

Prior to going live, your testing phase is also a good time to double check your site’s workflow. Is your site easy to use and to navigate? This is an important part of your site’s development. If your site is difficult to navigate you will probably lose you visitors once it has gone live. Remember as well to check all of the links in your pages and navigation menus.

In addition to looking at your site’s workflow, also make sure that you include a ‘404 Page Not Found‘ page to your site’s pages. The 404 page appears if a visitor clicks on a link to a page that does not exist or cannot be found. Using a 404 page in your site helps keep the visitor within your site and helps you direct them back to another page within your site e.g. your 404 page could include a button to take the visitor back to your Home page. In EverWeb, add your 404 page to your site in the Site Publishing Settings page which can be accessed from the File-> Edit Publishing Settings menu option.

When it comes to rooting out potential problems before you go live, often developers publish the site to a ‘test’ area on Internet until all issues have been resolved. This is as close to a Go Live as you can get. Once any problems have been resolved, the site can then be published to its true URL for Go Live.

The final way of checking for any potential issues on your site is to test it once it has gone live and to look out for any feedback from the site’s visitors about things that do not work, or work in unexpected ways. It may be possible that you cannot test some features using a test setup and Go Live is the only way to try out some of your sites features. In this case, whenever possible, fix any such problems as soon as possible. This will add credibility and professionalism to your site. If a visitor to your site posts an issue on social media, respond quickly, courteously and positively as possible. Also remember to update those who flagged the issues as to the progress in fixing the problem they highlighted. This approach is good PR for you even though if it is hard work at the time.

Get Your Website’s Stats!

Once your site is up and running, you can find out how interested visitors are in it by analyzing your visitor statistics. If you have an EverWeb+Hosting account, you can access your site stats through your EverWeb Client Area. If you use your own Hosting Provider, please contact them for more information on getting your stats.

Using your visitor statistics, over time, will detail how your site traffic is holding up. It is also useful to check your stats after you have made any major changes to your site as this may indicate whether the changes you have made have been successful or not. Site statistics can also be affected by your site’s SEO in relationship to Google, Microsoft Bing, Alexa and other search engines algorithms.

Is Your SEO Strategy Working?

Often you will attract visitors by having your site found in internet searches. Your site’s visitor statistics is a good indicator as to whether your site’s SEO strategy is working. If your SEO strategy is working properly your chances of being found in an Internet search will be better.

SEO can be tricky to evaluate, as any changes that Google (or other search engine providers) search algorithms may affect your site’s traffic. As such, monitoring traffic on a regular basis may provide you with valuable insights in to whether your SEO is on target or not.

For more information about SEO in EverWeb, either follow our SEO for EverWeb Video Course or check out the chapter on SEO in the EverWeb User Manual. Additionally, you can also fine tune your SEO using EverWeb’s SEO Power Up Addon.

Keeping Your Visitors Interested: Initial Take Aways…

Keeping visitors interested in your site is a constant task that needs attending to. If you fail to do so, over time you will find that the number of visitors to your site will decline. In addition, you should also review at your SEO strategy on a regular basis to make sure that you are still in synch with search engine algorithms and that you are targeting your market audience properly.

In the next post we will be focusing on website design and content as ways to keep your visitors interested in your site. Hooking visitors to your site is key to retaining and growing your site’s traffic and your business!

EverWeb on Social Media

You can also find EverWeb on the following social media platforms:

Facebook

Flipboard

YouTube

X

Instagram